Next.js by Vercel
This documentation is for version1.x.xIf you are running with version
0.x.xof the Next.js module, please follow this documentation.
This module intends to be used with the Next.js framework.
This documentation describes both server-side and client-side integrations.
Supported versions
DataDome supports Next.js versions until they are unsupported by the maintainer.
You can find the support policy of the maintainer on this page.
This module is compatible with Next.js versions 13 and higher.
Prerequisites
- The server-side key available in your DataDome dashboard
- The client-side key available in your DataDome dashboard
Installation
The module can be installed as an npm package:
npm install @datadome/module-nextjsUsage
Server-side configuration
Since version 16 of Next.js, the
middlewareconvention is deprecated and has been renamed toproxy.
See this migration guide for more details.
The DataDome server-side part is built as a Next.js middleware. As described in the Next.js documentation, the following conditions need to be respected to create a middleware:
- The middleware needs to be defined:
- in a
middleware.js/middleware.tsfile for versions prior to Next.js 16 - in a
proxy.js/proxy.tsfile for versions ulterior to Next.js 16
- in a
- This file need to be located at the root of your project
- This file needs to either declare:
- a
export defaultfunction - an exported function named
middlewarefor versions prior to Next.js 16 - an exported function named
proxyfor versions ulterior to Next.js 16
- a
import type { NextRequest } from 'next/server';
import { DataDomeMiddleware } from '@datadome/module-nextjs';

export const config = {
    /**
     * Match all request paths except for the ones starting with:
     * - _next/static (static files)
     * - _next/image (image optimization files)
     * - favicon.ico, sitemap.xml, robots.txt (metadata files)
     *
     * It avoids to send those requests to the DataDome's integration.
     * @see {@link https://nextjs.org/docs/pages/building-your-application/optimizing/static-assets}
     */
    matcher: ['/((?!_next/static|_next/image|favicon.ico|sitemap.xml|robots.txt).*)'],
};

const ddMiddleware = new DataDomeMiddleware('YOUR_SERVER_SIDE_KEY');

export default async function middleware(req: NextRequest) {
  return ddMiddleware.handleRequest(req);
}
import type { NextRequest } from 'next/server';
import { DataDomeMiddleware } from '@datadome/module-nextjs';
export const config = {
/**
* Match all request paths except for the ones starting with:
* - _next/static (static files)
* - _next/image (image optimization files)
* - favicon.ico, sitemap.xml, robots.txt (metadata files)
*
* It avoids to send those requests to the DataDome's integration.
* @see {@link https://nextjs.org/docs/pages/building-your-application/optimizing/static-assets}
*/
matcher: ['/((?!_next/static|_next/image|favicon.ico|sitemap.xml|robots.txt).*)'],
};
const ddProxy = new DataDomeMiddleware('YOUR_SERVER_SIDE_KEY');
export default async function proxy(req: NextRequest) {
return ddProxy.handleRequest(req);
}Client-side configuration
In order to enhance the detection, you need to install the JS Tag in your Next.js project by creating a custom App component.
It will load the JS Tag in the <head> element so it can run as early as possible and intercept block responses on XHR and Fetch requests.
import type { AppProps } from "next/app";
import Script from "next/script";
import { DataDomeComponent } from "@datadome/module-nextjs";

function MyApp({ Component, pageProps }: AppProps) {
  return (
    <>
      {/* DataDome bot protection */}
      <DataDomeComponent clientSideKey={process.env.NEXT_PUBLIC_DATADOME_CLIENT_SIDE_KEY!} />

      <Component {...pageProps} />
    </>
  );
}

export default MyApp;
Settings
Server-side settings
| Setting | Description | Default |
|---|---|---|
enableGraphQLSupport | Enable the support of GraphQL requests. | false |
endpointHost | Host of the Protection API. | 'api.datadome.co' |
logger | The Logger instance to use in the module. | console |
timeout | The timeout limit for requests sent to the Protection API, in milliseconds | 150 |
urlPatternExclusion | Regex to match to exclude requests from being processed with the Protection API. | Extensions for static assets |
The
urlPatternInclusionoption does not exist on this module.To define an inclusion pattern, you can use the matcher from the configuration of your middleware file.
Here is an example of configuration with default values that you can modify according to your needs:
const ddMiddleware = new DataDomeMiddleware('YOUR_SERVER_SIDE_KEY', {
  endpointHost: 'api.datadome.co',
  logger: console,
  timeout: 150,
  urlPatternExclusion: /\.(avi|avif|bmp|css|eot|flac|flv|gif|gz|ico|jpeg|jpg|js|json|less|map|mka|mkv|mov|mp3|mp4|mpeg|mpg|ogg|ogm|opus|otf|png|svg|svgz|swf|ttf|wav|webm|webp|woff|woff2|xml|zip)$/i,
});
Client-side settings
| Setting | Description | Default |
|---|---|---|
| clientSideKey | Your client-side key. | |
| options | The options of the JS Tag. | {} |
| tagsUrl | The source URL of the JS Tag. | https://js.datadome.co/tags.js |
Here is an example of configuration with default values that you can modify according to your needs:
<DataDomeComponent
  clientSideKey={"YOUR_CLIENT_SIDE_KEY"}
  options={{}}
  tagsUrl={"https://js.datadome.co/tags.js"}
/>
FAQ
How to chain multiple middleware?
If you already have middleware in places, or you want to add several middleware with the DataDome's integration, you need to slightly change the server-side configuration in order chain the middlewares.
You need to:
- Define a
datadomeMiddleware/datadomeProxyfunction that will call the Next.js module - Instantiate a
NextResponsein themiddleware/proxyfunction, and use it across your middlewares or proxies - Provide the response to the DataDome's
handleRequestmethod - Check the response status after the call of the
datadomeMiddleware/datadomeProxyfunction and return the response in case of 403 status code
const ddMiddleware = new DataDomeMiddleware('YOUR_SERVER_SIDE_KEY');

async function datadomeMiddleware(req: NextRequest, res?: NextResponse) {
  return ddMiddleware.handleRequest(req, res);
}

function firstMiddleware(req: NextRequest, res: NextResponse) {
  res.headers.append('X-First-Header', 'Foo');

  return res;
}

function thirdMiddleware(req: NextRequest, res: NextResponse) {
  res.headers.append('X-Third-Header', 'Bar');

  return res;
}

export default async function middleware(req: NextRequest) {
  // Instantiate a NextResponse
  let res = new NextResponse();

  // Call first middleware
  res = firstMiddleware(req, res);

  // Call DataDome's Middleware
  res = await datadomeMiddleware(req, res);
  if (res.status === 403) {
    return res;
  }

  // Third middleware will not be called if datadomeMiddleware returns a 403 status code
  res = thirdMiddleware(req, res);

  return res;
}
const ddProxy = new DataDomeMiddleware('YOUR_SERVER_SIDE_KEY');
async function datadomeProxy(req: NextRequest, res?: NextResponse) {
return ddProxy.handleRequest(req, res);
}
function firstProxy(req: NextRequest, res: NextResponse) {
res.headers.append('X-First-Header', 'Foo');
return res;
}
function thirdProxy(req: NextRequest, res: NextResponse) {
res.headers.append('X-Third-Header', 'Bar');
return res;
}
export default async function proxy(req: NextRequest) {
// Instantiate a NextResponse
let res = new NextResponse();
// Call first proxy
res = firstProxy(req, res);
// Call DataDome's proxy
res = await datadomeProxy(req, res);
if (res.status === 403) {
return res;
}
// Third middleware will not be called if datadomeProxy returns a 403 status code
res = thirdProxy(req, res);
return res;
}How to deploy on Vercel infrastructure?
Environment variables for the browserThe DataDome client-side key must be available in the browser, for this reason it must match the naming convention defined in the Nextjs documentation and be prefixed by
NEXT_PUBLIC_.
DataDome provides an example that you can reuse to integrate the DataDome module inside your Vercel app.
- Access to the example repository
- Click on the "Deploy" button on the repository's README documentation
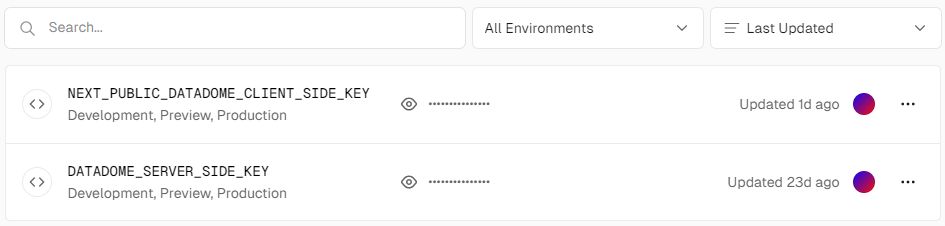
- Add a DATADOME_SERVER_SIDE_KEY variable inside Your Vercel Project > Project Settings > Environment Variables with the
server-sidekey that you can find in the Management section of your dashboard - Also add a NEXT_PUBLIC_DATADOME_CLIENT_SIDE_KEY variable with the
client-sidekey from your dashboard
- Update other settings if needed
- Redeploy your Vercel app
Updated 4 months ago