Account security
Learn how to enforce Dashboard & API security access.
Enforce account securityWhen dealing with user access to the Dashboard and API, you may consider adding an extra layer of security. Here you will find a way to restrict access to both Dashboard & API only to the IP addresses you specify.
You will also learn how to activate your email notifications to receive information about events occurring in your configuration, in few seconds. Email notifications is a very useful feature when you're away from the Dashboard while important events have occurred.
This page focuses on how to setup the following:
- IP restriction to access the dashboard
- IP restriction to call the API
- Email notifications to be sent to all admin users
- Enforcing Two-Factor Authentication for all users

Dashboard access IP restriction

CautionWhen this feature is enabled, the Dashboard access will be restricted to the list of allowed IP addresses
Here you can input the IP address to be allowed.
Simply click on the "Add" button to input an IP address:

After you click "Confirm", you will be able to see the IP address in the following list:
From here, you simply need to activate the list by clicking on the toggle button.
API access IP restriction
CautionThis restriction will be applied to both APIs: the Protection API and the Management API
As a result you would need to allow your infrastructure IP where DataDome module is integrated .
CautionWhen this feature is enabled, the API calls will be restricted to the list of allowed IP addresses
The same principle applies here. You can add the IP address to be allowed:

When your IP address is added and confirmed, you can then activate the list by clicking on the toggle button:

Email notifications
All the events listed below will trigger an email notification to all the users with admin rights:
- Global protection Status Toggle: if the status of global protection has changed
- Endpoint protection Status Toggle: if the protection status of one of your endpoints has changed
- User invitation: each time a new user is provided access to your DataDome Dashboard
- User role edition: each time a user role is changed
- User deletion: each time a user account gets deleted
- Failed login attempt: each time a known user of your DataDome Dashboard failed to connect
- Deactivation of email notifications: whenever the email notifications are turned off
To activate the email notifications, click on the toggle button as shown below:

Enforcing Two-Factor Authentication for all users
CautionYou must activate Two-Factor Authentication on your personal profile before you can enforce it for all users.
Switch the toggle button to the "ON" position. On their next login attempt, all users will be directed to a mandatory screen with a prompt to enable Two-Factor Authentication (2FA) on their profile. They will not be able to access the Dashboard until they have enabled 2FA.

Enabling Single Sign-On (SSO)
Plan restrictionThis feature is only available to Enterprise plans.
Multiple workspace ownerThe SSO configuration can only be manage through your parent workspace.
Single Sign-On (SSO) allows your team to log in to the DataDome Dashboard using your corporate Identity Provider (IdP). This enhances security by centralizing user authentication and management.
DataDome supports 3 types of SSO:
- SAML 2.0
- Microsoft Entra ID
- Open ID Connect
We support any Identity Provider compliant with SAML 2.0, such as Okta, Bitium, OneLogin, Centrify, etc.
Configuration Overview
Configuring SSO is a four-step process:
- Choose Your IdP: Select your Identity Provider from the tabs below.
- Configure in IdP: Create a new application within your IdP for DataDome by following the steps provided.
- Configure in DataDome: Copy the required details from your IdP into the DataDome Console's SSO settings.
- Test & Enforce: Test the connection with a pilot user before enforcing SSO for all users in your organization.
Identity Provider Configuration
Select your provider below for detailed, step-by-step instructions.
We recommend using OIDC for its modern security and ease of setup.
OIDC (Recommended)
Step 1: Create an OIDC App Integration in Okta
- In the Okta Admin Console, navigate to Applications > Applications.
- Click Create App Integration.
- Select OIDC - OpenID Connect as the sign-in method and Web Application as the application type.
- On the settings page:
- App integration name: Enter
DataDome. - Sign-in redirect URIs: Enter the callback URL from your DataDome SSO settings. It will be
https://app.datadome.co/auth/callback.
- App integration name: Enter
- Under Assignments, choose who can access the application.
- Click Save.
Step 2: Retrieve OIDC Credentials
After saving, copy the following values from the application's configuration page:
- Client ID
- Client secret
- Okta domain (e.g.,
your-company.okta.com)
Step 3: Configure DataDome
- In the DataDome Console, navigate to Management > Account Security.
- Click on Add SSO, select OIDC and create a name for this connexion
- Fill in the fields with the information from Okta:
- Client ID: Paste the Client ID.
- Client Secret: Paste the Client Secret.
- Issuer URL: Enter your Okta domain with a
https://prefix (e.g.,https://your-company.okta.com).
- Save the configuration and test.
SAML
Step 1: Create a SAML App Integration in Okta
- In the Okta Admin Console, go to Applications > Applications and click Create App Integration.
- Select SAML 2.0 as the sign-in method.
- On the Configure SAML tab, enter the following:
- Single sign on URL (ACS): Enter the ACS URL from your DataDome SSO settings (
https://app.datadome.co/saml/acs). - Audience URI (SP Entity ID): Enter the Entity ID from your DataDome SSO settings (
urn:datadome:sso). - Name ID format: Select
EmailAddress. - Application username: Select
Email.
- Single sign on URL (ACS): Enter the ACS URL from your DataDome SSO settings (
- Click Next, then Finish.
Step 2: Retrieve SAML Metadata
- On the application's Sign On tab, find the SAML Signing Certificates section.
- Click Actions > View IdP metadata.
- A new tab will open with the XML metadata. Save this URL or download the XML file.
Step 3: Configure DataDome
- In the DataDome Console, navigate to Management > Account Security.
2. Click on Add SSO, select SAML and create a name for this connexion - Provide the metadata from Okta by either uploading the XML file or pasting the Metadata URL.
- Save the configuration and test.
We recommend using OIDC for its modern security and ease of setup.
OIDC (Recommended)
Step 1: Register an Application in Entra ID
- Sign in to the Microsoft Entra admin center.
- Navigate to Identity > Applications > App registrations and click + New registration.
- Enter a name, such as
DataDome. - Under Redirect URI, select Web and enter the callback URL from your DataDome SSO settings:
https://app.datadome.co/auth/callback. - Click Register.
Step 2: Create a Client Secret
- From the application's page, navigate to Certificates & secrets.
- Click + New client secret, add a description, and click Add.
- Immediately copy the secret's
Value. This is the only time it will be fully displayed.
Step 3: Configure DataDome
- In the DataDome Console, navigate to Management > Account Security.
2. Click on Add SSO, select OIDC and create a name for this connexion - Fill in the fields:
- Client ID: Paste the Application (client) ID from the app's Overview page.
- Client Secret: Paste the Client Secret Value.
- Issuer URL:
https://login.microsoftonline.com/{Directory (tenant) ID}/v2.0(replace{Directory (tenant) ID}with your tenant ID from the Overview page).
- Save the configuration and test.
SAML
Step 1: Create an Enterprise Application
- In the Microsoft Entra admin center, navigate to Identity > Applications > Enterprise applications.
- Click + New application, then + Create your own application.
- Enter a name and select Integrate any other application you don't find in the gallery (Non-gallery).
Step 2: Configure SAML
- In the application, go to Single sign-on and select SAML.
- In the Basic SAML Configuration box, click Edit:
- Identifier (Entity ID): Enter the Entity ID from your DataDome SSO settings (
urn:datadome:sso). - Reply URL (Assertion Consumer Service URL): Enter the ACS URL from your DataDome SSO settings (
https://app.datadome.co/saml/acs).
- Identifier (Entity ID): Enter the Entity ID from your DataDome SSO settings (
- Click Save.
- In the SAML Certificates box, find the Federation Metadata XML and click Download.
Step 3: Configure DataDome
- In the DataDome Console, navigate to Management > Account Security.
2. Click on Add SSO, select SAML and create a name for this connexion - Upload the Federation Metadata XML file you downloaded from Entra ID.
- Save the configuration, assign users in Entra ID, and test.
This guide explains how to set up Google Workspace as your OIDC Identity Provider.
Step 1: Create OAuth 2.0 Credentials
- Go to the Google Cloud Console and select your project.
- Navigate to APIs & Services > Credentials.
- Click + CREATE CREDENTIALS and select OAuth client ID.
- If prompted, configure your OAuth consent screen first (select Internal for User Type).
- For Application type, select Web application.
- Under Authorized redirect URIs, click + ADD URI and enter the callback URL from your DataDome SSO settings:
https://app.datadome.co/auth/callback. - Click Create.
Step 2: Retrieve Your Credentials
A pop-up will appear with your credentials. Copy them now and store them securely.
- Your Client ID
- Your Client Secret
Step 3: Configure DataDome
- In the DataDome Console, navigate to Management > Account Security.
2. Click on Add SSO, select OIDC and create a name for this connexion - Fill in the fields:
- Client ID: Paste your Client ID.
- Client Secret: Paste your Client Secret.
- Issuer URL:
https://accounts.google.com
- Save the configuration and test.
This guide explains how to set up JumpCloud as your SAML 2.0 Identity Provider.
Step 1: Create a SAML Application in JumpCloud
- In the JumpCloud Administrator Console, navigate to USER AUTHENTICATION > SSO.
- Click the
+icon and select Custom SAML App. - On the General Info tab, enter an Application Name, such as
DataDome. - Select the SSO tab and enter the following values from your DataDome SSO settings:
- SP Entity ID:
urn:datadome:sso - ACS URL:
https://app.datadome.co/saml/acs
- SP Entity ID:
- Under SAMLSubject NameID, select
email. - Click Activate.
Step 2: Export IdP Metadata
- After activating, reopen the application settings.
- Click Export Metadata to download the XML file.
Step 3: Configure DataDome
- In the DataDome Console, navigate to Management > Account Security.
2. Click on Add SSO, select SAML and create a name for this connexion - Upload the metadata XML file you downloaded from JumpCloud.
- Save the configuration.
Step 4: Assign Users and Test
- In JumpCloud, go to the User Groups tab in the application and assign the users who need access.
- Test the login flow.
This guide explains how to set up PingFederate as your SAML 2.0 Identity Provider for the DataDome Console.
Step 1: Create a New SP Connection
- Log in to your PingFederate Administrative Console.
- Under IDP Configuration, select SP Connections.
- Click Create Connection.
- On the Connection Template screen, do not select a template. Click Next.
- On the Connection Type screen, select Browser SSO and click Next.
- On the Connection Options screen, select SAML 2.0 as the protocol and click Next.
Step 2: Configure Browser SSO
- On the Import Metadata screen, select None and click Next. This will allow for manual configuration.
- On the General Info screen:
- Partner's Entity ID (SP): Enter the Entity ID from your DataDome SSO settings. It is typically
urn:datadome:sso. - Connection Name: Enter a descriptive name, such as
DataDome.
- Partner's Entity ID (SP): Enter the Entity ID from your DataDome SSO settings. It is typically
- Click Next.
- In the Browser SSO section, click Configure Browser SSO.
- On the SAML Profiles screen, ensure only the SP-Initiated SSO checkbox is selected. Click Next.
- On the Assertion Lifetime screen, you can leave the default values. Click Next.
- On the Assertion Creation screen, click Configure Assertion Creation.
Step 3: Map Attributes
- On the Identity Mapping screen, select Standard. Click Next.
- On the Attribute Contract screen, you will define the attributes to be sent to DataDome.
- For the Subject Name Format, select
urn:oasis:names:tc:SAML:1.1:nameid-format:emailAddress. - Extend the contract by adding the following attributes (case-sensitive):
emailfirstNamelastName
- For the Subject Name Format, select
- Click Next.
- On the Authentication Source Mapping screen, click Map New Adapter Instance.
- Select the IdP Adapter Instance you use for authentication (this is specific to your PingFederate setup) and click Next.
- On the Mapping Method screen, select Retrieve additional attributes from multiple data stores using one mapping. Click Next.
- Map the attributes from your data store to the contract attributes you defined:
- SAML_SUBJECT / email: Map to the user's email attribute (e.g.,
mail). - firstName: Map to the user's first name attribute (e.g.,
givenName). - lastName: Map to the user's last name attribute (e.g.,
sn).
- SAML_SUBJECT / email: Map to the user's email attribute (e.g.,
- Click Next and then Done.
Step 4: Configure Protocol Settings
- Back in the main Browser SSO configuration, click Protocol Settings.
- On the Assertion Consumer Service (ACS) URL screen:
- Endpoint URL: Enter the ACS URL from your DataDome SSO settings:
https://app.datadome.co/saml/acs. - Binding: Select POST.
- Endpoint URL: Enter the ACS URL from your DataDome SSO settings:
- Click Add.
- On the Allowed SAML Bindings screen, ensure only POST is selected. Click Next.
- On the Signature Policy screen, you can keep the defaults (e.g., "Sign assertion"). Click Next.
- On the Encryption Policy screen, select None. Click Next and then Done.
Step 5: Configure Credentials and Activate
- In the main configuration, click Credentials.
- Select the Signing Certificate that PingFederate will use to sign SAML assertions. Click Next.
- Click Save to complete the SP Connection setup.
- On the SP Connections screen, find your new
DataDomeconnection and set the Status to Active.
Step 6: Export Metadata
- On the SP Connections list, find the
DataDomeconnection. - In the Action column, select Export Metadata.
- Select the appropriate signing certificate and click Export. Save the
metadata.xmlfile.
Step 7: Configure DataDome
- In the DataDome Console, navigate to Management > Account Security.
- Select SAML as the SSO method.
- Upload the metadata XML file you just downloaded from PingFederate.
- Save the configuration and test the login flow with an assigned user.
Test Your Configuration Before Enforcing
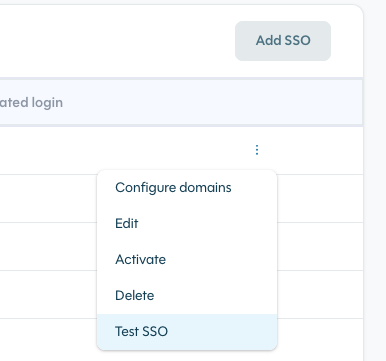
After saving your SSO configuration, use the Test button next to your connection in the SSO table. This opens a dedicated testing window that:
- Runs a real authentication flow against your Identity Provider
- On success — displays the decoded ID token fields (connection name, user role, user name) so you can verify claims are mapped correctly
- On failure — shows the specific error and description from your IdP, helping you pinpoint misconfiguration before it affects your team
We strongly recommend testing before enabling enforcement, as a misconfigured SSO connection could lock users out of the dashboard.
Automatic login from your Identity provider
To allow users to log in directly from your Identity Provider on the DataDome Dashboard, you can:
-
if you use SAML 2.0 enable the IdP-Initiated Login option:
-
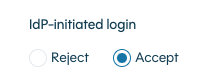
for Entra ID and Open ID Connect, just use the URL at step 2 called "Initiate login URL" and past it into your IdP configuration
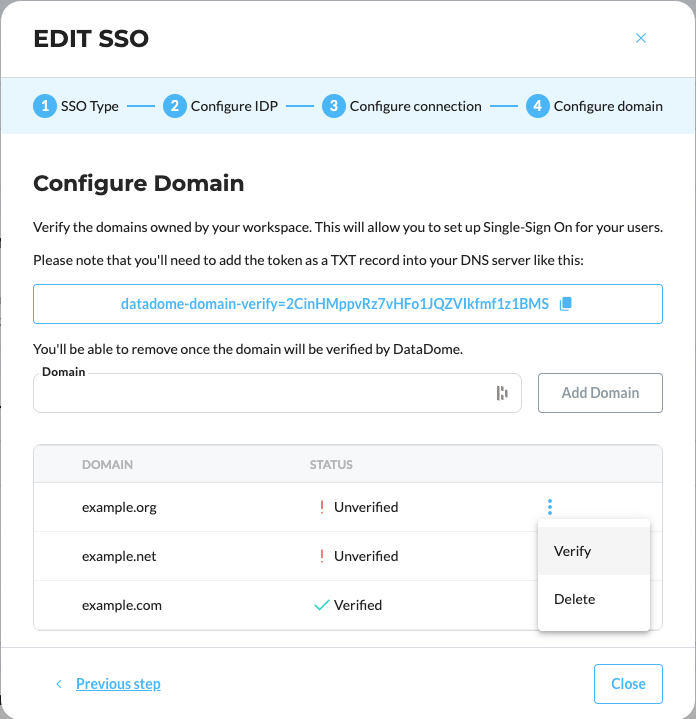
Configuring domain
Domain for multiple workspaceThe verified domain will be active for all your current workspace.
It means that an user will be able to access any of your DataDome workspaces on which he has been added.
Follow step 3 to add any domain you need, associated with your SSO configuration.
FAQ when configuring SSO
- Which name do I need to choose for my configuration?
You can choose any name - Where am I supposed to add the CallBack URL?
Depending on what IdP you are using, sometimes it's called "Initiate Login URI" on OKTA with OpenID Connect, "PostBack URL", "Sign On URL" on Microsoft Entra ID, or "Login URL" on JumpCloud. - Can I add multiple configurations?
Yes, you can add several SSO configurations, useful if you need to switch from one configuration to another. Please remember that you can have only 1 enabled simultaneously. - Can I add several domains to my configuration?
Yes, you can add several domains per SSO configuration. Please note that all these domains will be enabled for all your DataDome workspaces. - What are Client ID and Secret used for?
[!INFO]
The Client ID and Client Secret are credentials used only for OIDC-based SSO.- The Client ID is a public identifier for the DataDome application in your IdP.
- The Client Secret is a confidential password that proves the authentication request is coming from the legitimate DataDome application.
These are not used for SAML configurations, which use a certificate-based verification method instead. Always keep your Client Secret secure.*
- What is the Redirect URI / ACS URL I should use?
The values you need to provide to your IdP are available in the DataDome Console's SSO settings. They are typically:
- OIDC Redirect URI:
https://app.datadome.co/auth/callback - SAML ACS URL:
https://app.datadome.co/saml/acs
[!WARNING]
Always copy the exact URL from your DataDome SSO configuration page to ensure it is correct for your account and region.
Automatic Account Creation
Plan restrictionThis feature is only available to Enterprise plans.
For SSO only usersYou must have a SSO configuration already configured.
You will find the Automatic Account Creation (a.k.a User Provisioning) on the Account Security tab of the Management panel of the DataDome Dashboard.
Make sure your SSO configuration is already activated

Configure your Automatic Account Creation
Be sure to configure your Automatic Account Creation through your main Workspace.
- Click "Add AAC" and choose the domain you want the account to be created automatically.

- If you have multiple workspaces, choose at least one where you want this configuration to be applied

- From there, you can keep the default configuration, meaning that every newly created user will have the default DataDome role 'Viewer' and then you're done

- Choose the 'Customized roles' option to customize the role of every new user to map it to your Identity Provider roles
If you selected multiple workspaces, please note than this roles will be applied across all the selected workspaces

- Go back to your Identity Provider (Okta for example here) and add an Attribute to your Profile Editor
Please note that every Identity Provider is different and you may need to adapt this configuration
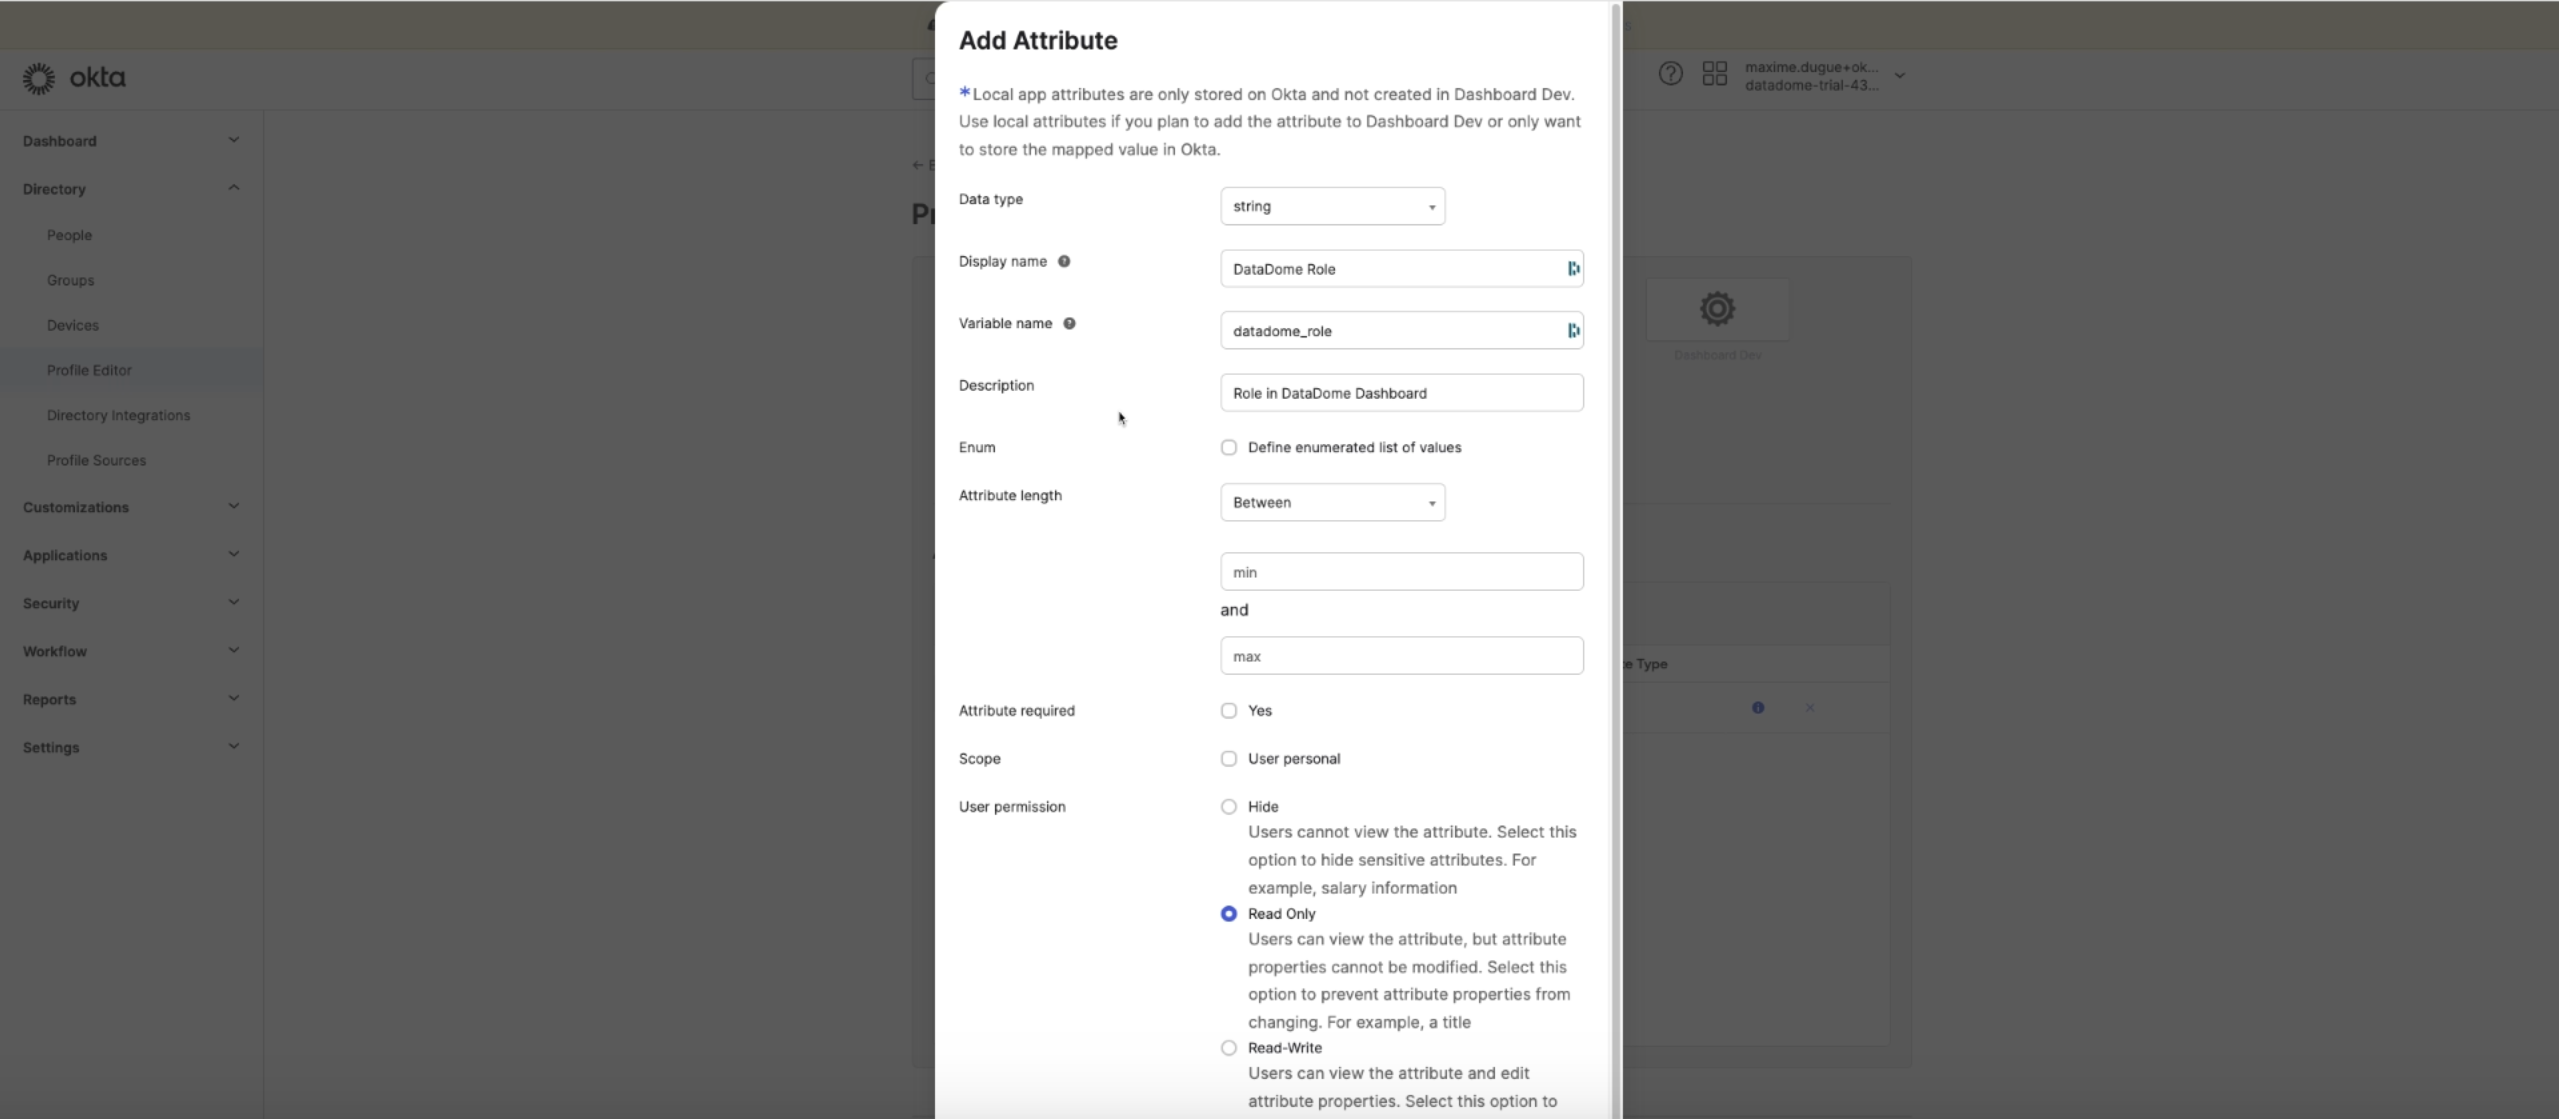
- Click on 'Define enumerated list of values' and add the attribute members to map your roles into DataDome roles: Admin, Editor, Viewer
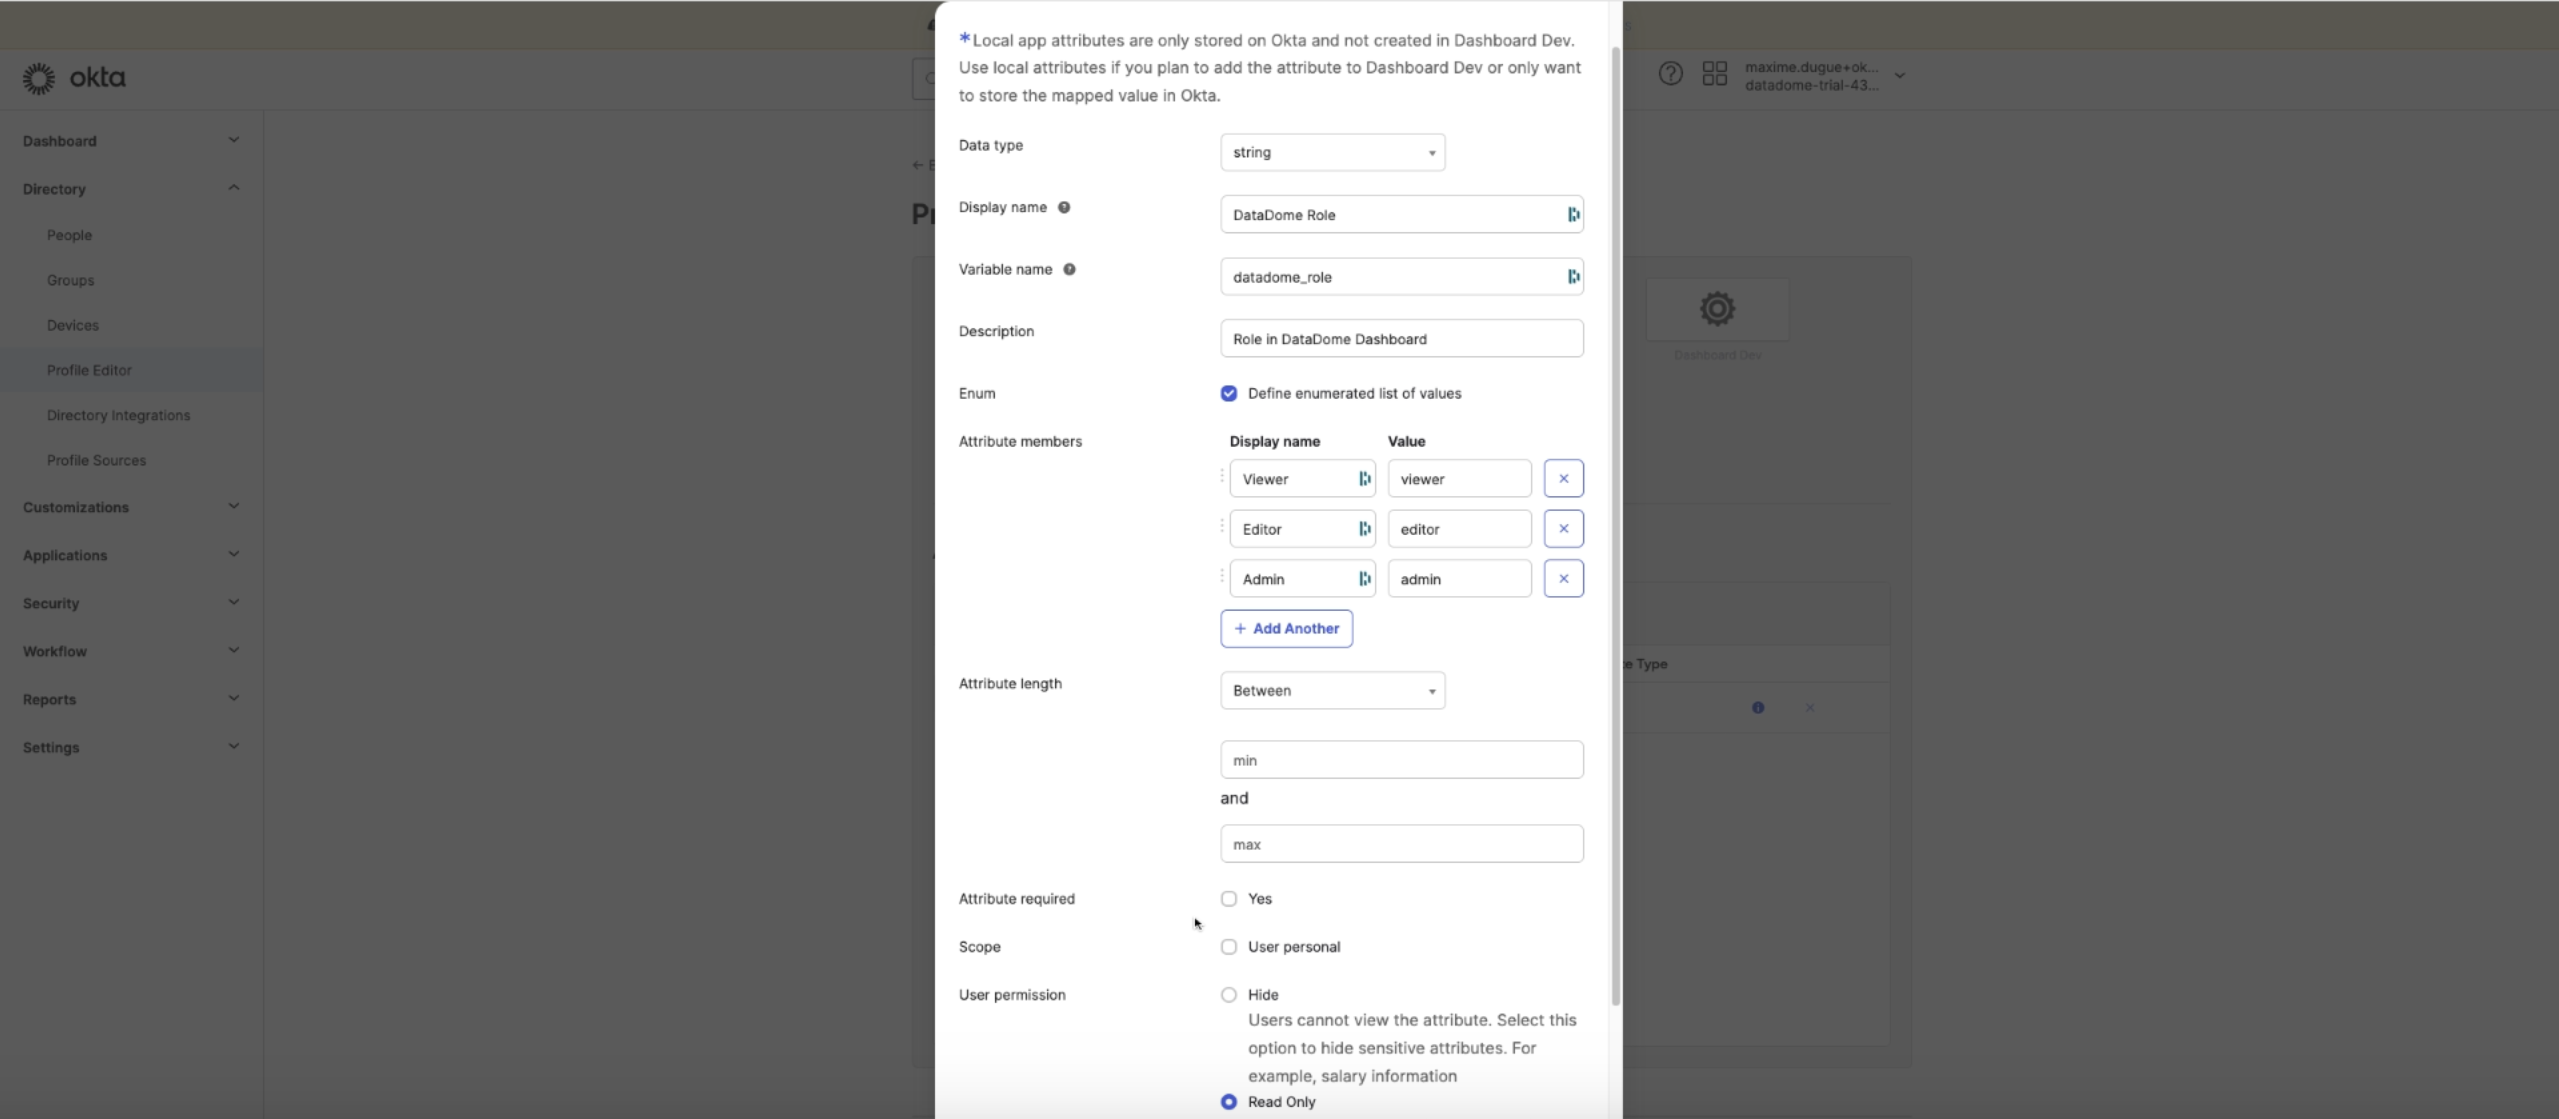
Attribute mapping guidelinesTo configure the first name and last name of your users, you must send one of the following attributes:
name: expected values is with first and last names separated by a space, ex: “John Doe”- or
first_name: expected values is "John" andlast_name: expected values is "Doe"- or
firstNameandlastName, same expected values as above- or
given_nameandfamily_name, same expected values as aboveFor the role you can have:
- either
datadome_roleorrolewith the following values:viewer,editor,admin(case insensitive)
- Choose 'Yes' for 'Attribute Required'

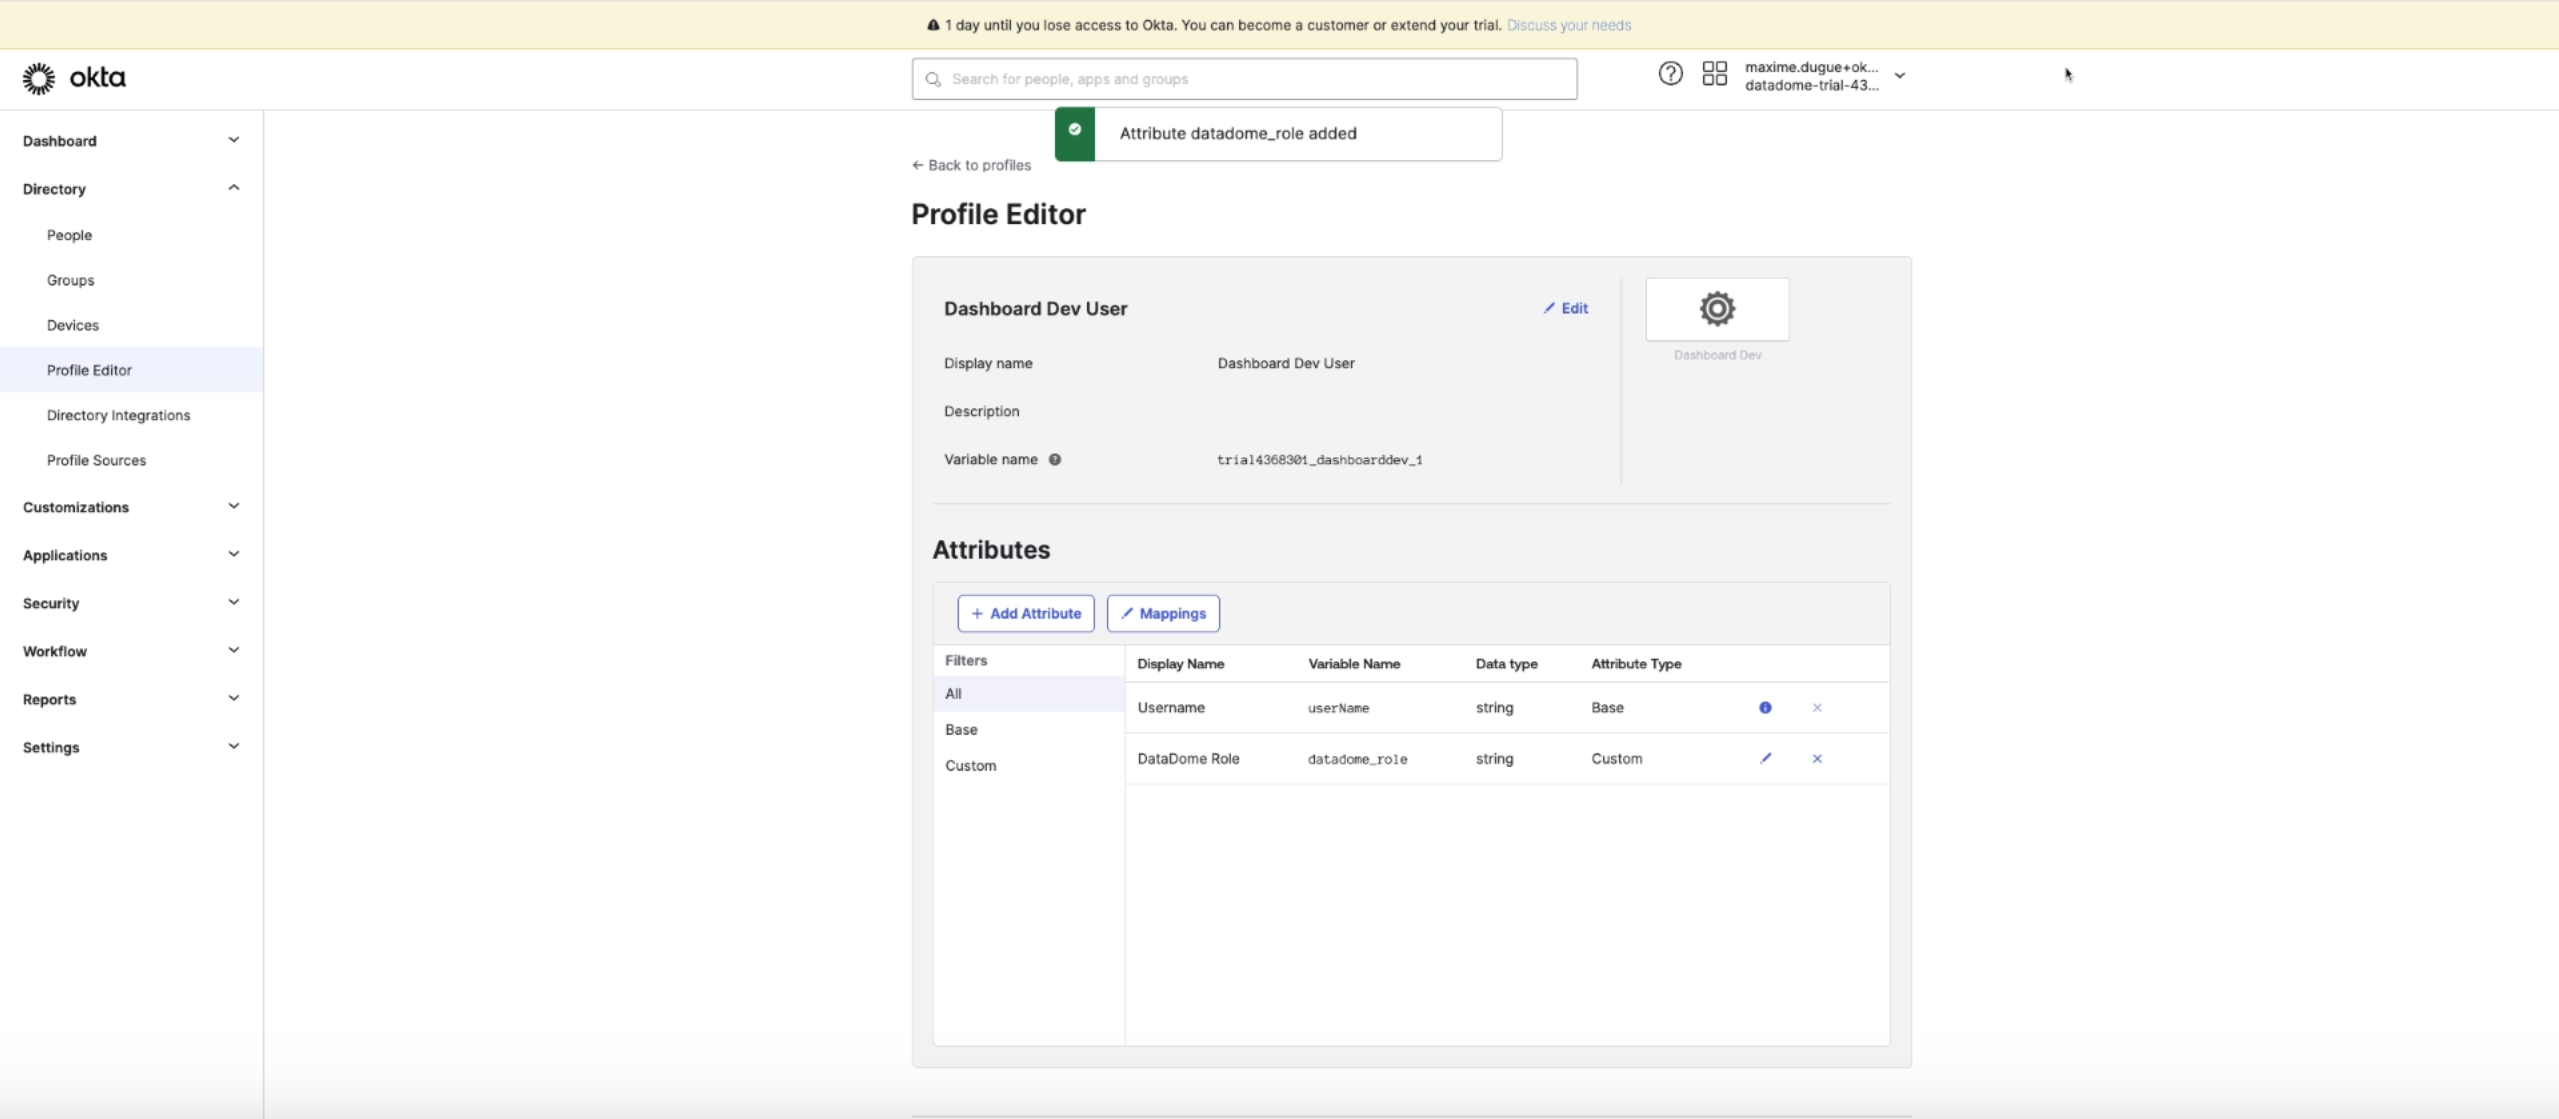
-
Save your attribute configuration and you should see your Profile editor as shown below
-
Then go back to DataDome Dashboard and 'Add AAC'

FAQ when configuring Automatic Account Creation
- What is Automatic Account Creation (user provisioning)?
Automatic Account Creation (a.k.a User provisioning) is a process that creates user accounts and their profiles across IT infrastructure and business applications. - How does user provisioning work in our DataDome Dashboard?
DataDome utilizes SAML 2.0 to automate the process of creating, updating, and managing user accounts. It assigns roles to users, a default one (viewer), or any other role coming from your Identity Provider if you wish. - How can I activate it?
Just follow all the steps above from your main workspace if you have more than one. - What are the prerequisites?
You must have an SSO configuration up and running. - What will happen if I activate it on my existing account with current users?
If you activate it with the default role mapping, your current users won't be affected by these changes. On the contrary, if you choose the customized role mapping, please note that the roles of your current users will be impacted. If you map DataDome role 'viewer' to one of your roles on your Identity Provider, all your current users with this role will become 'viewer' on the DataDome Dashboard. - Is my Identity Provider compatible?
If your Identity Provider supports SAML 2.0 then it's compatible. - How can I map the role from my Identity Provider?
See the Step. 6 above. - Can I delete users thanks to this feature? (de-provisioning)
No, this feature is not available. - Can I activate it on all my Workspace?
Yes, please follow the step 2 above. - I already have an SSO configured on one of my workspaces, can I use this feature to add my current on other workspaces?
Yes, you can use this feature to add automatically your current users in another workspace if that's not the case. Follow the steps above from your main workspace to activate it.
Updated 5 months ago