Akamai EdgeWorkers
Akamai integration for Bot Protection
Overview
This guide walks you through integrating DataDome Bot Protection into your Akamai setup using an EdgeWorker. Before diving into the steps, here is a quick picture of what you will configure.
| Step | What you do |
|---|---|
| Create and activate a dedicated DataDome EdgeWorker |
| Add the DataDome Server Side Key, API endpoint, and request metadata variables in your Akamai Property Manager |
| Create a rule in Property Manager that triggers the EdgeWorker on all non-static requests |
| Create an origin rule that forwards the /validate-request path to api-akamai.datadome.co |
| Disable Akamai mPulse injection for DataDome responses |
| Ensure Datadome is executed in all cases |
| Deploy your updated property to Staging, verify traffic, then promote to Production |
Sequence flow

Prerequisites
- Enabled access to the Akamai EdgeWorkers from the Akamai Marketplace: https://control.akamai.com/apps/marketplace-ui
- Have access to Akamai Edge Worker Dynamic or Enterprise Compute plan
- Contact your Akamai representative to increase the user-defined variables limits from 1024 to 4000
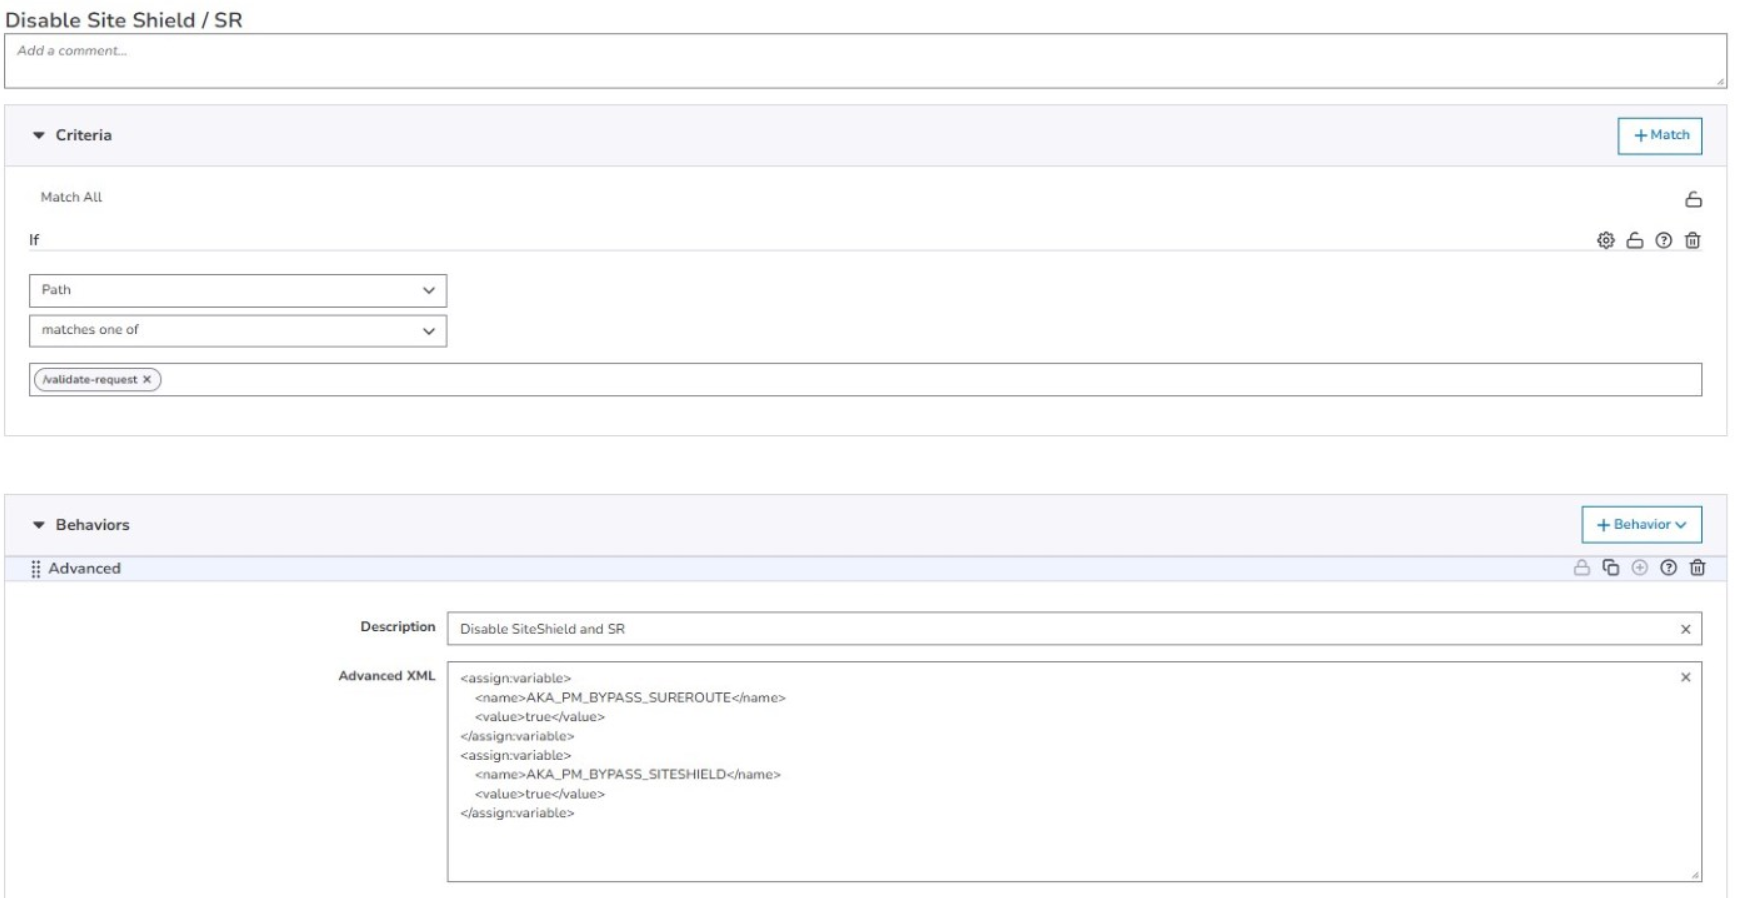
- If you are using Akamai SiteShield, you need to contact Akamai Professional Services to disable SiteShield for DataDome API Request.
- If you are using Phased release cloudlet make sure the path
/validate-requestdoes not match it
Installation
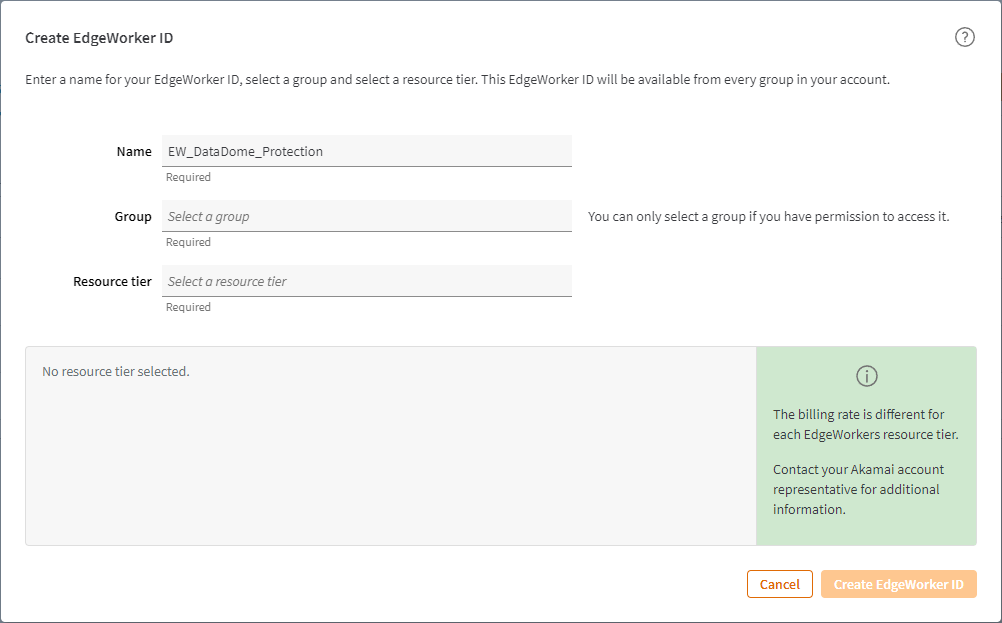
1. Create and activate DataDome EdgeWorker code
- Access the EdgeWorkers Management screen at: https://control.akamai.com/apps/edgeworkers.
- Click on the Create EdgeWorker ID button at the top-right.

- The Create EdgeWorker ID modal is shown
- Set the name of the EdgeWorker to EW_DataDome_Protection
- The Group refers to which set of access permissions you are going to apply to the newly created EdgeWorker
- Set the Resource Tier to Dynamic Compute
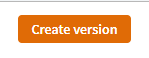
- A new row will be added to the EdgeWorker table.

- Click on the respective ID, the EdgeWorker ID details page will be shown.
- Click on the Create Version button, the Create Version modal will be shown.
- Drag and drop the provided tar file in the droppable area.
- The droppable area should validate the dropped bundle
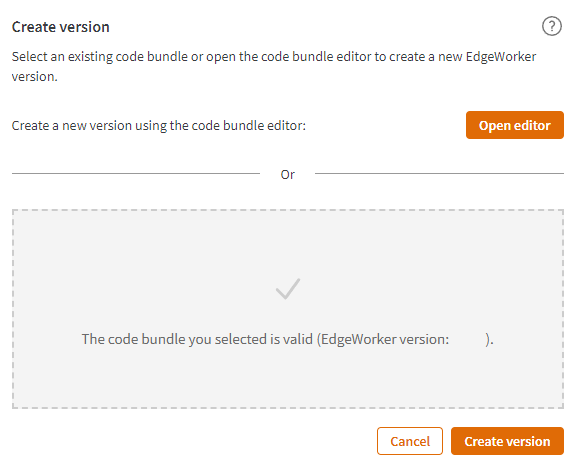
- Click on the Create version button on the bottom-right of the modal.
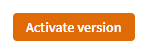
- A row will be added to the Versions table.
- Click on the last version added, the EdgeWorker version details page will be shown.
- Click on the Activate version button, the Activate version modal will be shown.
- Choose a Network to deploy this version to.
EdgeWorker environments are updated separately, the activation process needs to be done twice to update both the Staging and the Production environments

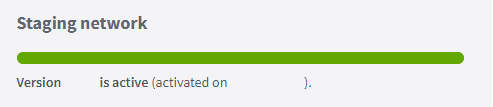
- Click on the Activate version button to proceed; the EdgeWorker version details page will get updated with a notification on the top-right and a progress bar.
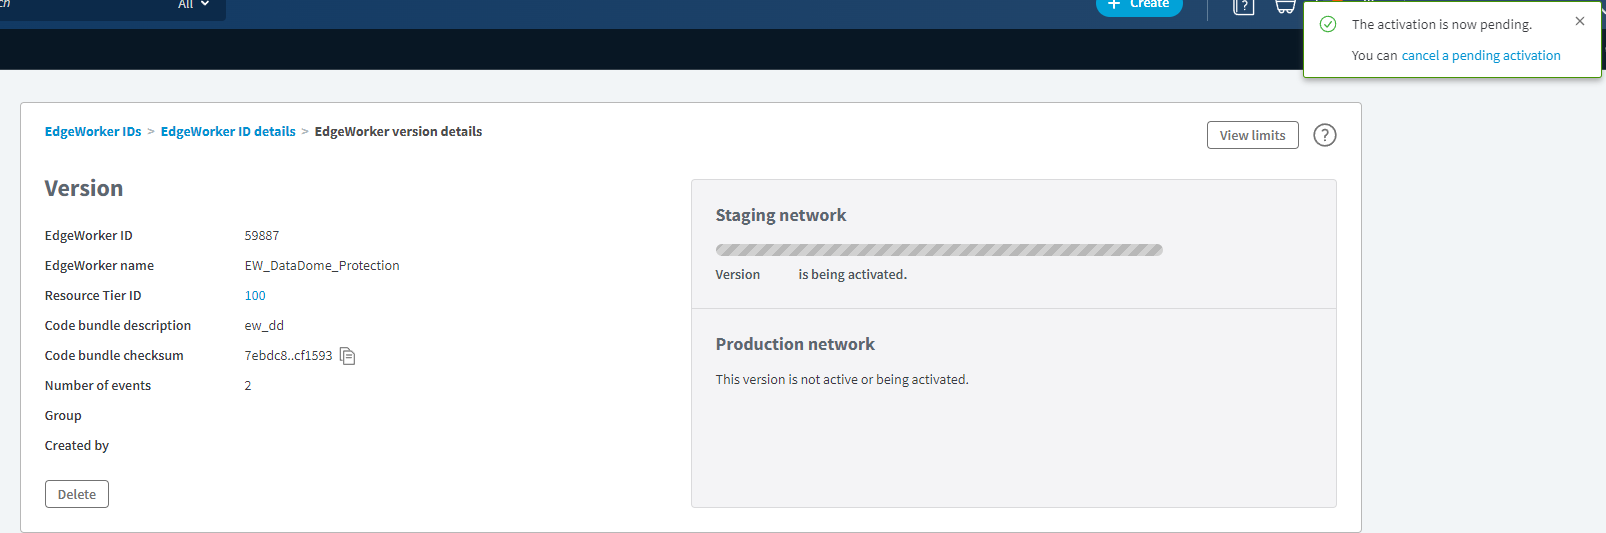
- Kindly wait until the progress bar is full and green, and the version is marked as active in that environment.
2. Configure property variables
Step 1 : Create a new version of your Akamai property
-
Go to your Akamai property you would like to protect with DataDome.
-
Create a new version of this property to be able to update it.
You need to create a new version of your property, otherwise you will not be allowed to edit a Property version that is already deployed to Staging and/or Production.
Step 2: Add the following variables and their respective values in the Property Variables section
Please note that Akamai prepends the variables with
PMUSER_- no need to re-add it.
Required variables
| Variable name | Description | Security settings | Notes |
|---|---|---|---|
| EW_DD_LICENSE_KEY | DataDome server-side key | Hidden | Value of your Server Side Key available in DataDome Dashboard > Management > Integrations |
| EW_DD_DOMAIN | DataDome API endpoint | Hidden | Value: api-akamai.datadome.co |
| EW_CLIENT_IP | Used to get the client IP | Hidden | |
| EW_TLS_VERSION | Used to retrieve the TLS version | Hidden | |
| EW_TLS_CIPHER_NAME | Used to retrieve the TLS Cipher name | Hidden |
3. Trigger the EdgeWorker on Dynamic requests
- Scroll down to the Property Configuration Settings panel and click on +Rules and Standard property behavior.
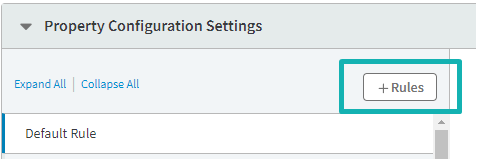
- The Add Rule modal will be shown. Search for Blank Rule Template. Create a rule named : DataDome
-
Click on .. under the previous created rule DataDome. Click on Child Rule
-
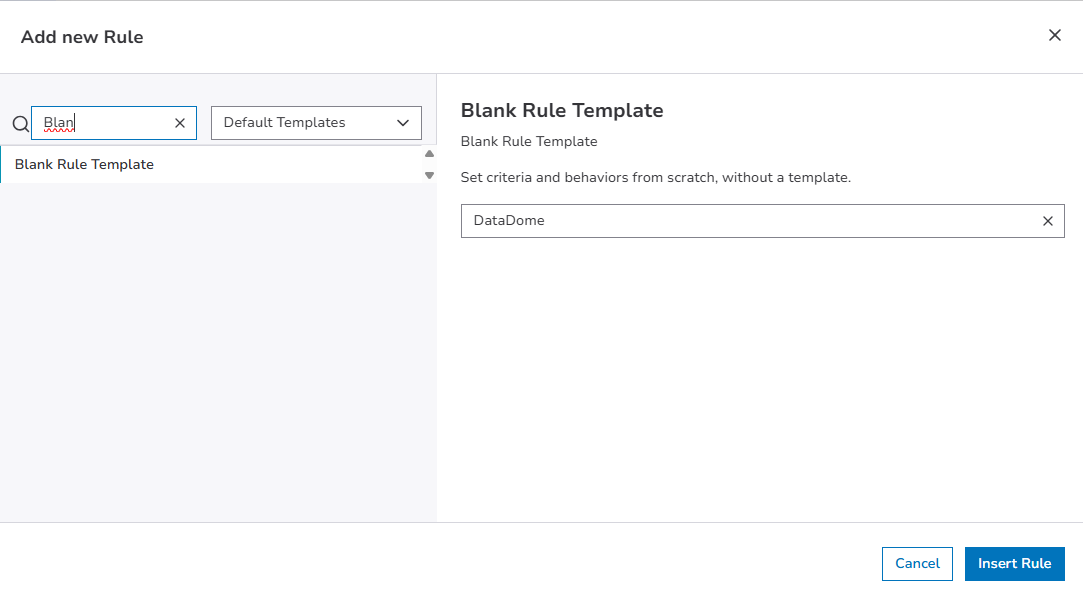
Search for Blank Rule Template. Create a rule named : DataDome - Edge Worker

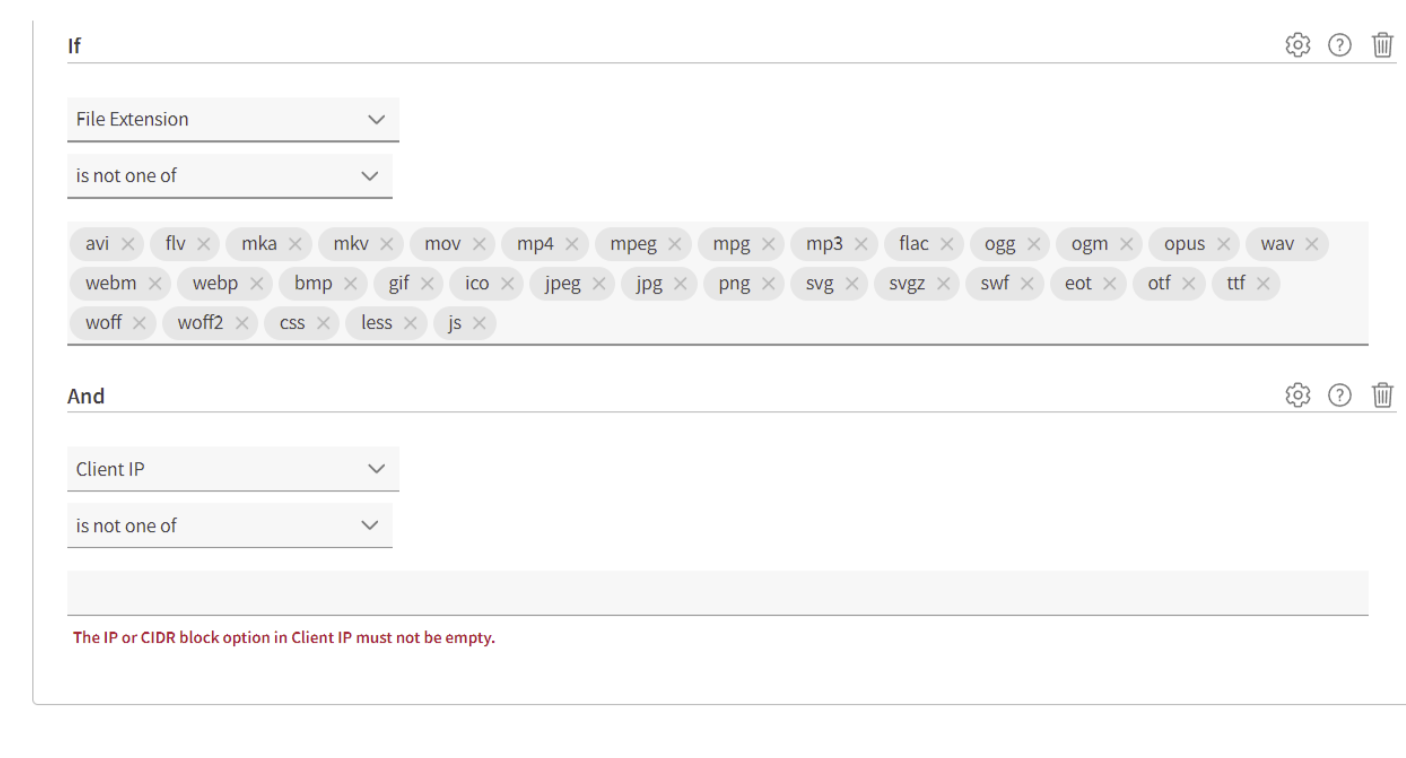
- Add the following criteria in the Criteria panel - this will not forward static file requests to the EdgeWorker
- Criteria:
Match All - Case Sensitive:
Off - Condition: If File extension
is not one of - Ensure Case-sensitive is unchecked (visible inside the wheel icon on the right)
- Criteria:
avi
flv
mka
mkv
mov
mp4
mpeg
mpg
mp3
flac
ogg
ogm
opus
wav
webm
webp
bmp
gif
ico
jpeg
jpg
png
svg
svgz
swf
eot
otf
ttf
woff
woff2
css
less
js
map
txt
json
webmanifest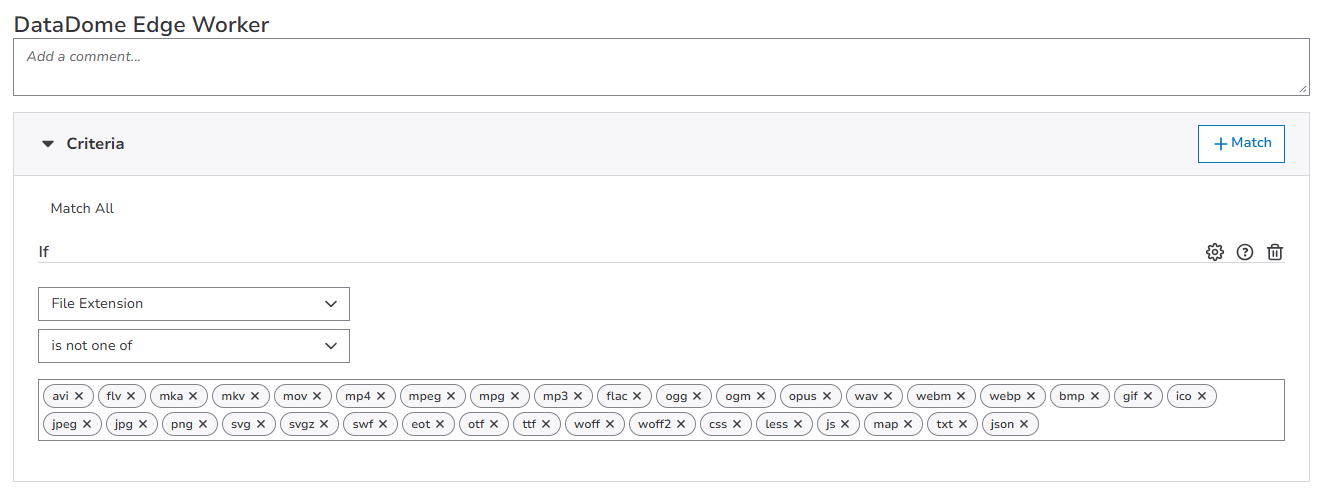
- Click on Behavior > Stand property behavior in the Behaviors panel
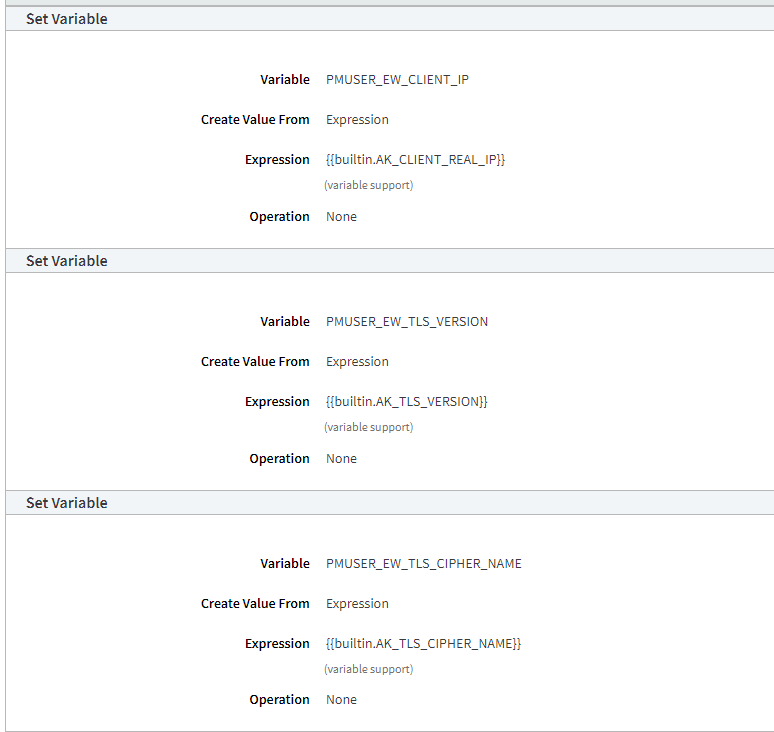
- Search for Set Variable and add 3 rules of type Set Variable like described below
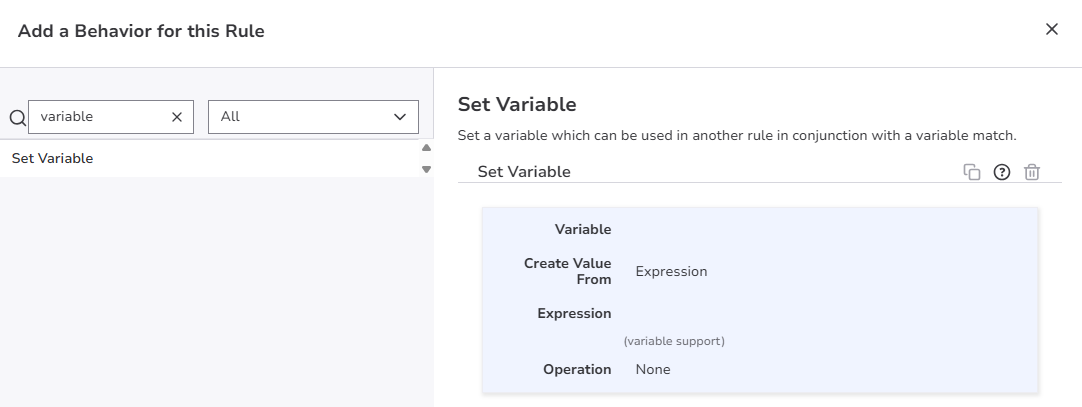
- Variable 1 :
- Variable :
PMUSER_EW_CLIENT_IP - Create Value From : Expression
- {{builtin.AK_CLIENT_REAL_IP}}
- Variable :
- Variable 2 :
- Variable :
PMUSER_EW_TLS_VERSION - Create Value From : Expression
- {{builtin.AK_TLS_VERSION}}
- Variable :
- Variable 3 :
- Variable :
PMUSER_EW_TLS_CIPHER_NAME - Create Value From : Expression
- {{builtin.AK_TLS_CIPHER_NAME}}
- Variable :
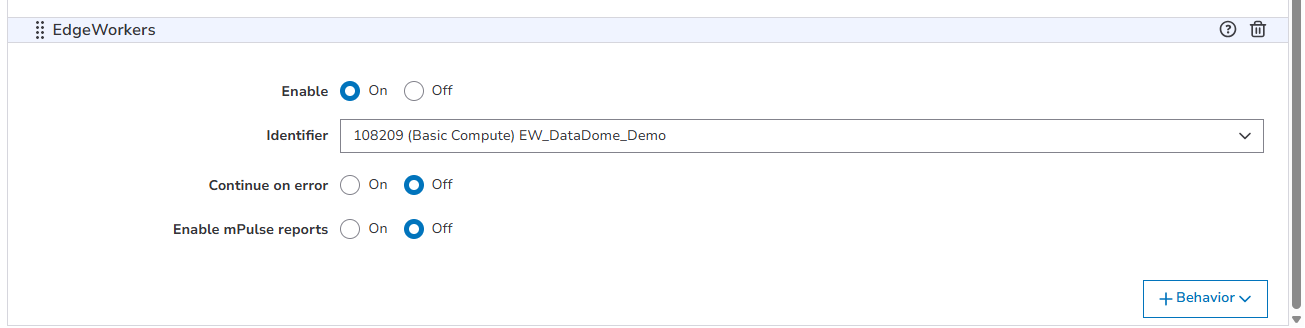
- Click on Behavior > Stand property behavior in the Behaviors panel:
- Search for EdgeWorkers and add it
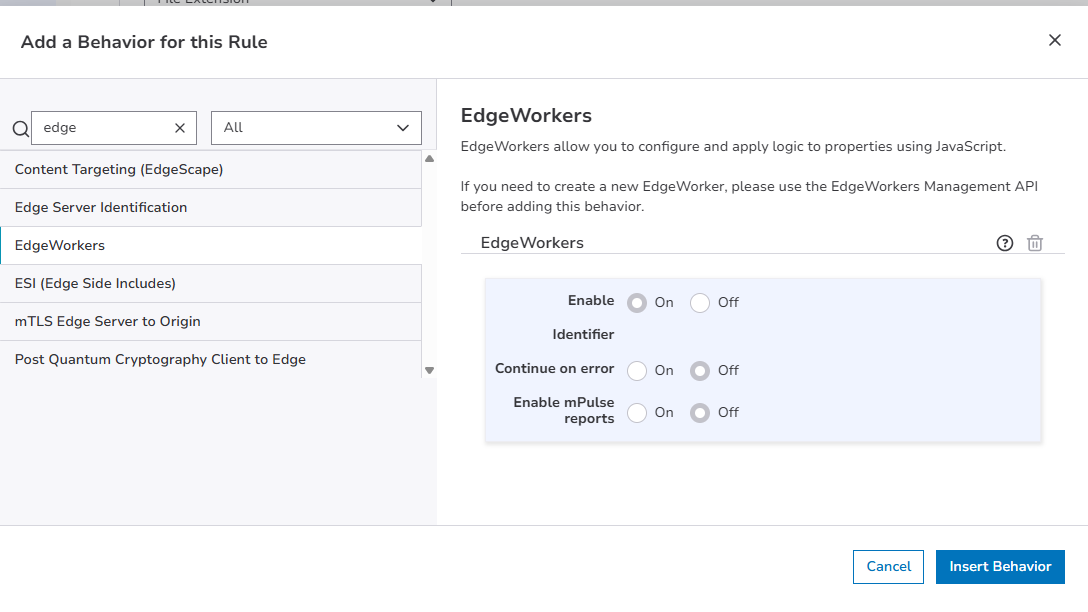
- Apply this configuration (Identifier is the name of the Edge Worker previously created):
| Order | Type | Settings |
|---|---|---|
| 4 | EdgeWorkers |
|
- Click on the Save button at the top-right or bottom-right.
4. Route /validate-request to DataDome Origin API
This part of the installation is required because Akamai EdgeWorkers are not allowed to make subrequests to origins that are not on the Akamai network. For this reason the
/validate-requestpath is mapped to forward the requests to the DataDome API: see Akamai documentation
- Inside the rule DataDome, create a child rule by clicking on "..." then Child Rule
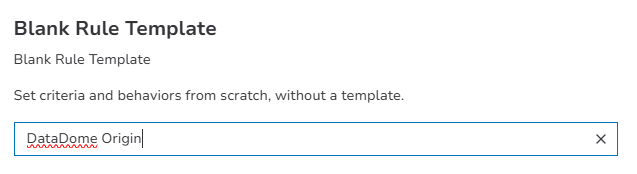
- The Add Rule modal will be shown; search for Blank Rule Template. For this documentation, we will be naming the rule
DataDome Origin. Click on the Insert Rule button when done.
-
Click on the newly added rule. Both the Criteria and Behaviors panels should be empty.
-
Add the following Criteria:
Criteria:
Match AllCondition : If
Pathmatches one of/validate-request

- Click on the +Behavior button (top-right of the Behaviors panel) and add an Origin Server like this :
| Type | Settings |
|---|---|
| Origin Server | -Origin Type: Your Origin
|
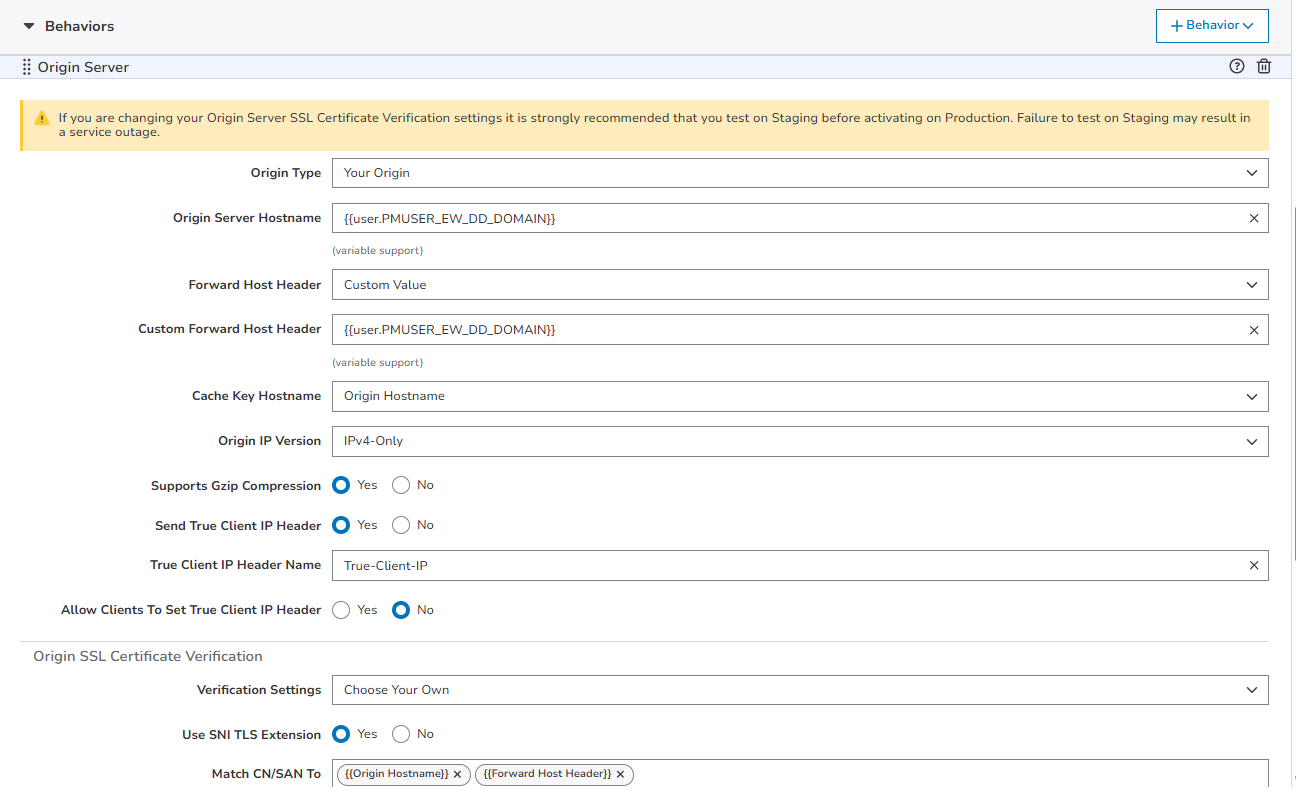
- If you are using Akamai SureRoute, disable it for this rule. (More detail in the FAQ)
- Click on the Save button at the top-right or bottom-right

5.Bypass mPulse (if applicable)
This step is mandatory if you use mPulse module in your property. Without disabling mPulse for DataDome backend request, we won't be able to display any challenge due to Akamai's limitation on EdgeWorker. (Maximum body size for responses created using the respondWith() is 2048 characters)
-
Create a variable in Property Manager called
PMUSER_MPULSE_SNIPPET
-
Create a Behaviors (inside the rule DataDome Origin) to set up this variable
PMUSER_MPULSE_SNIPPETtofalse

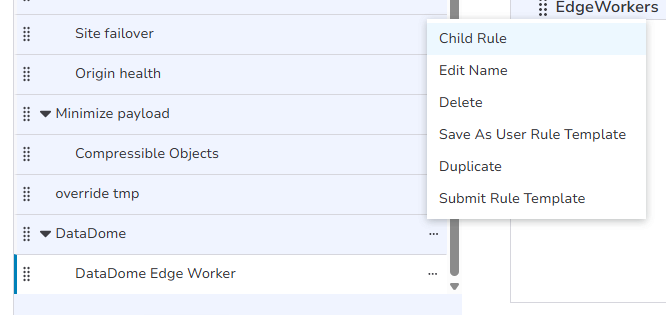
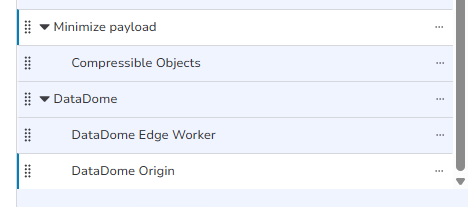
6. Move the DataDome parent rule to the end of your rules
Be sure the new DataDome Parent rule is at the end of your configuration (to avoid other origins overriding it). You should have something like this at the end:
7. Activate the changes
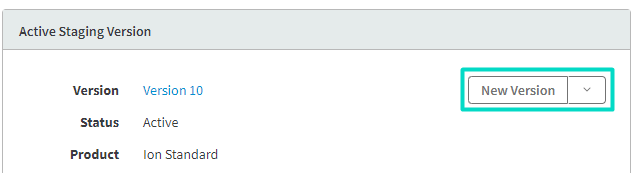
- Switch to the Activate tab at the top.

- Click on the Activate v on the Staging button, and the Activate version modal will be shown.
It is recommended that deployments are first done in Staging to be validated, then deployed to Production when all the necessary checks are made.

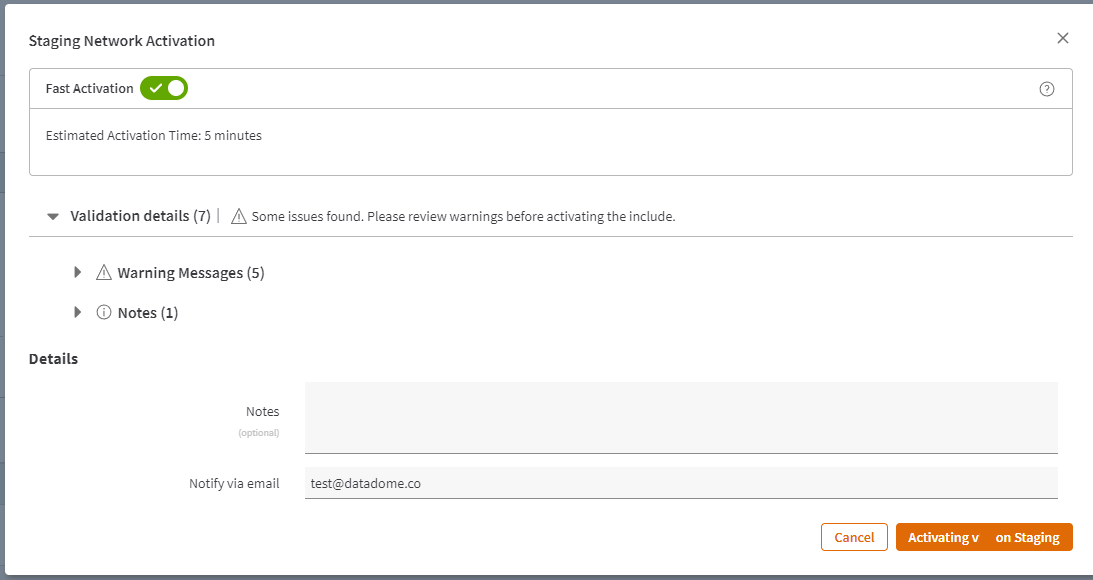
- Click on the Activate v on Staging button to proceed; the Property version activation details page will get updated with a notification on the top-right and a progress bar.
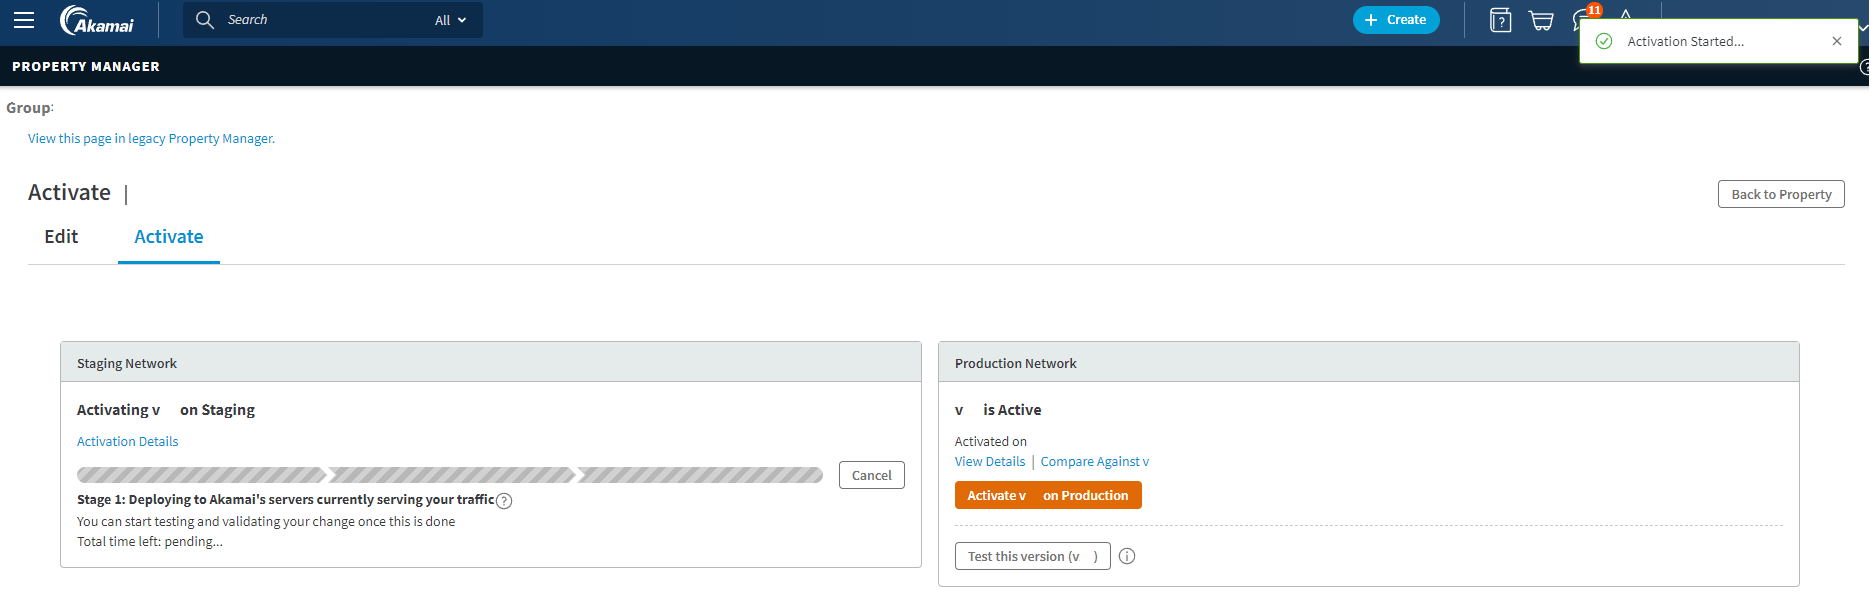
- Kindly wait until the progress bar is full and green, and the version is marked as active in that environment.
- Replicate the same activation process for production
Settings
| Description | Variable name | Security settings | Notes |
|---|---|---|---|
| DataDome timeout | EW_DD_TIMEOUT | Hidden | Default value : 300 (in ms) |
| Enable response logging inside X-DataDome-log response header | EW_DD_ENABLE_LOGGING | Hidden | Value should be true or falseDefault value is false. |
Troubleshooting
If you are not seeing any traffic on the DataDome Dashboard, or if challenges are not displayed, follow these steps:
Step 1: Validate Akamai EdgeWorker is executed
- Validate the DataDome variables have been correctly defined inside the
INITIAL VALUEcolumn and not theDESCRIPTIONcolumn. - Make a request to a page that you want to protect, with an additional
Pragmaheader:
Pragma: akamai-x-get-client-ip, akamai-x-cache-on, akamai-x-cache-remote-on, akamai-x-check-cacheable, akamai-x-get-cache-key, akamai-x-get-extracted-values, akamai-x-get-nonces, akamai-x-get-ssl-client-session-id, akamai-x-get-true-cache-key, akamai-x-serial-no, akamai-x-get-request-id, akamai-x-ew-debug- In the response, look for the
x-akamai-edgeworker-onclientresponse-infoandx-akamai-edgeworker-onclientrequest-infoheaders.- If they are present, make sure that the version of the EdgeWorker that has been executed is the one you deployed. In this example, the version is
v1.2.2< x-akamai-edgeworker-onclientresponse-info: ew=61928 v1.2.2-3ef1321:EW_DataDome_Protection; status=Success < x-akamai-edgeworker-onclientrequest-info: ew=61928 v1.2.2-3ef1321:EW_DataDome_Protection; status=Success - If they are not present, verify the rule to call the EdgeWorker is correctly set up (Step 3).
- If they are present, make sure that the version of the EdgeWorker that has been executed is the one you deployed. In this example, the version is
Step 2: Validate DataDome API is being called
- Add the variable
EW_DD_ENABLE_LOGGINGwith the valuetrueinside the Akamai DataDome property.
This will add ax-datadome-logheader to all responses going through the Akamai EdgeWorker. - Redeploy your Akamai property.
- Make a request to a page you want to protect.
- Inspect the HTTP response and look for the
x-datadome-logheader. - Depending on the value of
x-datadome-log, follow the next steps.
Datadome Validate response status code
Datadome Validate response status codeIf the DataDome call status is not 200:
- Ensure
EW_DD_LICENSE_KEYand other variables are correctly set:- Incorrect values may cause
400errors.
- Incorrect values may cause
- Check if the
/validate-requestpath is altered by Akamai and remove it from all policies:- This can lead to
404errors. (The request will be sent to the internal redirect URL instead ofEW_DD_DOMAIN)
- This can lead to
No X-DataDomeResponse in DataDome response
No X-DataDomeResponse in DataDome responseImpact : DataDome Challenge can't be displayed to the visitor
If there is no X-DataDomeResponse header in the DataDome response, it means that headers are being removed from DataDome HTTP responses by one of your Akamai Policies.
Solution: Remove any policy that can alter DataDome headers.
RangeError: Response body length exceeds limit of 2048
RangeError: Response body length exceeds limit of 2048Impact : DataDome Challenge can't be displayed to the visitor
It means the challenge page returned by DataDome is too large.
Akamai forces the body to be less than 2048 characters and the challenge sent by DataDome is under 2048 characters, but additional services may add content to the response body.
It is generally due to Akamai mPulse Monitoring being enabled for your Property. mPulse adds a lot of JavaScript content inside the page to be able to monitor it.
Solution: You need to disable mPulse for calls to the DataDome API
Setting metadata variable would exceed total variable size limit
Setting metadata variable would exceed total variable size limitImpact : DataDome Challenge can't be displayed to the visitor
It means the variables set by the EdgeWorker have exceeded the limits of your plan.
By default, the total size limit when creating Property Manager user-defined variables is 1024 characters.
This limit includes the name and value of the variable and only applies to EdgeWorkers added or modified using the JavaScript API.
This error is raised when you are trying to use too many variables in your EdgeWorker.
Solution: Upgrade your EdgeWorker Dynamic Compute tier and contact your Akamai representative to apply this change to your account.
FAQ
How can I exclude IPs and not send traffic to DataDome?
- Akamai allows ClientIP match based on an IP address, a range of IP addresses, or a CIDR block.
- The IP values can be added separated by space, comma, or carriage return.
- For more information, please check Akamai's official documentation page.
How can I use enriched headers in my Akamai property?
Since version 2.0.0 of the module, it is possible to use the value of enriched headers in your Akamai property.
In order to proceed, you need to create a new property variable with the following requirements:
- it must be prefixed with
EW_USER_ - it must contain the enriched header name without the
X-DataDome-prefix - the enriched header name must be in uppercase
- it must not exceed 25 characters due to Akamai's restriction
For example, the X-DataDome-Traffic-Rule-Response header would have its variable named EW_USER_TRAFFIC_RULE_RESP.

Variable limitsThe creation of multiple variables can reach the limits of Akamai variables.
Please refer to this troubleshooting section to fix it.
How can I disable Akamai SiteShield and SureRoute for DataDome Requests ?
If you are using Akamai SiteShield and you don't disable SiteShield, you will get all traffic routed to a limited set of DataDome Pops and it might generate higher response time and timeout.
- You need to contact Akamai Professional Services to disable SiteShield and SureRoute for DataDome Request. (Condition Path matches one of
/validate-request)
How can I use Flexible Composition?
Akamai Flexible Composition allows two or more EdgeWorkers to handle a single request. The DataDome module is fully compatible with this architecture.
Before proceeding, make sure the DataDome EdgeWorker is already configured according to our official documentation above. This is a required prerequisite.
We recommend following Akamai’s official documentation to:
Below is an example of the bundle.json and main.js files for a parent EdgeWorker that invokes the DataDome child EdgeWorker:
{
    "edgeworker-version": "1",
    "description" : "Parent EdgeWorker",
    "dependencies": {
        "datadome": {
            "edgeWorkerId": DATADOME-EDGEWORKER-ID,
            "version": "active"
        }
    }
}If a request is challenged, the DataDome module will generate the response page immediately. Consequently, any subsequent EdgeWorkers in the chain will not be executed - more details in Akamai Doc on respondWith
  import * as datadome from "datadome";

  export async function onClientRequest(request) {
    // Call DataDome child worker for bot protection
    await datadome.onClientRequest(request);
    // Continue with parent logic if request wasn't challenged
  }

  export function onClientResponse(request, response) {
    // Call DataDome child worker to add response headers
    datadome.onClientResponse(request, response);
    // Continue with parent logic
  }
In case the second worker used in the flexible composition also alter the request flow, make sure the path to /validate-request detailed in Step 3 must have priority, or is excluded from the second worker using Akamai Properties.
Can I restore the Referer request header after a challenge is passed?
Referer request header after a challenge is passed?Due to Akamai limitations regarding the body length of the response to be less than 2048 characters, it is not possible to restore the referrer after passing a challenge.
Updated 3 days ago