AWS CloudFront
This module is made for AWS CloudFront distributions, using the AWS CloudFront Lambda@Edge service.
Supported runtimes
DataDome supports Lambda runtimes until they reach their deprecation date.
You can find the list of supported runtimes in this AWS documentation.
DataDome supports the following Lambda runtimes:
| Language | Supported runtimes |
|---|---|
| Node.js v1 | nodejs22.x |
| Node.js v2 | nodejs22.x, nodejs24.x |
| Python | python3.10, python3.11, python3.12, python3.13, python3.14 |
Support ofnodejs24.xruntimeSince the version 24 of the Node.js runtime, the callback-based functions are deprecated. You must use the v2 of the CloudFront Node.js module to use the
nodejs24.xruntime and above.Please refer to the migration guide to upgrade your module version from v1 to v2.
Installation
Prerequisites
- The server-side key available in your DataDome dashboard
- DataDome JavaScript Tag set up as First-Party
- The client-side key available in your DataDome dashboard to be able to set up the first party Javascript Tag
DataDome JavaScript Tag as First-PartyThe JS Tag must be implemented as First-Party to ensure reliable bot detection.
- Our AWS CloudFront module requires the JS Tag
- Some browser configurations prevent running scripts from third-parties
AWS IAM permissions
In order to associate your Lambda@Edge function with your CloudFront distribution and be able to record logs, you need to create IAM permissions and roles based on the snippet below.
- Access to the Identity and Access Management (IAM) page, in the Policies tab.
- Click on the Create policy button.
- Select JSON in the Policy editor, and paste the following permissions:
{
    "Version": "2012-10-17",
    "Statement": [
        {
          "Effect": "Allow",
          "Action": [
            "logs:CreateLogGroup",
            "logs:CreateLogStream",
            "logs:PutLogEvents"
          ],
          "Resource": [
            "*"
          ]
        }
    ]
}- Then click on the Next button, enter a name for this policy, and click on the Save button.
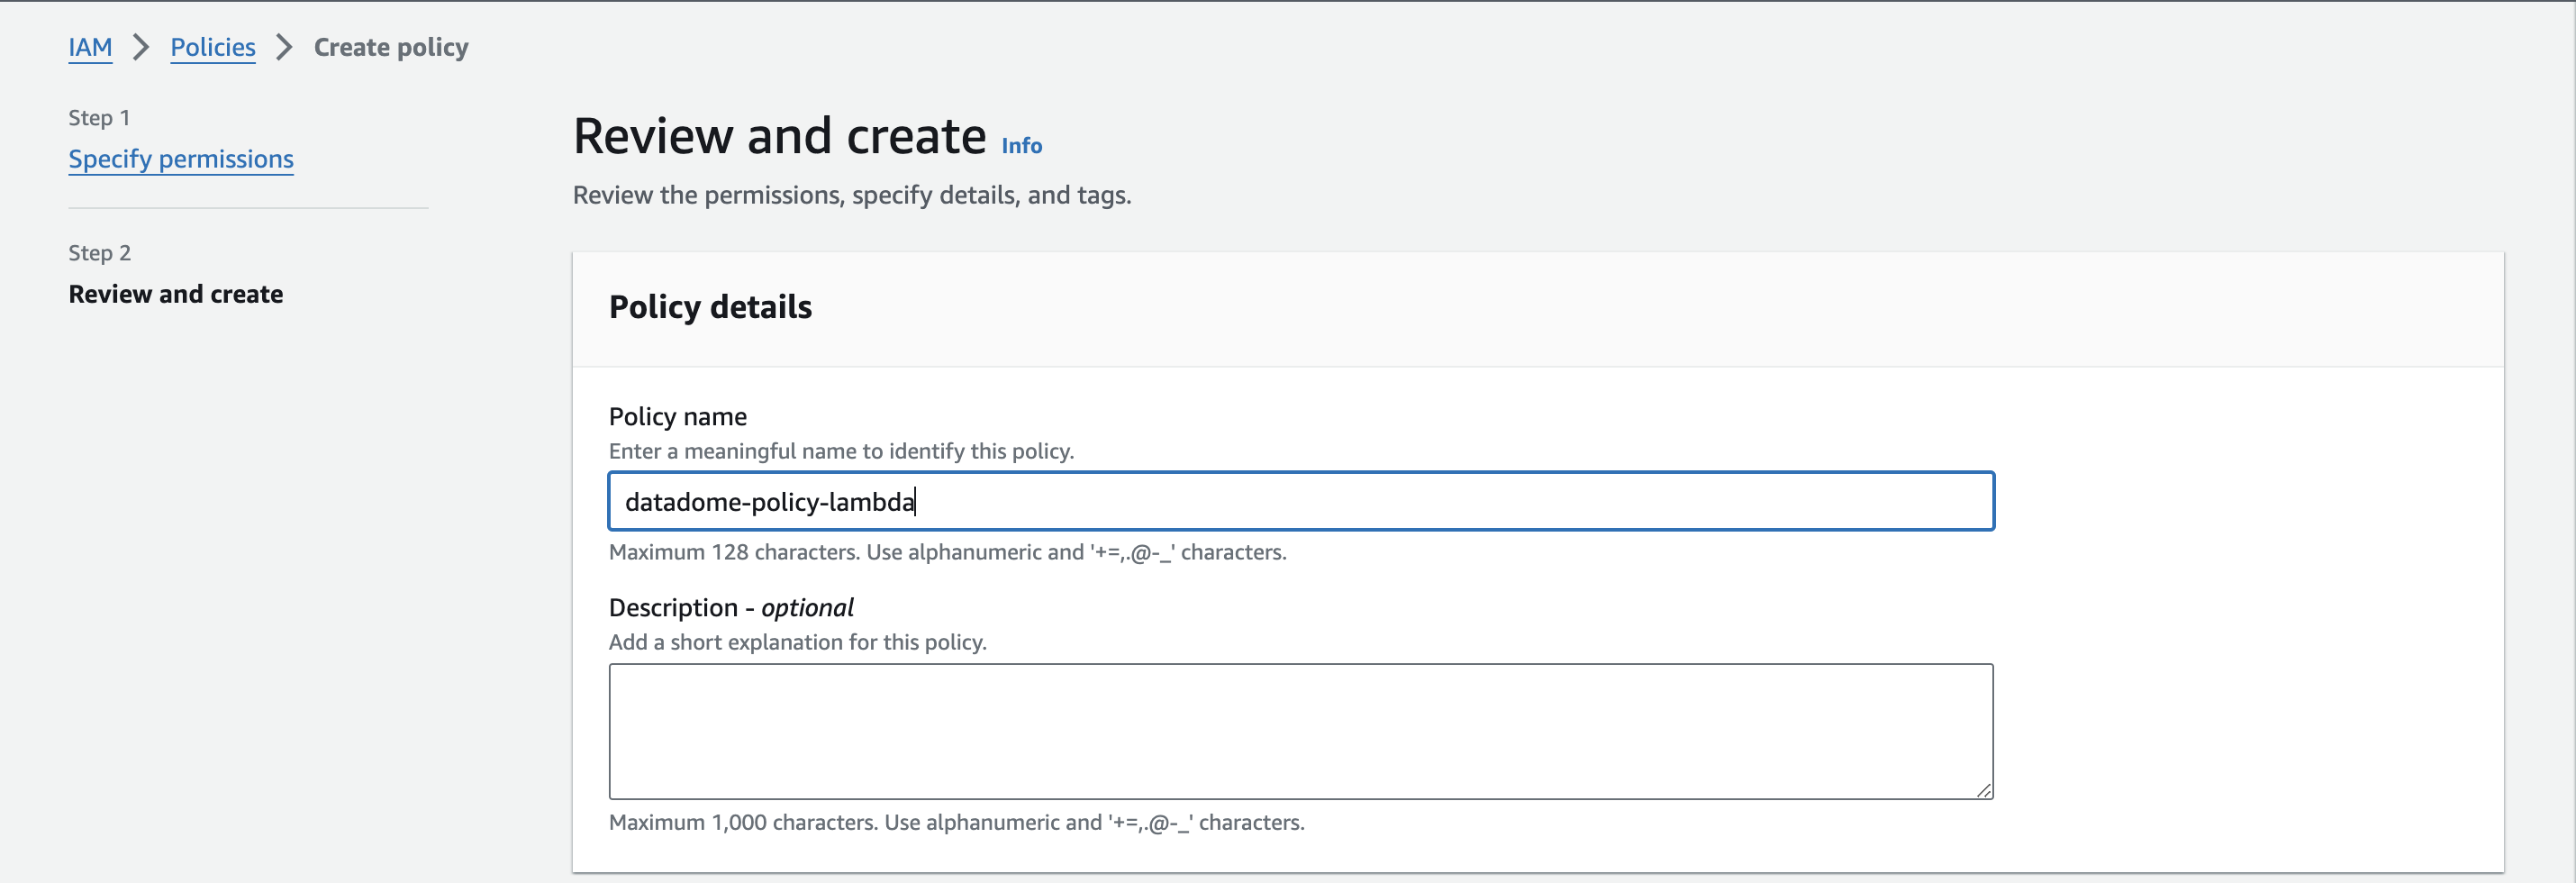
Form to create the policy
- Access the IAM page, in the Role tab.
- Click on the Create role button.
- Select the Trusted entity type to AWS service, select the Use case to Lambda, and click on the Next button.
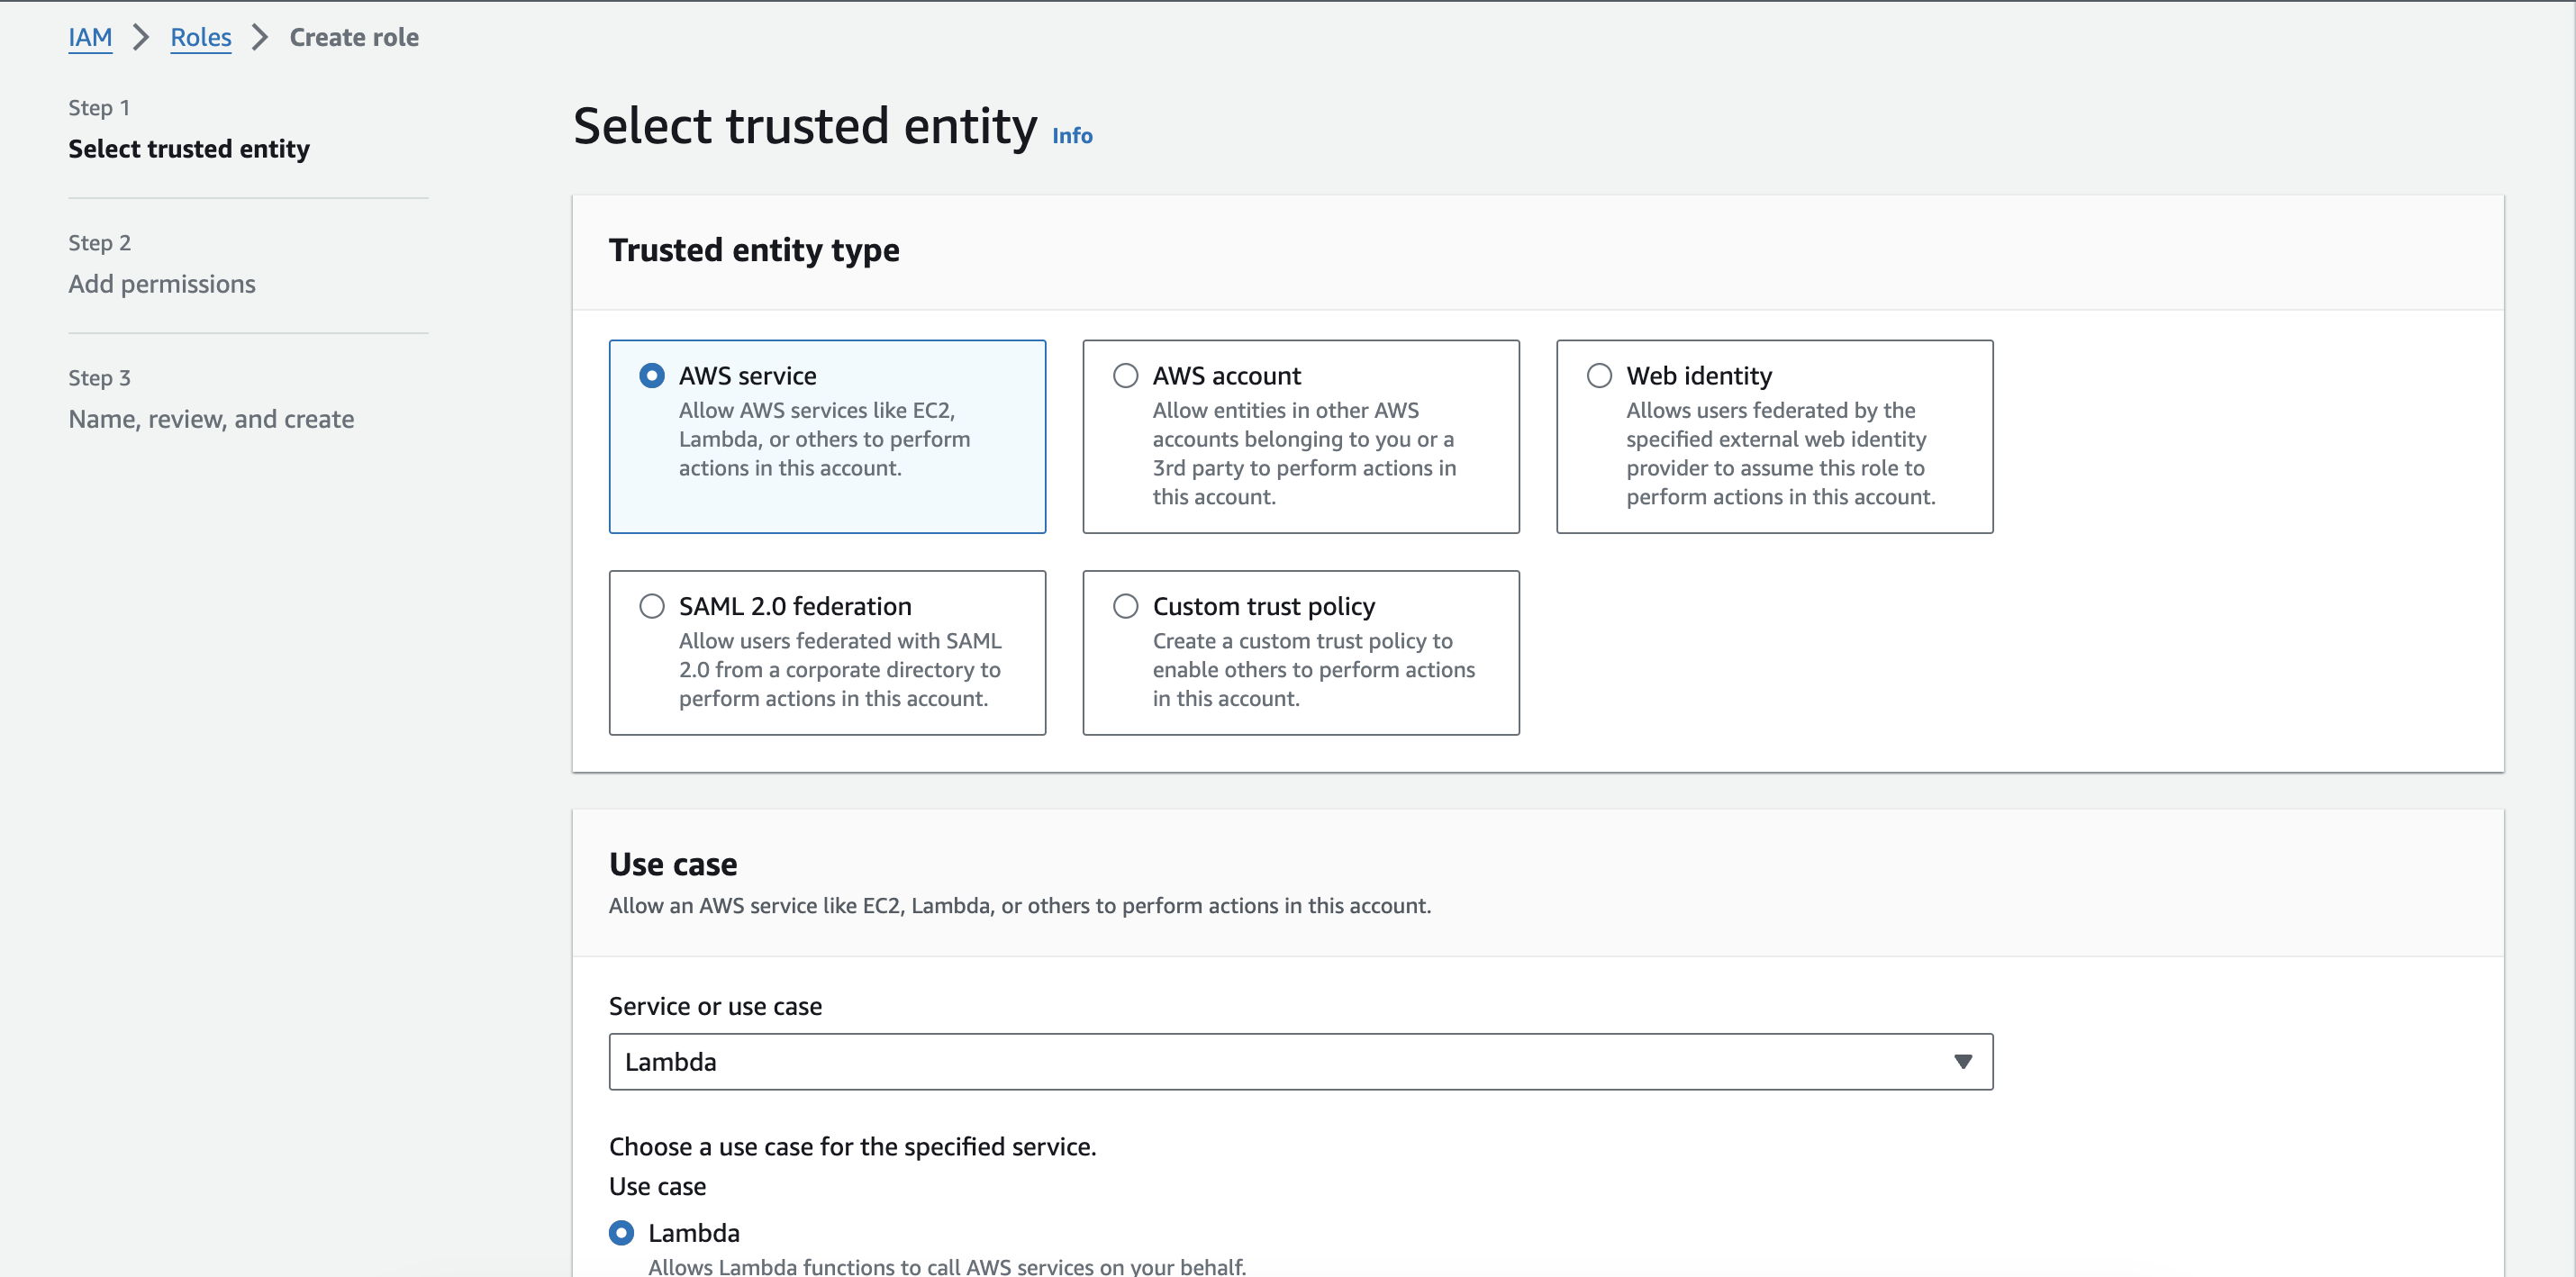
Form to select the trusted entity type and the use case
- Select the IAM policy created on step 4 and click on the Next button.
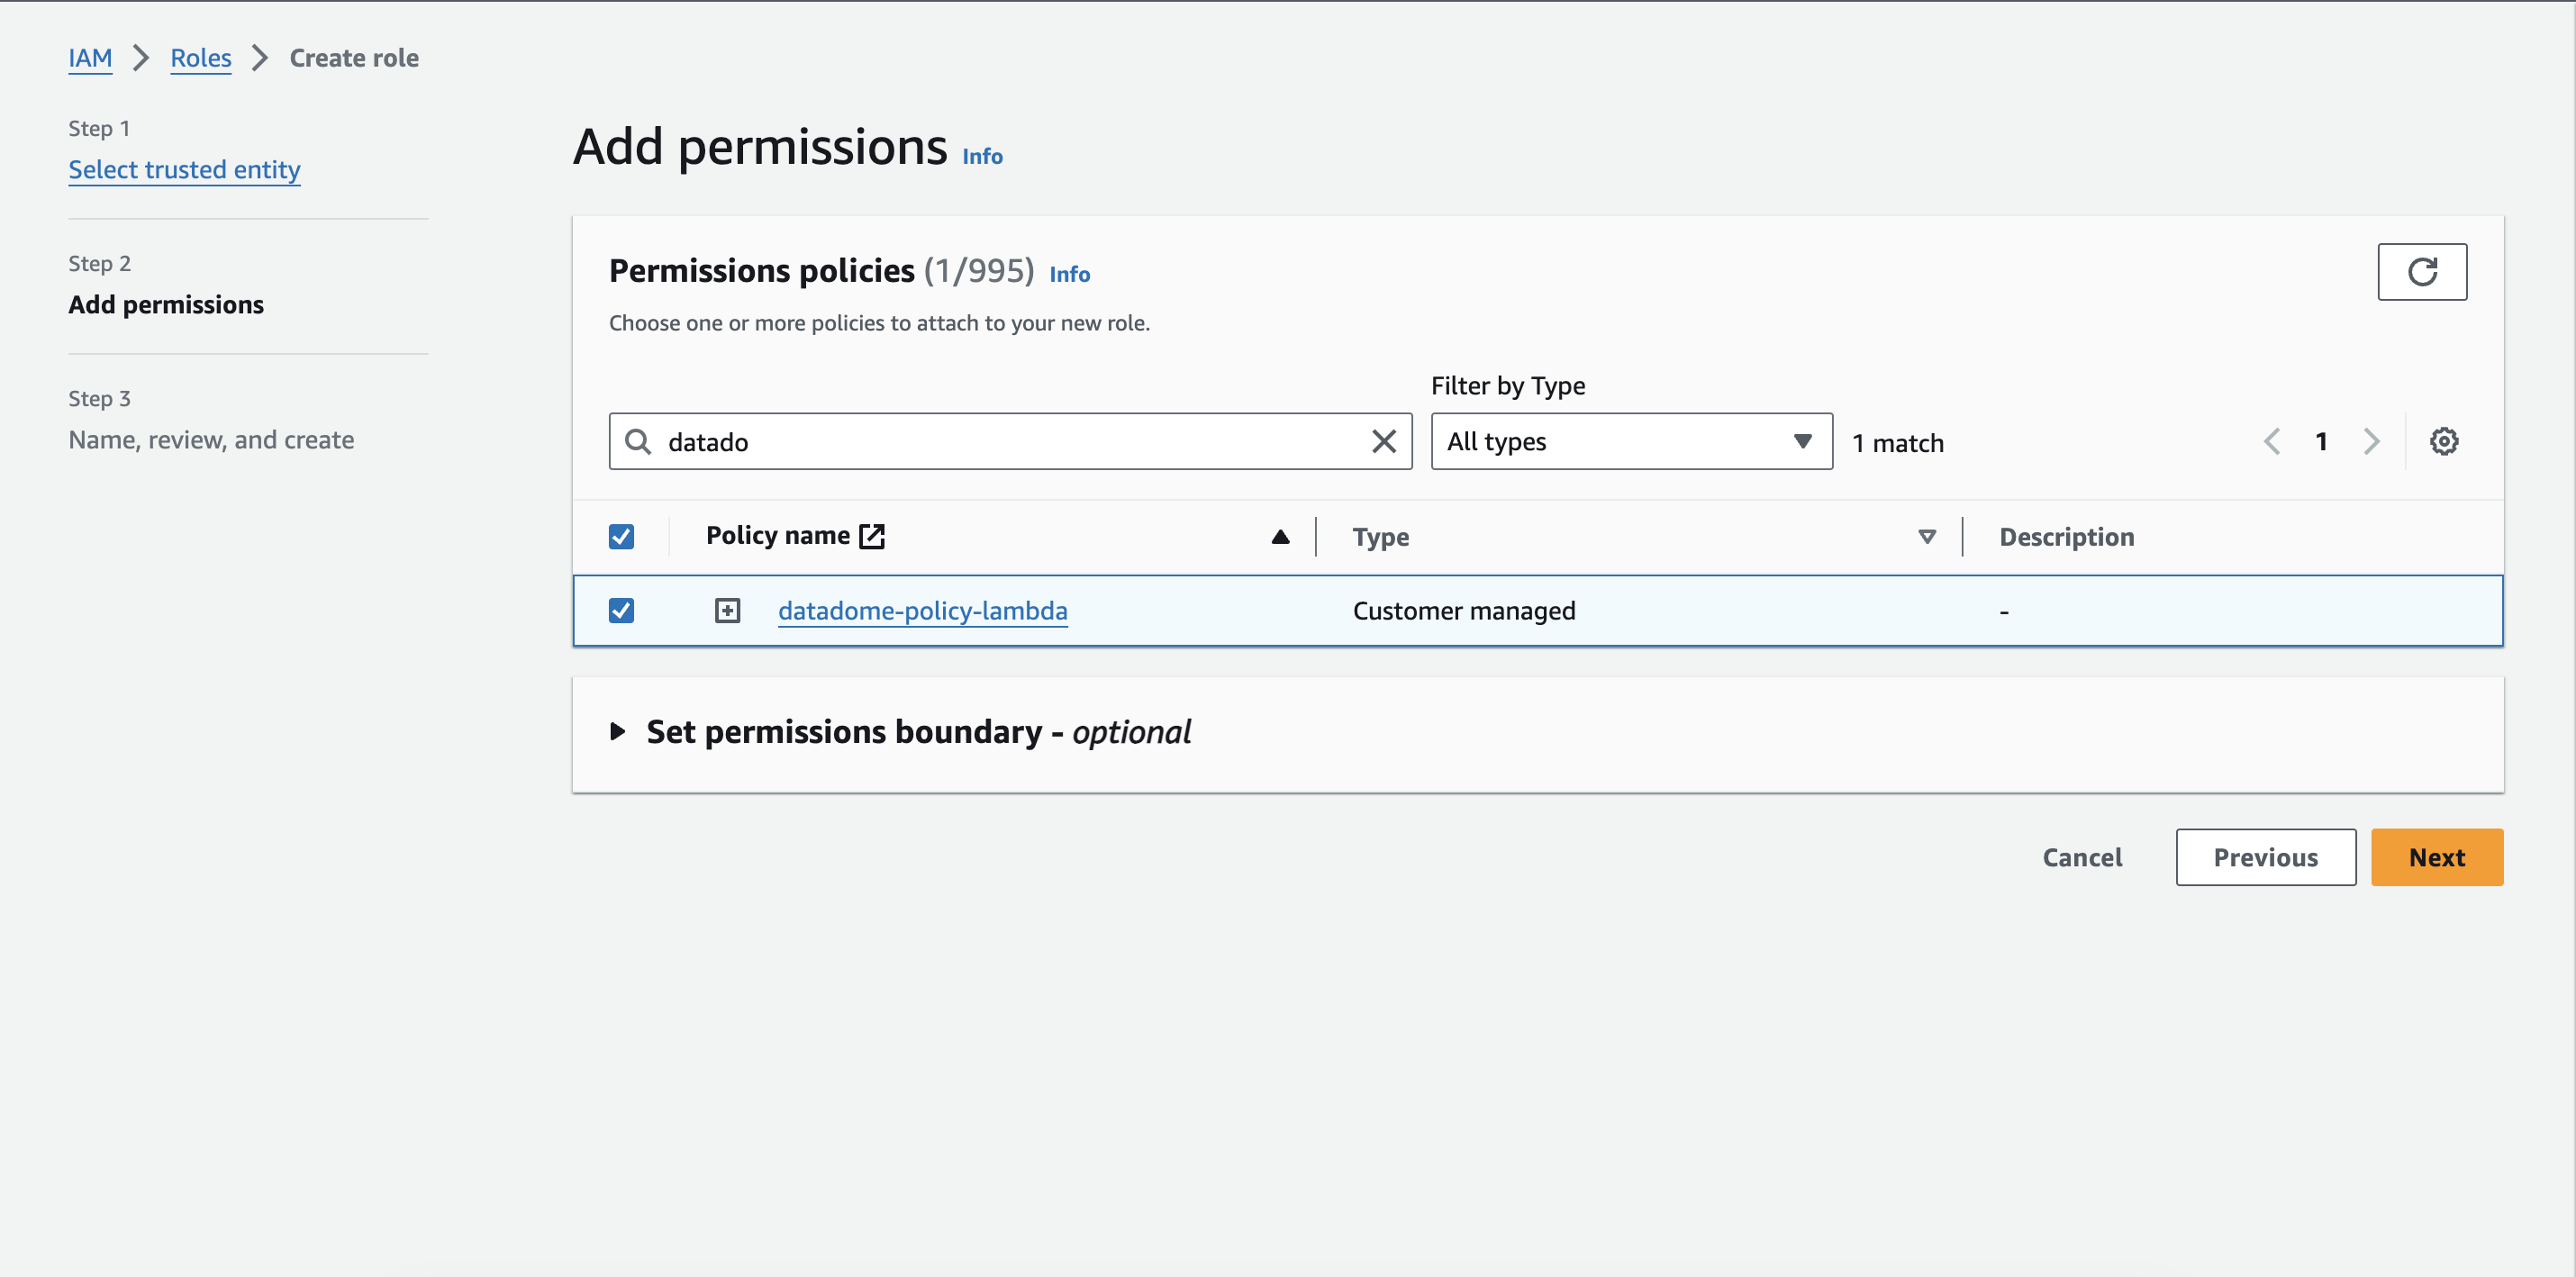
Attach the permission on the new role
- Enter a name for this role, and click on the Create role button.
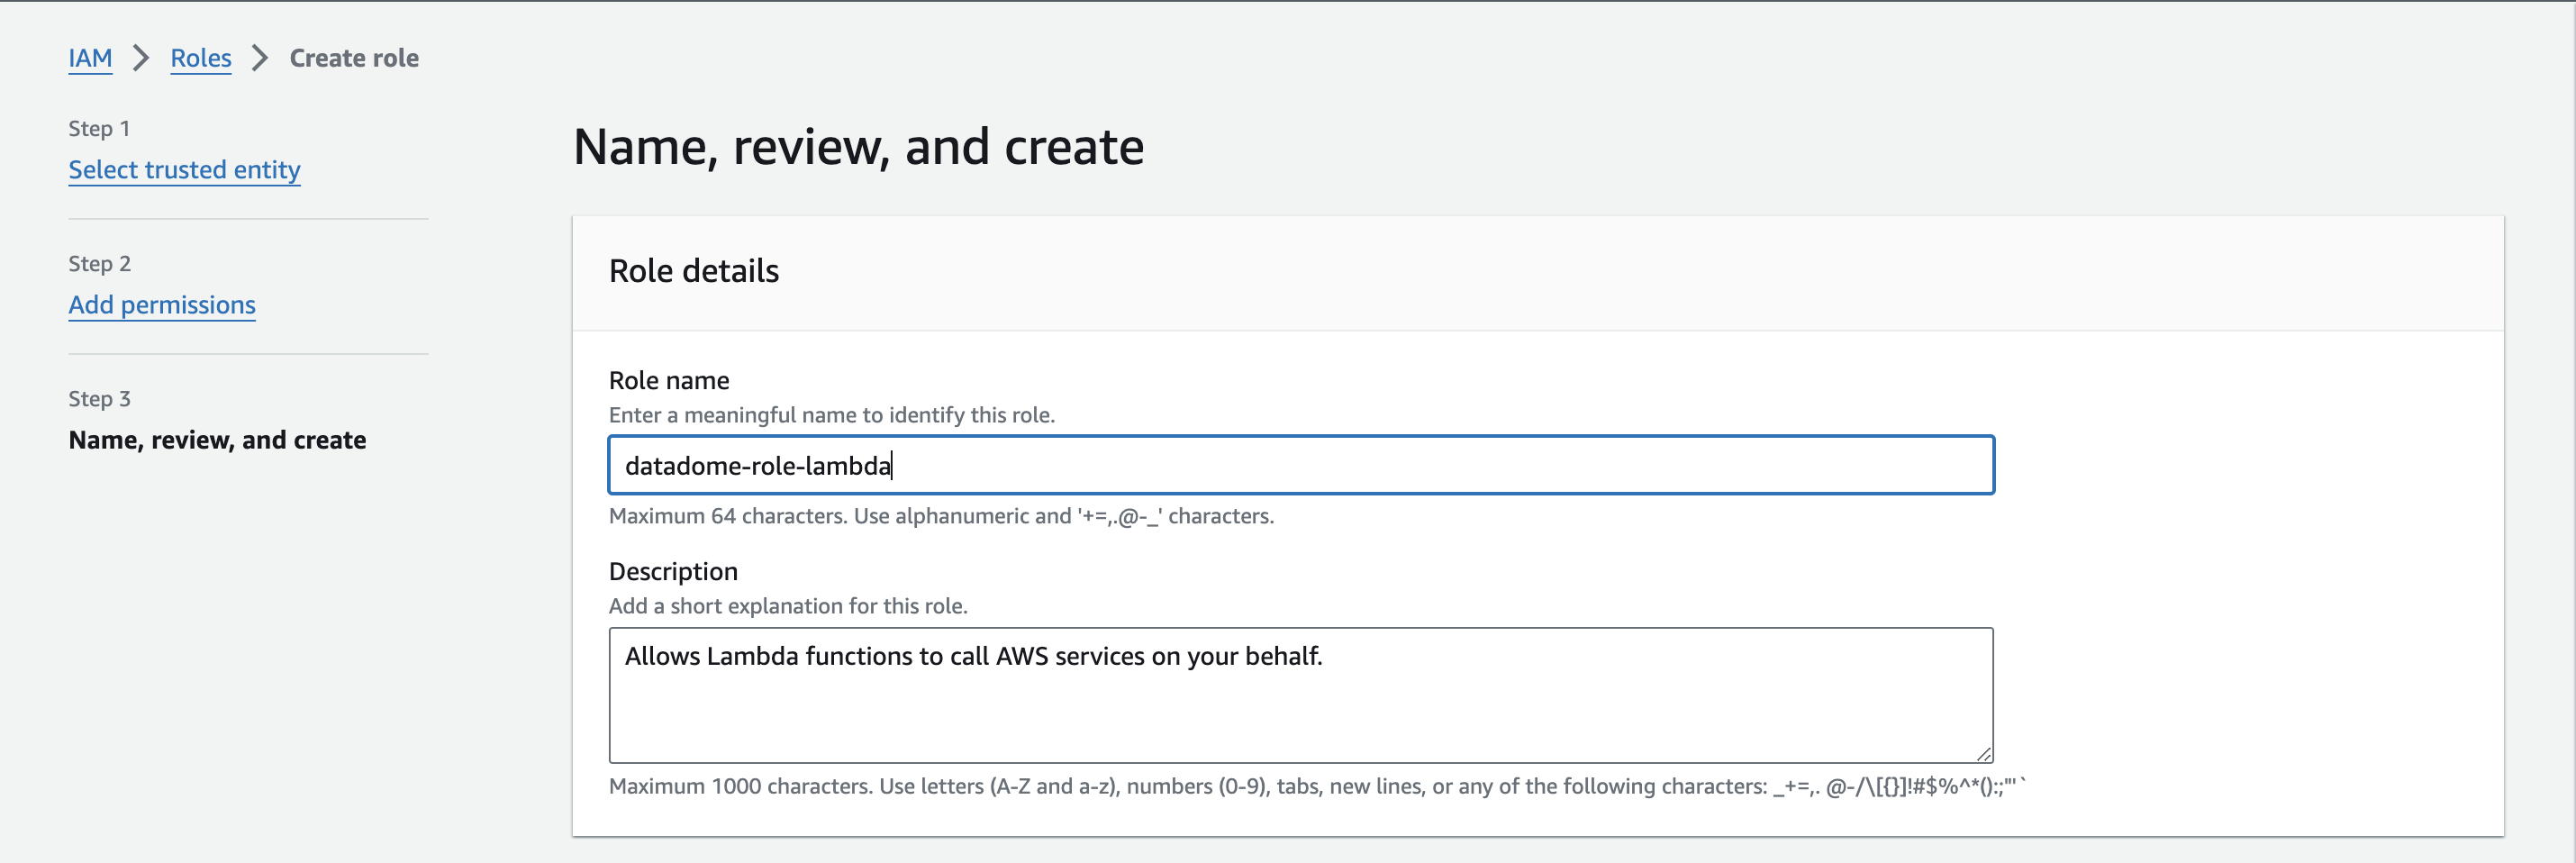
Form to create the role
- Click on the Trust relationships tab and Edit the trust relationship.

Trust relationships tab
- Paste the following trusted service principals to assume function execution role for your Lambda@Edge:
{
  "Version": "2012-10-17",
  "Statement": [
    {
      "Effect": "Allow",
      "Principal": {
        "Service": [
          "lambda.amazonaws.com",
          "edgelambda.amazonaws.com"
        ]
      },
      "Action": "sts:AssumeRole"
    }
  ]
}
Configuration of the CloudFront distribution
If you don’t already have one, refer to this AWS documentation to create a CloudFront distribution.
Create a custom error 403 response
This disables the caching of responses with 403 http code.
- Access your CloudFront distribution page in the Error pages tab, and click on Create custom error response button.
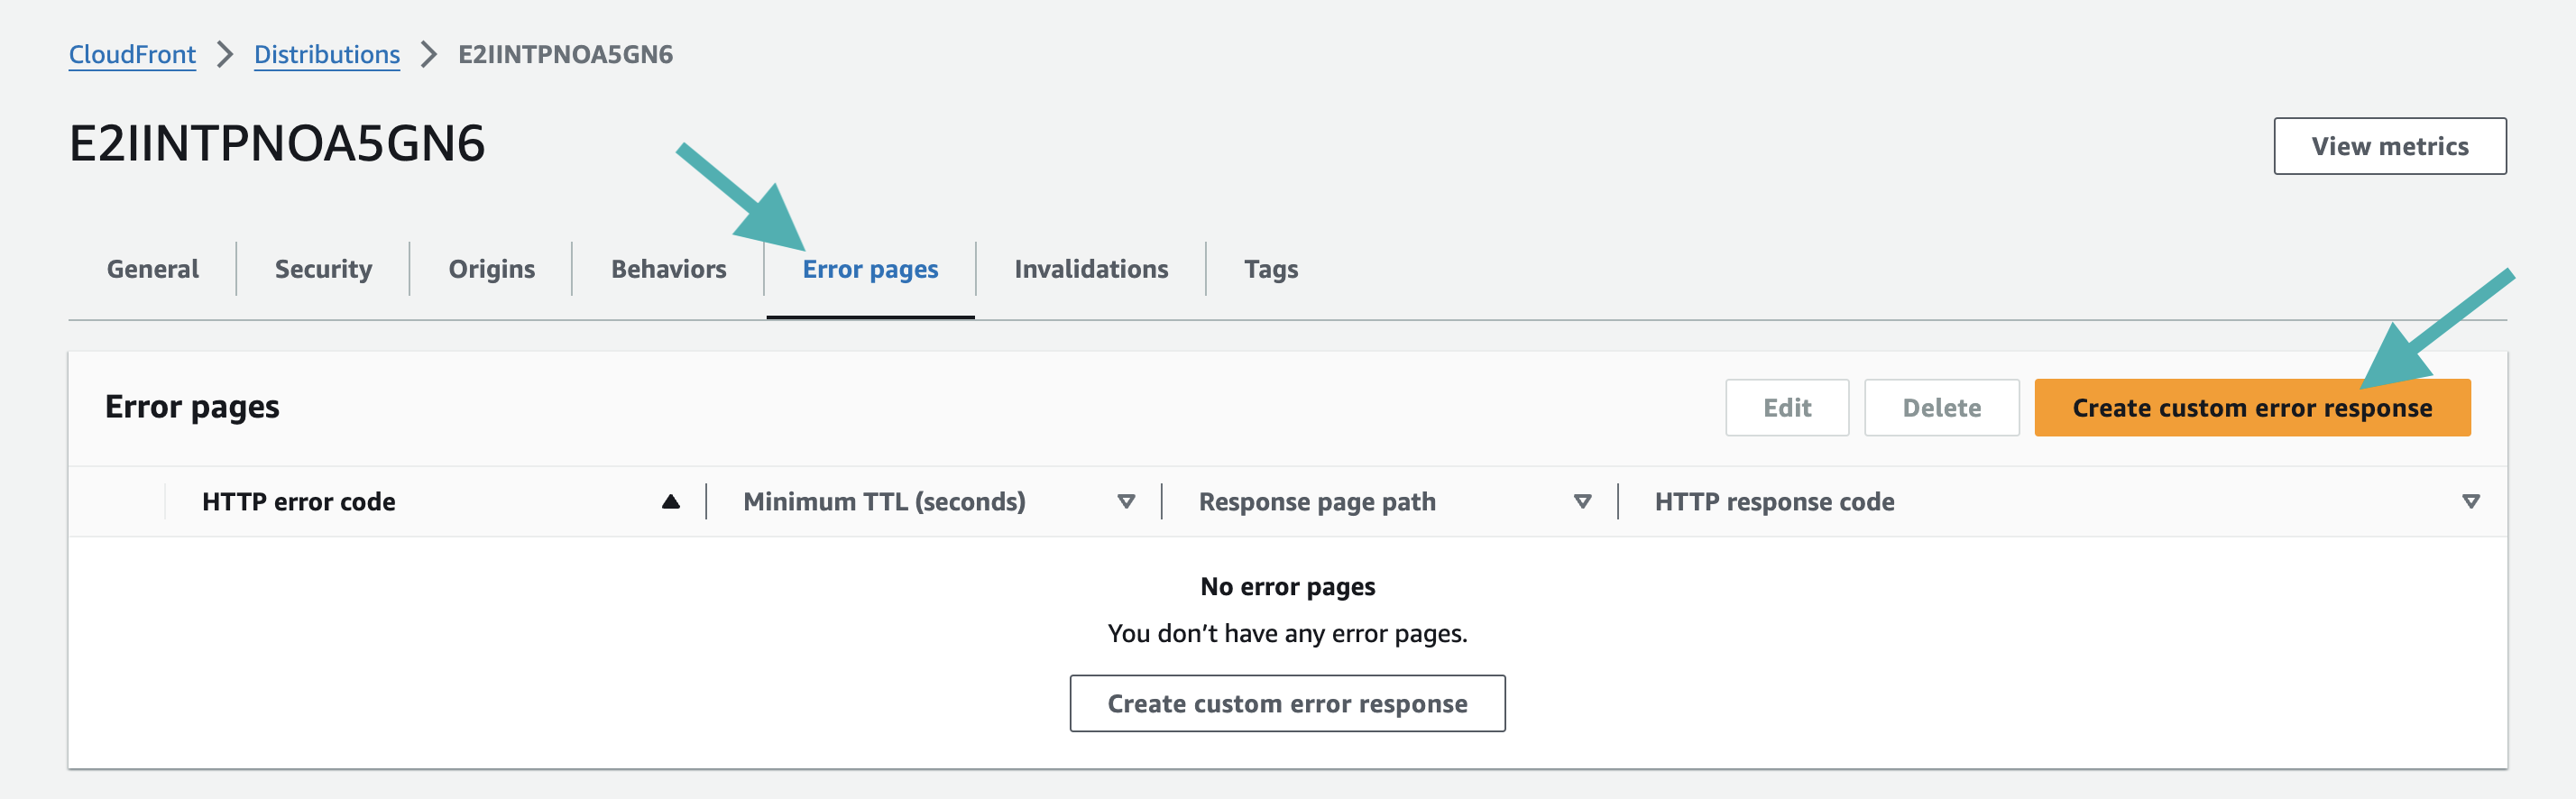
Create a new custom error response
- In the Create custom error response page, set the following properties:
- Select HTTP code 403.
- Set minimal TTL 0.
- Check no for Customize error response.
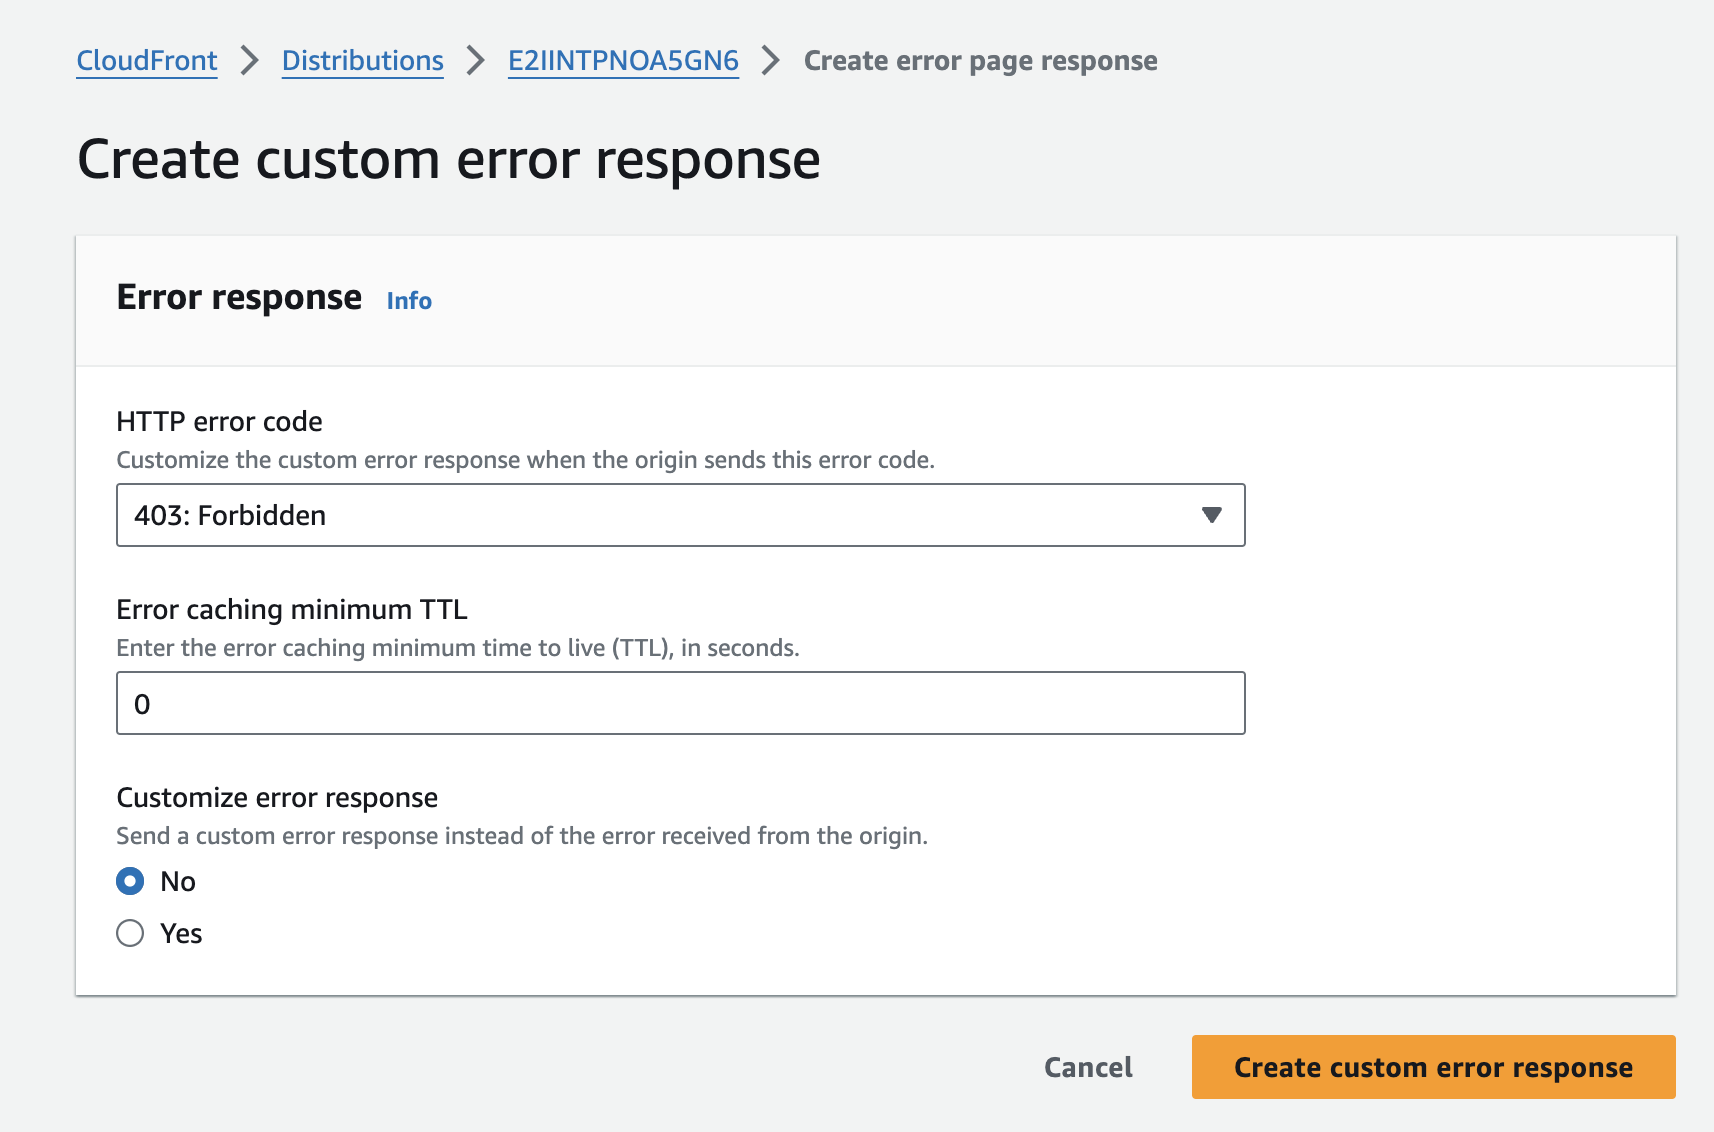
Form to create a new custom error response
- Click on the Create custom error response button.
Configure the distribution’s default behavior
This defines the default behavior of the CloudFront distribution.
- Access your CloudFront distribution page in the Behavior tab, and edit the default behavior

Edit the default behavior
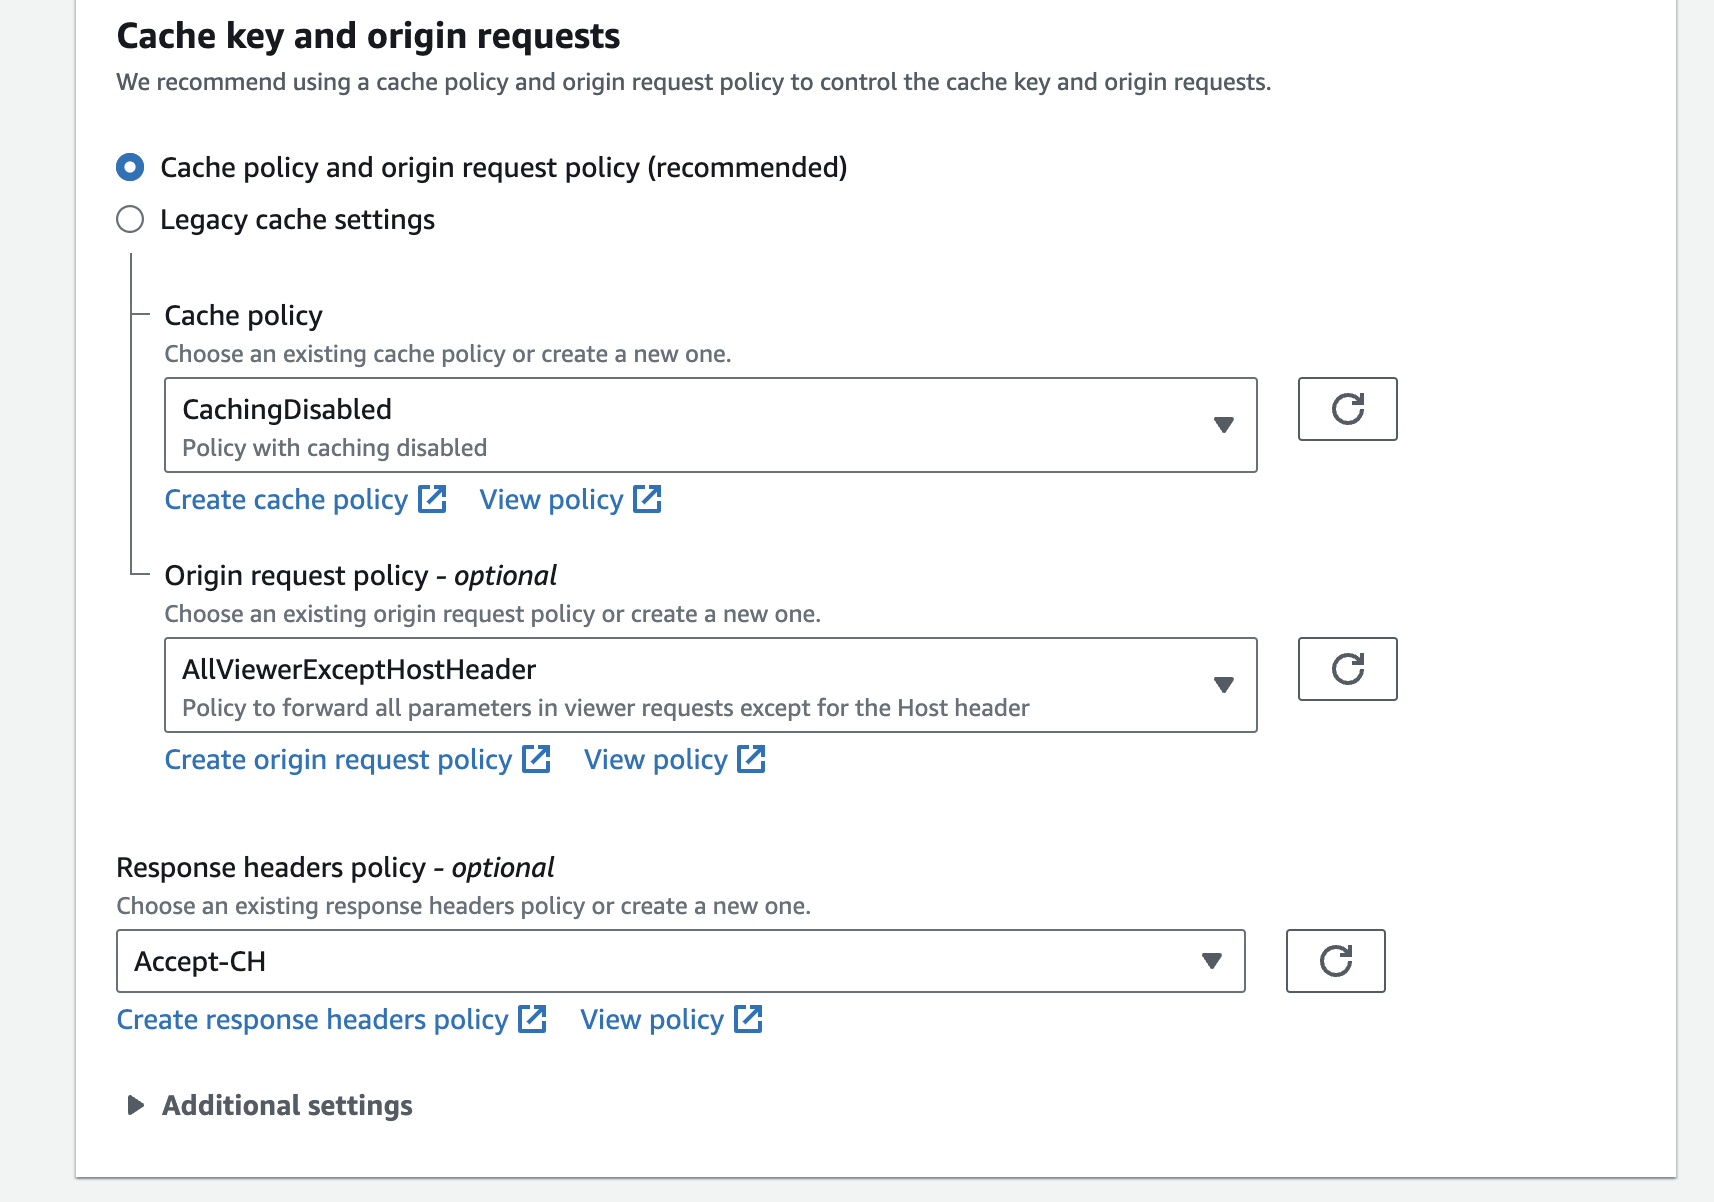
- In the Cache key and origin requests section, select Cache policy and origin request policy set the Origin request policy to
AllViewerExceptHostHeader. - Click on the Save changes button at the end of the page.
Configuration of the AWS Lambda@Edge function
In this section, you will create and configure the AWS Lambda@Edge function to intercept incoming requests and validate them with our service.
Can I re-use an existing Lamdba@Edge function?Yes, it is possible to call and configure the Lambda@Edge function through an existing one.
Refer to the advanced configuration section to use an existing Lambda@Edge function.
- Connect to your AWS console and go to the Lambda@Edge homepage.
- Create a new Lambda@Edge function
The function must be created on the us-east-1 region.AWS automatically selects the us-east-1 region when you access the Lambda@Edge portal.
Please don't change the region.
- Click on the Create function button, then select Author from scratch.

Create a new Lambda function
- In the Basic information section:
- Enter a name for your Lambda function, e.g.
DataDomeModule-{YOUR WEBSITE NAME}. - Select
Node.js 24.xorPython 3.12for the runtime. - Click on Create function button.
- Enter a name for your Lambda function, e.g.
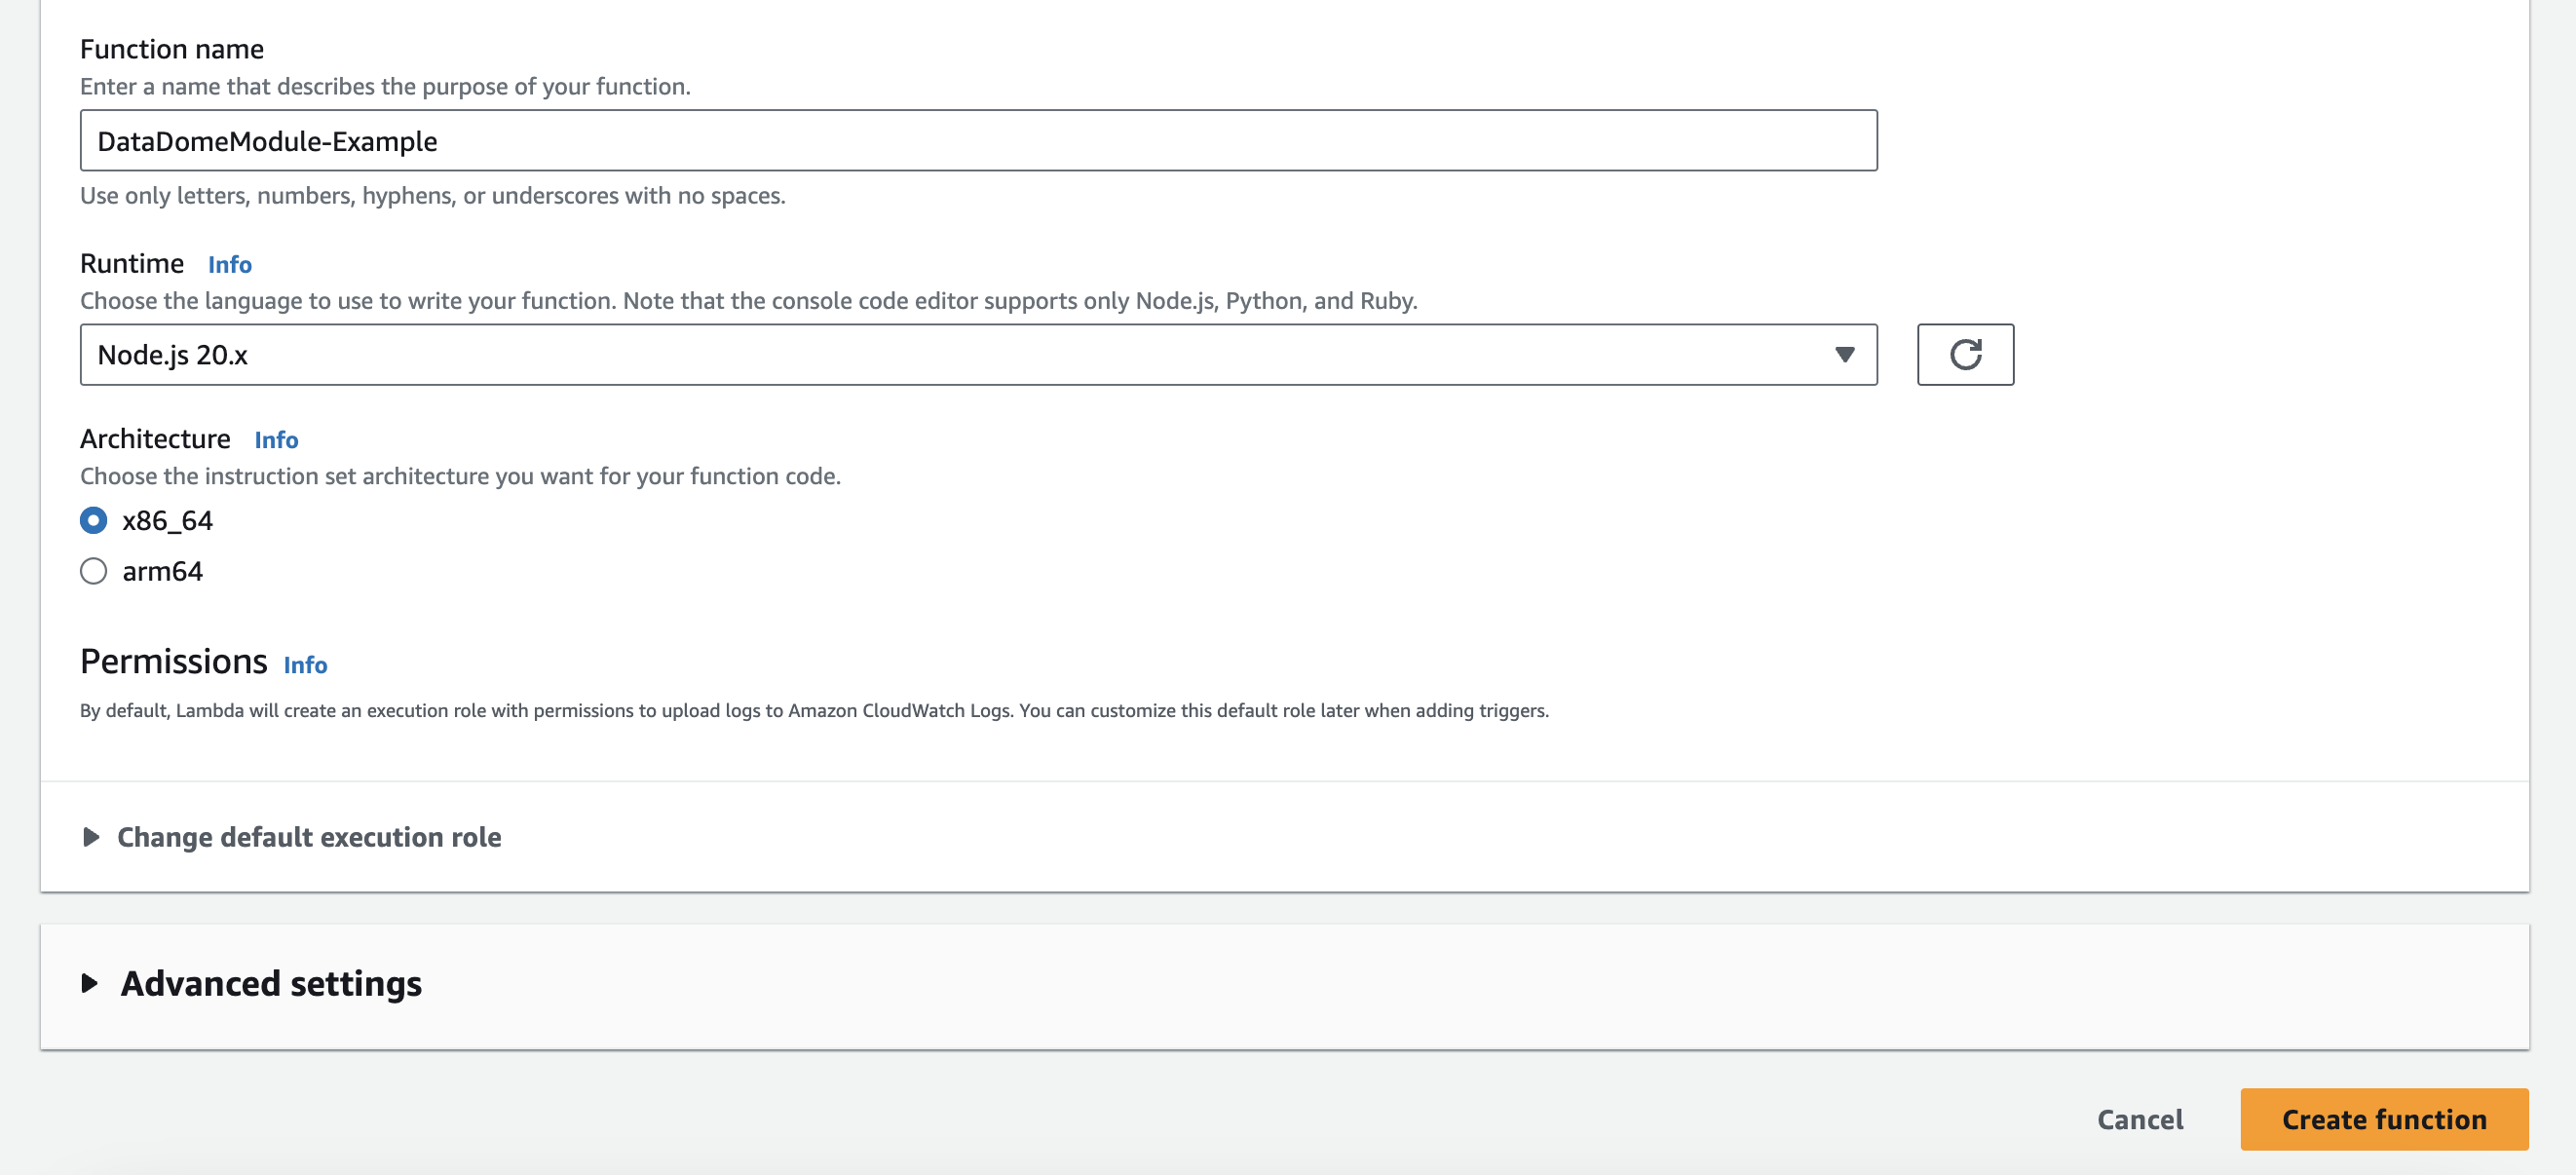
Set the basic information of the Lambda function
- In the Code source tab:
- Choose Upload a file from Amazon S3 and paste the following URL for the selected module.
https://s3.amazonaws.com/dd-lambda-edge/datadome-lambda-edge-v2-latest.ziphttps://s3.amazonaws.com/dd-lambda-edge/datadome-lambda-edge-latest.ziphttps://s3.amazonaws.com/dd-lambda-edge/datadome-lambda-edge-py-latest.zip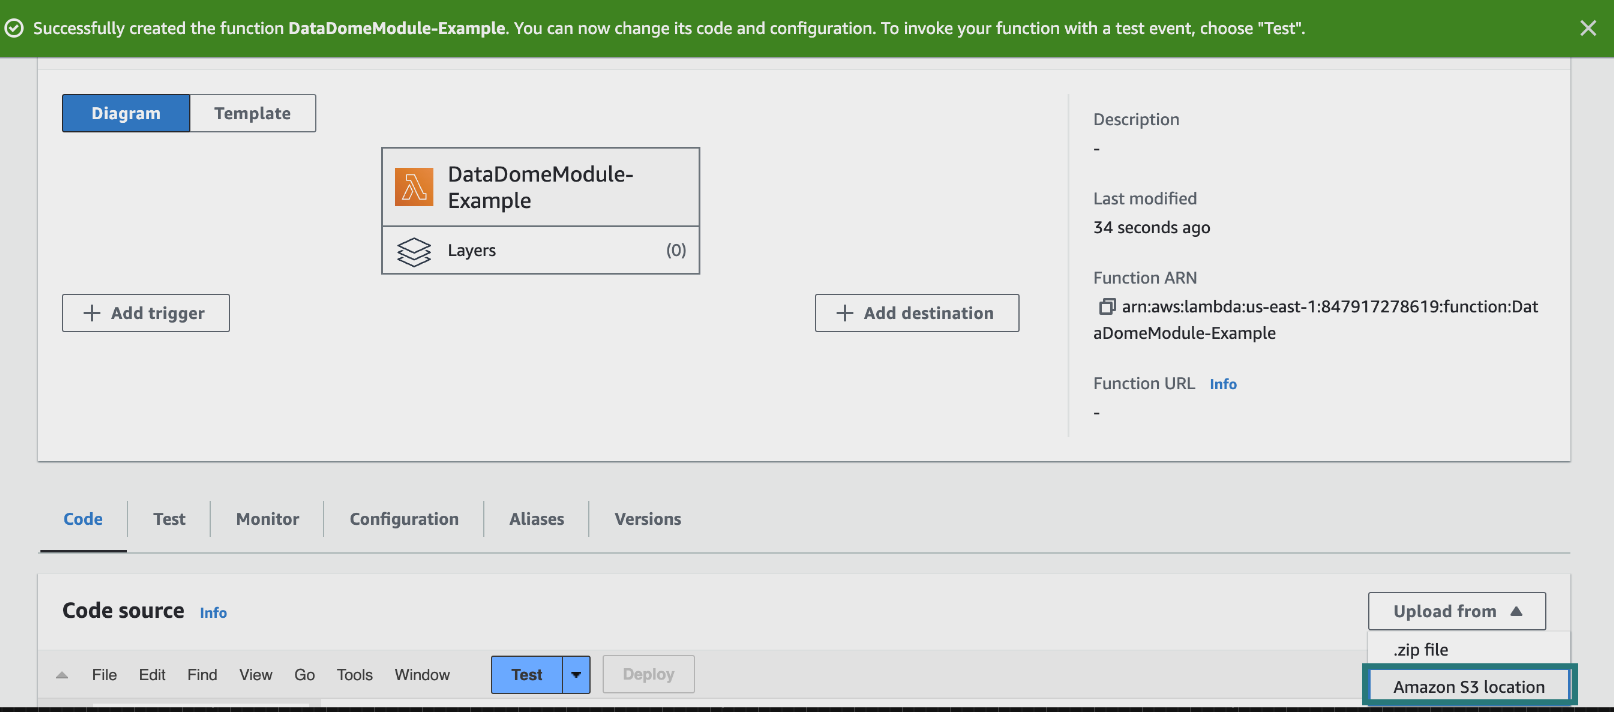
Upload a file from an Amazon S3 location
- Open the
datadome.mjs/datadome.jsfile (for the Node.js runtime) ordatadome.py(for the Python runtime) - Replace YOUR_DATADOME_LICENSE_KEY with your own DataDome server-side key, available in your DataDome dashboard.

Replace the DATADOME_LICENSE_KEY by your own DataDome server-side key
- Scroll down to the Runtime settings tab, click on Edit.

Update the runtime settings
- In the Runtime settings page:
- Enter
datadome.handler(for the Node.js runtime) ordatadome.lambda_handler(for the Python runtime) in the Handler field. - Click on Save button**.**
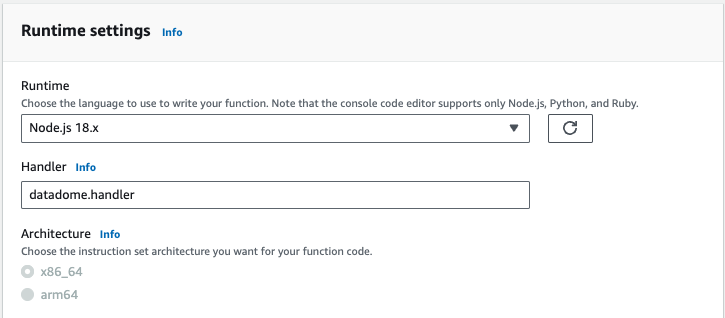
Set the runtime and the handler for the Lambda function
- In the Configuration tab and General configuration menu, click on Edit.
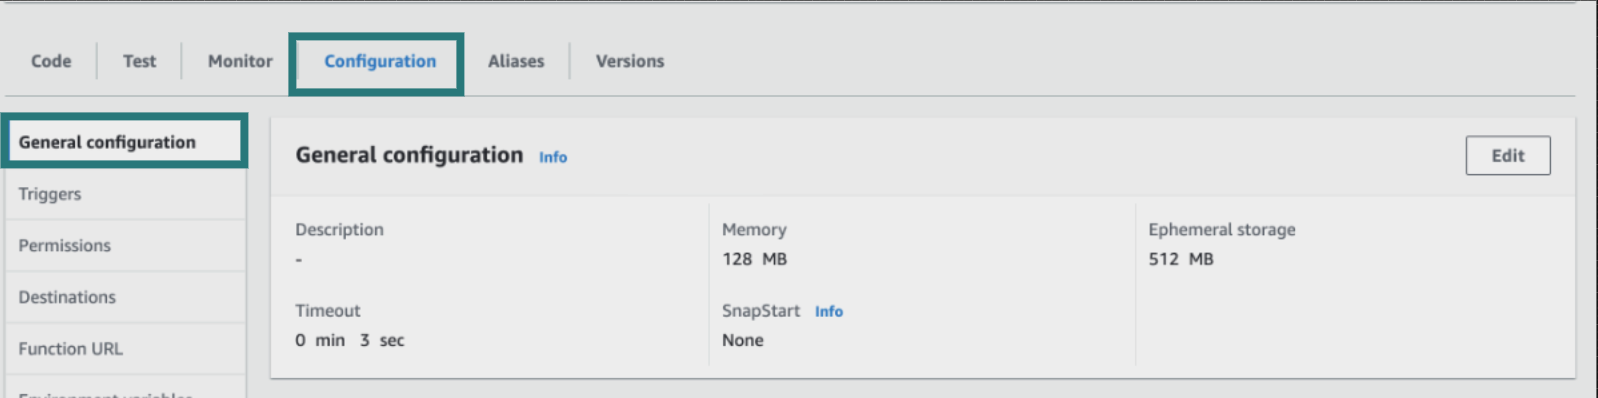
Update the general configuration of your Lambda function
- In the Edit basic settings page:
- Set Timeout to 0 min 1 sec.
- Select an existing role with the required permissions.
- Click on Save.
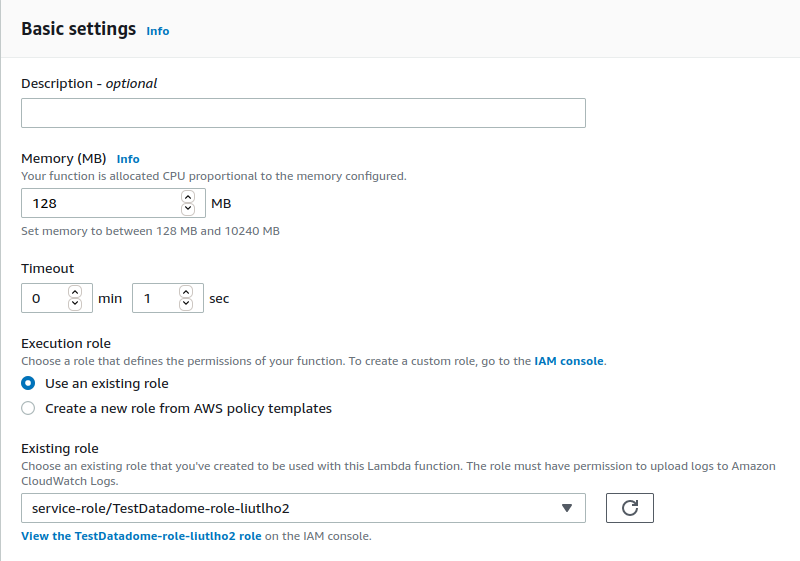
Update the basic settings of your lambda function
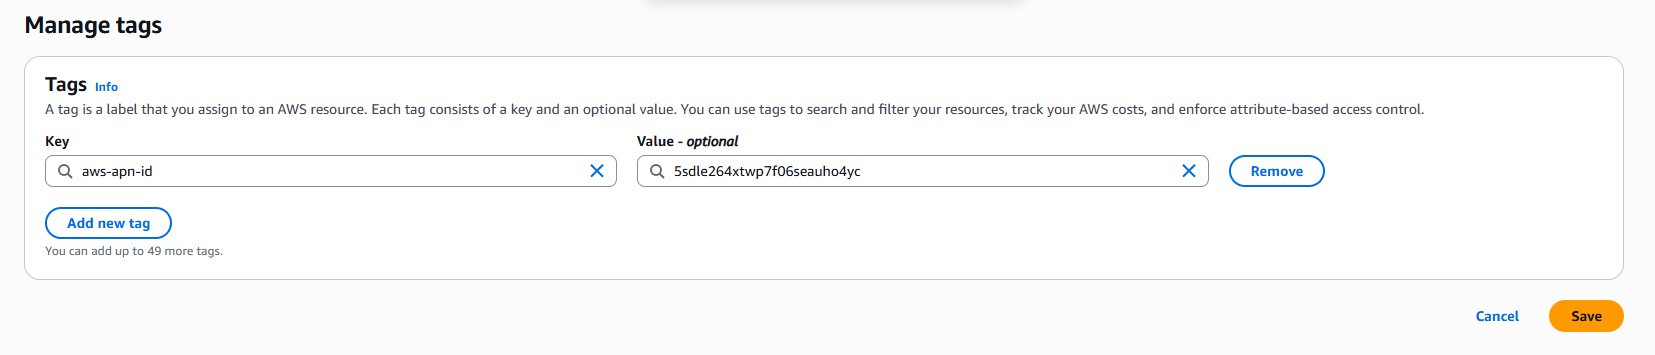
- In the Configuration tab and Tags menu, click on Manage Tags.
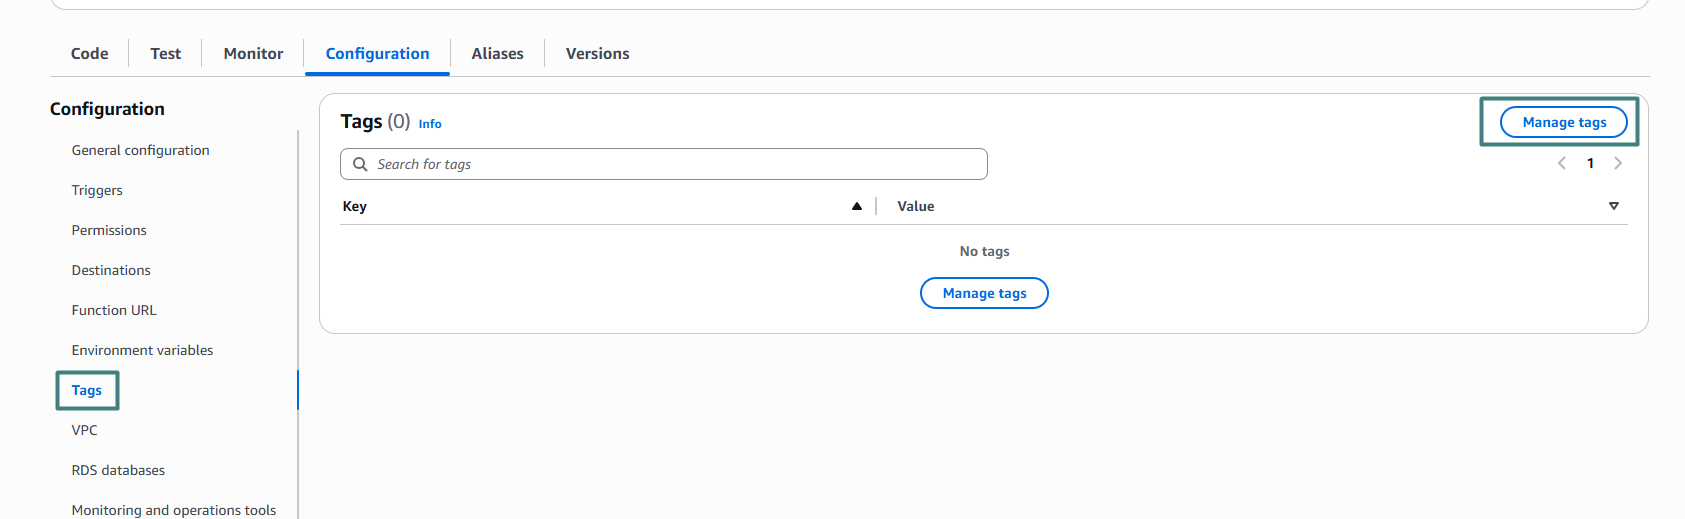
- Add a new tag and click on Save
- Key :
aws-apn-id - Value :
pc:5sdle264xtwp7f06seauho4yc
- Click on Actions and select Deploy to Lambda@Edge.
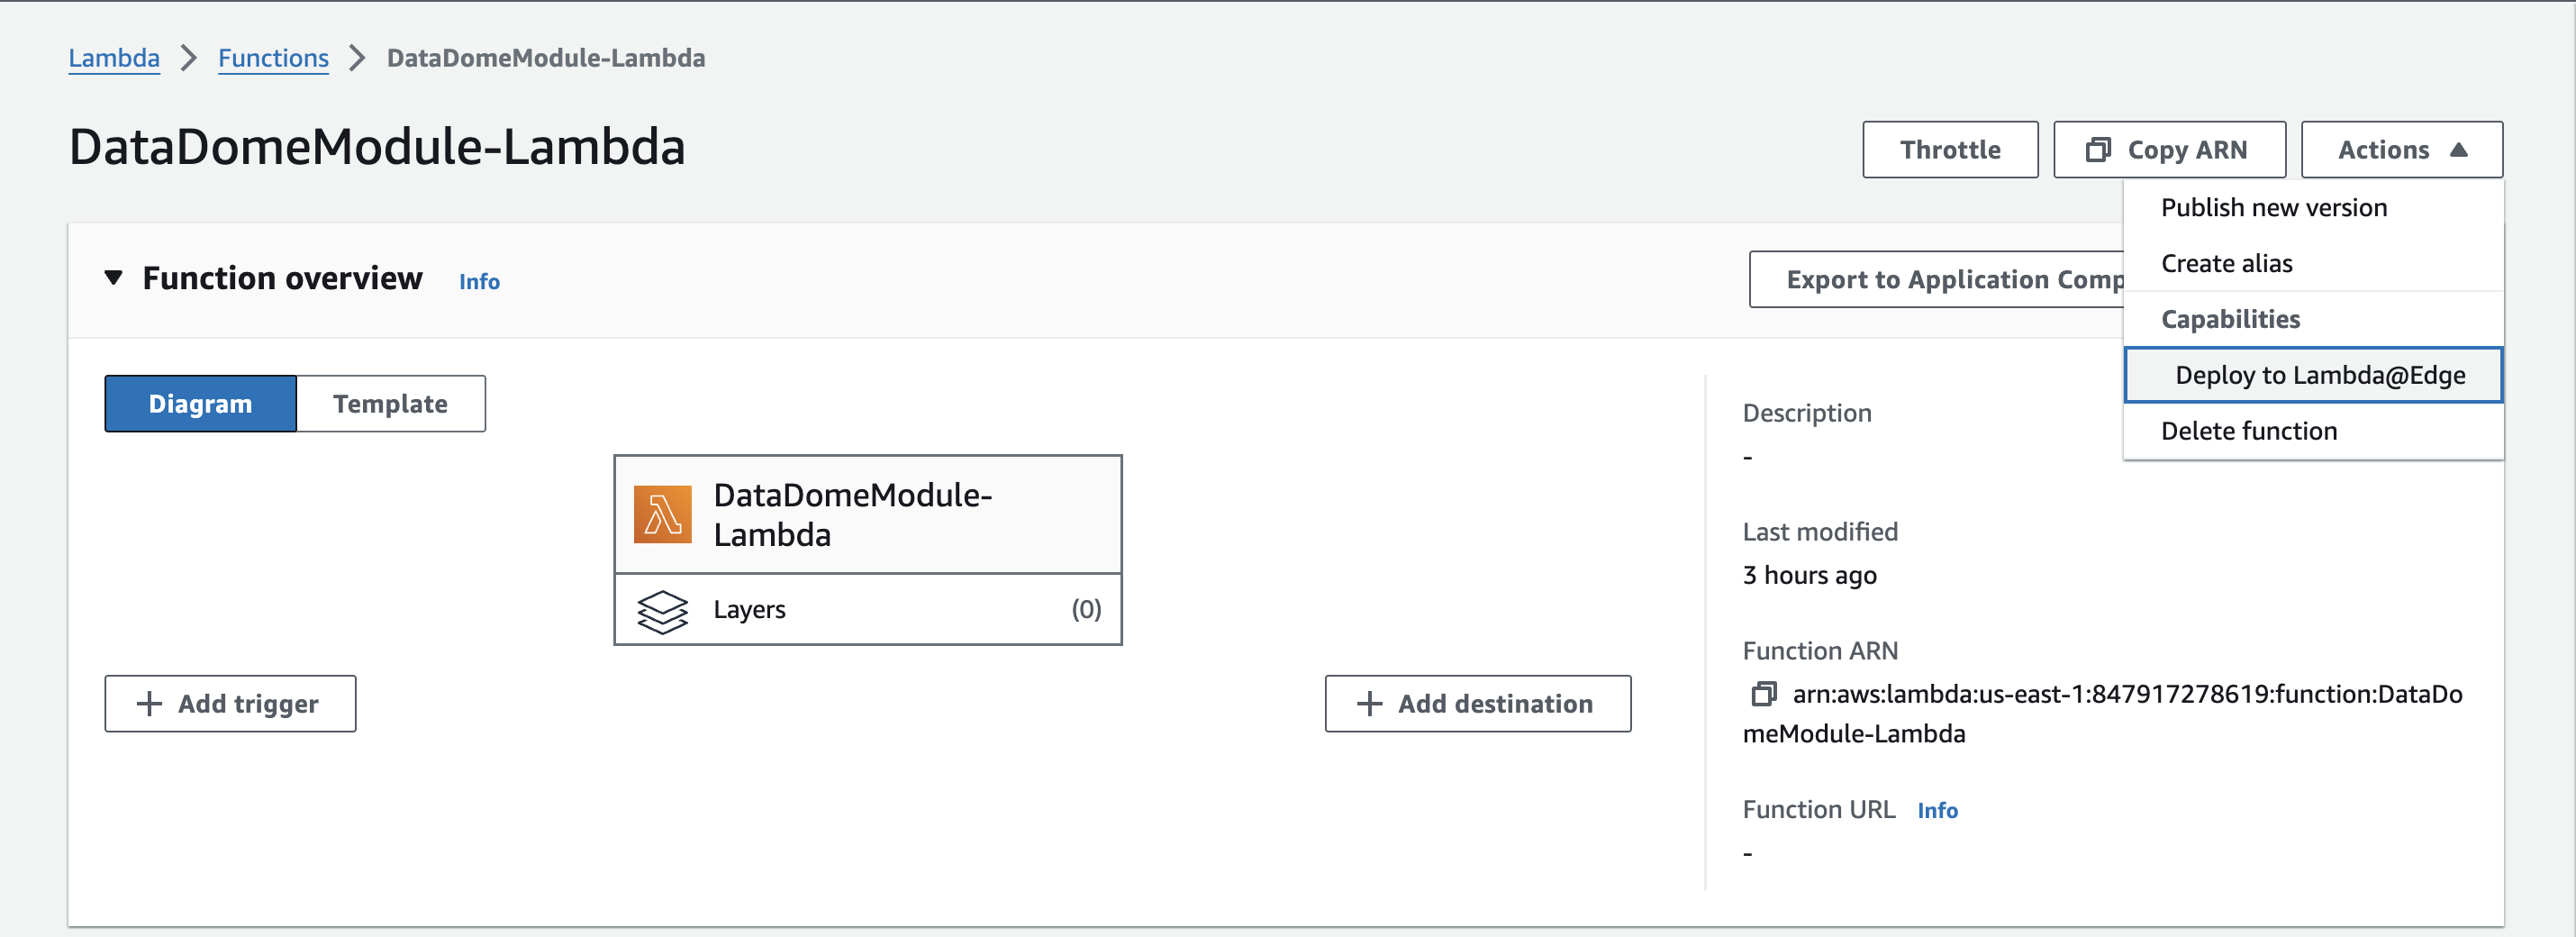
Deploy to Lambda@Edge
- In the Deploy to Lambda@Edge window, provide the following configuration:
- Select the CloudFront distribution that will send events to the Lambda function.
- Select the default Cache behavior (
*). - Select Viewer Request for CloudFront Event.
- Do not check the Include body box.
- Check the Confirm deploy to Lambda@Edge box.
- Click on Deploy button.
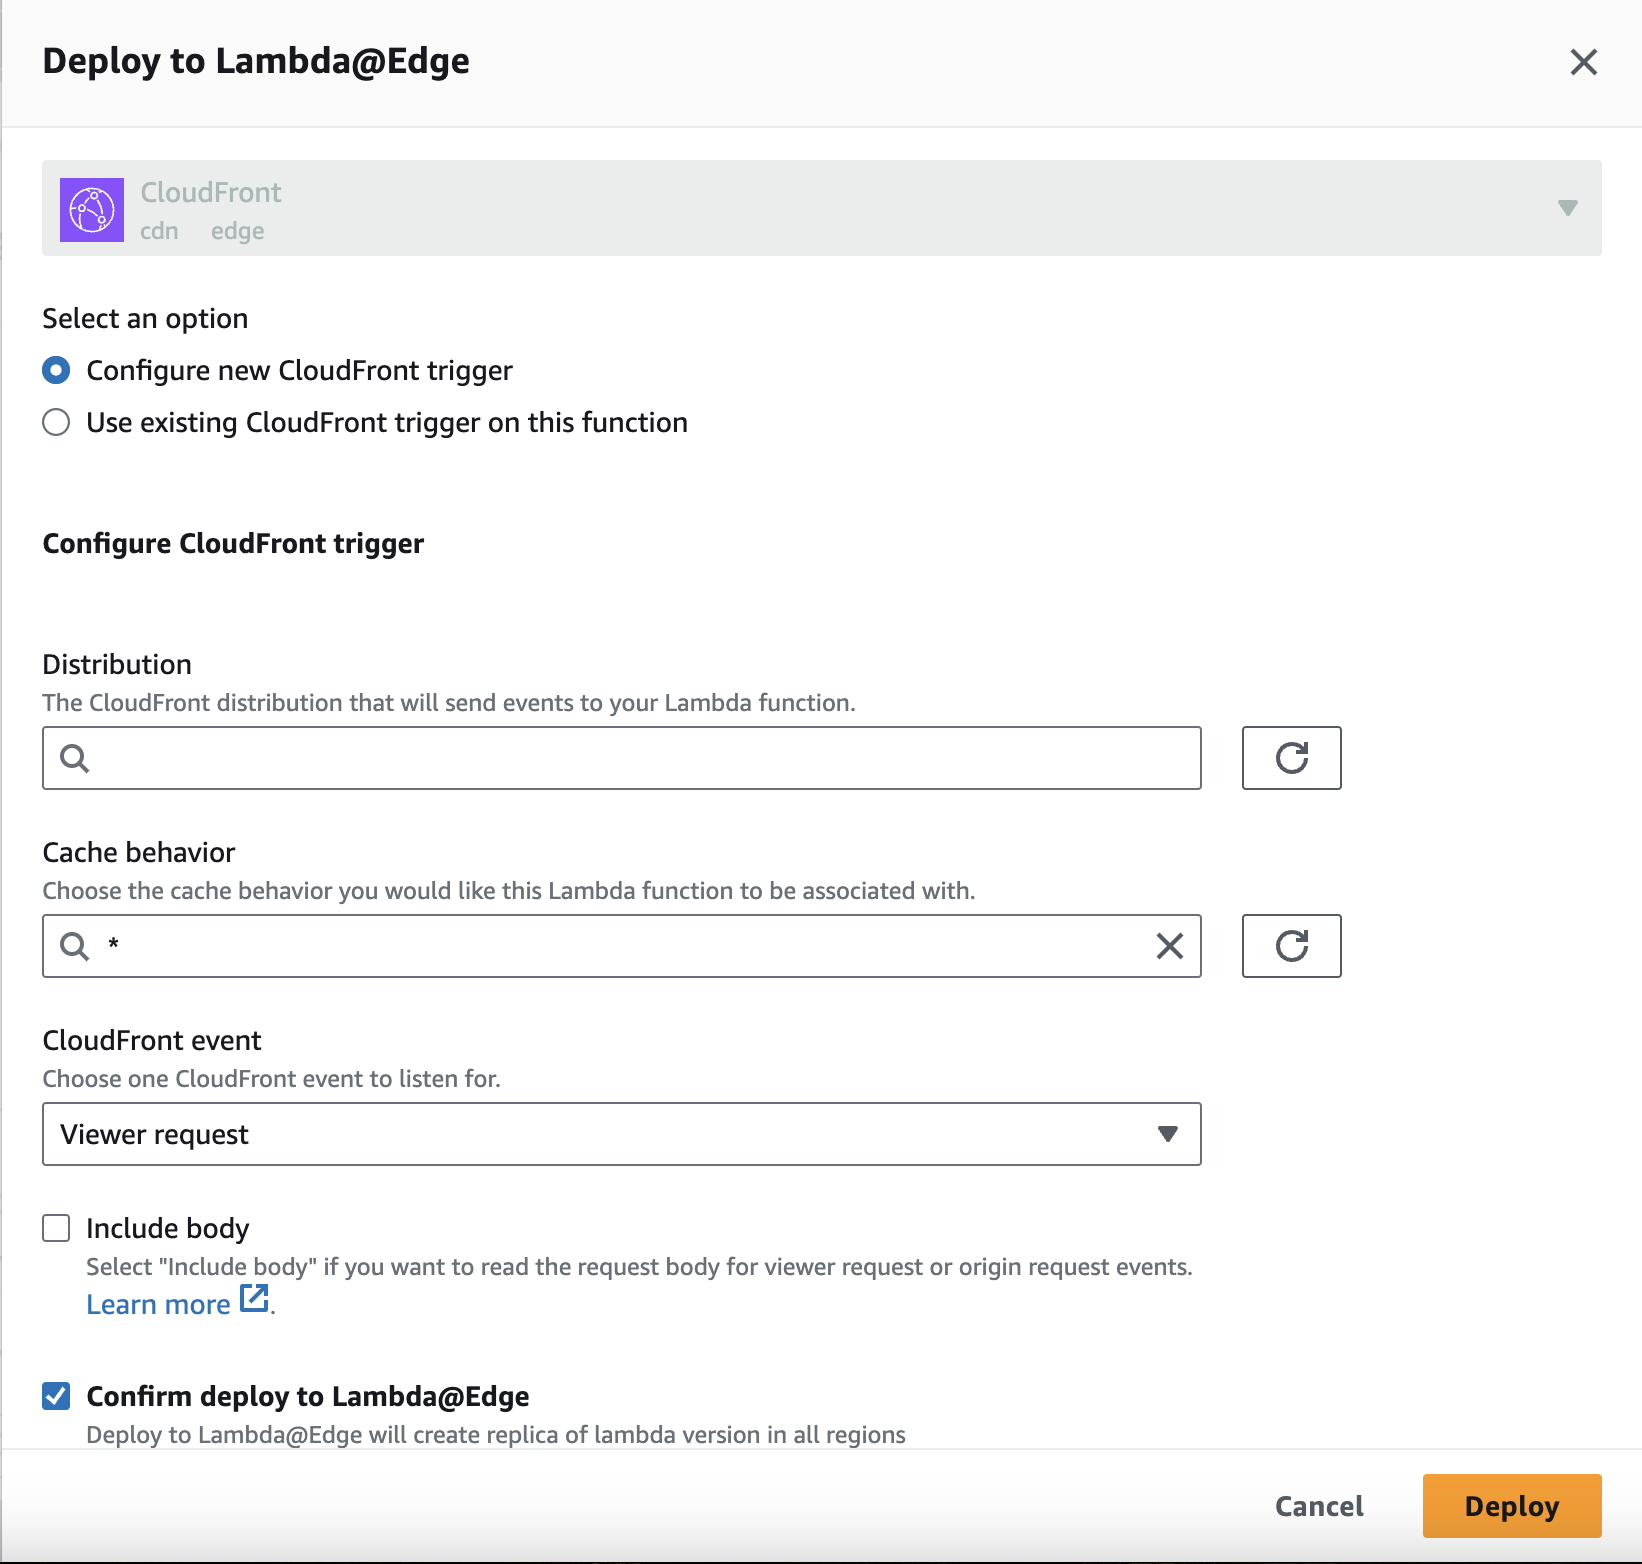
Configure the deployment of the Lambda@Edge
Can I associate the Lambda function to the CloudFront distribution onorigin request?No. Protection is not operational when the Lambda function is associated with
origin request.CloudFront will cache requests, even if the caching is completely disabled.
Most of the requests will be executed by the AWS caching mechanism, with modified headers (like
user-agent: Amazon CloudFront), and will not be intercepted by the DataDome module.If there is already another function associated with the
viewer requestevent, refer to the use of an existing lambda function to merge them.
Congrats! You can now see your traffic in your DataDome dashboard.
You can refer to the recommended configuration below to enhance the protection of your CloudFront distribution.
Include Client Hints in request headers
Client Hints must be collected by the DataDome module for optimal detection.
For these values to be defined by the browser, Accept-CH header must be sent by the origin. You can achieve this by using a response header policy .
- Access to the CloudFront distribution that you want to configure.
- In the Cache key and origin requests section, on the Response headers policy part click on the Create response headers policy to enable HTTP Client hints.
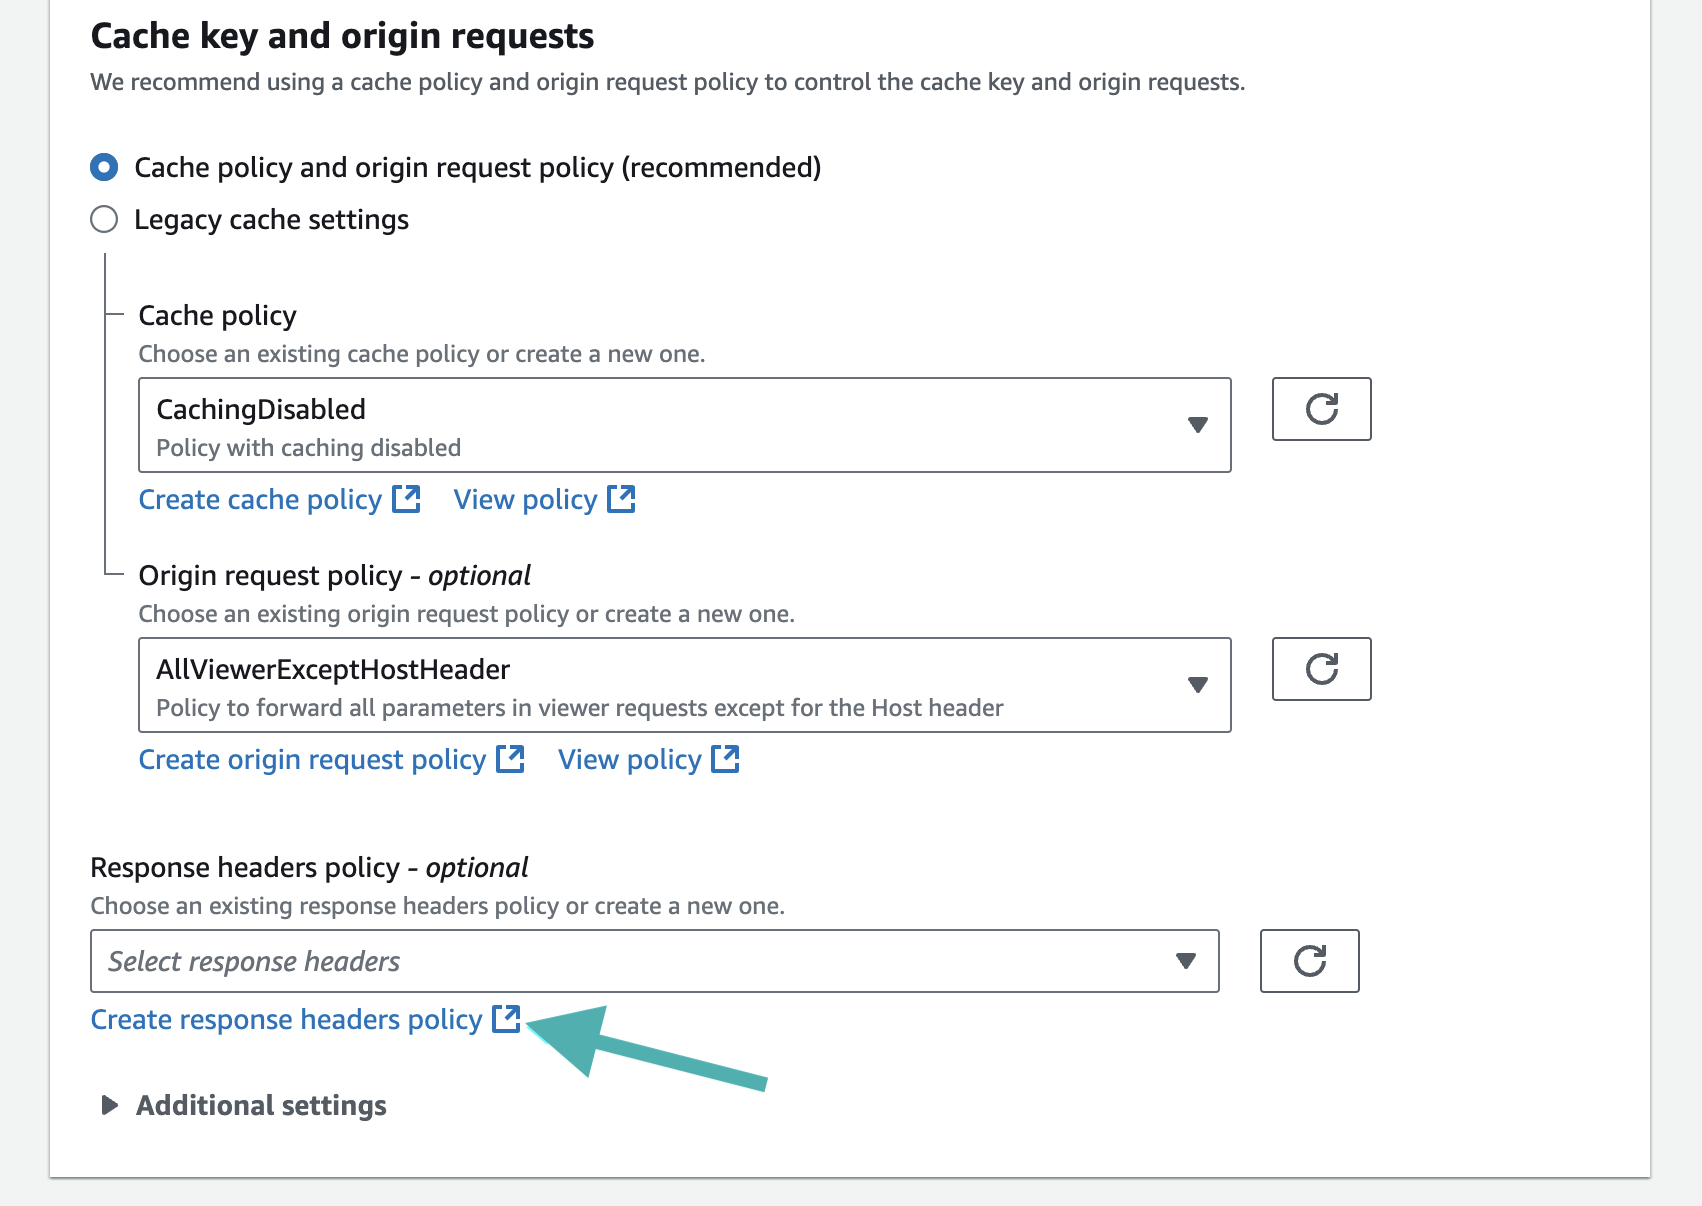
Create a new response headers policy
- In the Create response headers policy tab, set the following:
- On Details section, set the response headers policy’s name: Accept-CH.
- On Custom headers section, click on the Add header button.
- Set the following values for the new custom headers:
- Name: Accept-CH.
- Value:
Sec-CH-UA,Sec-CH-UA-Mobile,Sec-CH-UA-Platform,Sec-CH-UA-Arch,Sec-CH-UA-Full-Version-List,Sec-CH-UA-Model,Sec-CH-Device-Memory. - Check yes for the Origin override.
- Click on Create button at the end of the page.

- Back to the CloudFront distribution page, refresh the response headers policy’s list and select your Accept-CH custom header.
Attach the response headers policy
- Click on Save changes button at the end of the page.
Recommended configuration
Disable CloudFront Caching for "Set-Cookie" Headers
Do you need to do it ?
- NO: If you are protecting your website using only the CloudFront Lambda@Edge integration. You can skip this entire section.
- YES: If you have a "Hybrid" setup where you also have a DataDome module installed directly on your backend server (e.g., Nginx, Apache, IIS, or code-level) behind CloudFront.
The Problem
When DataDome is running on your backend server (the Origin), it generates a Set-Cookie header to identify individual visitors.
By default, if CloudFront is configured to cache dynamic content (like HTML pages), it will cache the response exactly as it receives it from the Origin, including the Set-Cookie header.
Consequence: CloudFront will cache the "User ID" cookie intended for the first visitor and serve that same cookie to every subsequent visitor.
Result: DataDome will see thousands of users sharing the exact same ID, causing false positives where legitimate users are flagged as bots.
The Solution
You must configure your backend server (Origin) to instruct CloudFront to cache the content but ignore the cookie.
On your webserver or application, add the following HTTP header to the response of any protected page:
Cache-Control: no-cache="Set-Cookie"What this header does
This specific directive tells CloudFront (and other intermediate caches):
- You may cache the page body/content.
- You must NOT cache the
Set-Cookieheader; you must fetch a fresh cookie from the Origin for every request.
You can find more information about this CloudFront behavior in AWS Documentation, in the Disable caching of Set-Cookie headers section.
Associate the Lambda@Edge with non-default distribution behaviors
By default, the Lambda@Edge is associated with the default behavior of the distribution you selected, meaning that the requests going through other behaviors, which are ranked higher, will not be protected.
- Access the CloudFront distribution console that you want to configure.
- Click on Behaviors.
- Select one of the behaviors you want to protect, and click on Edit.
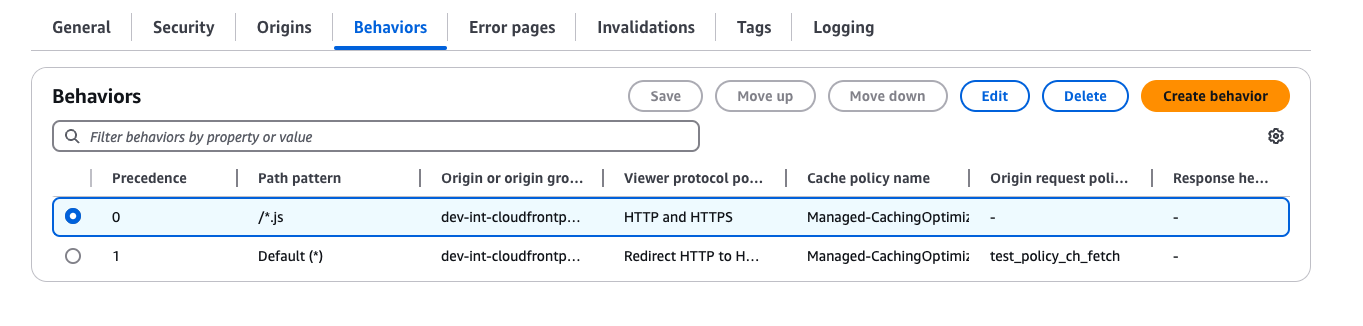
Edit behaviors
- Associate the Lambda@Edge function on the Viewer Request and copy the DataDome Lambda@Edge ARN, which includes the version number.
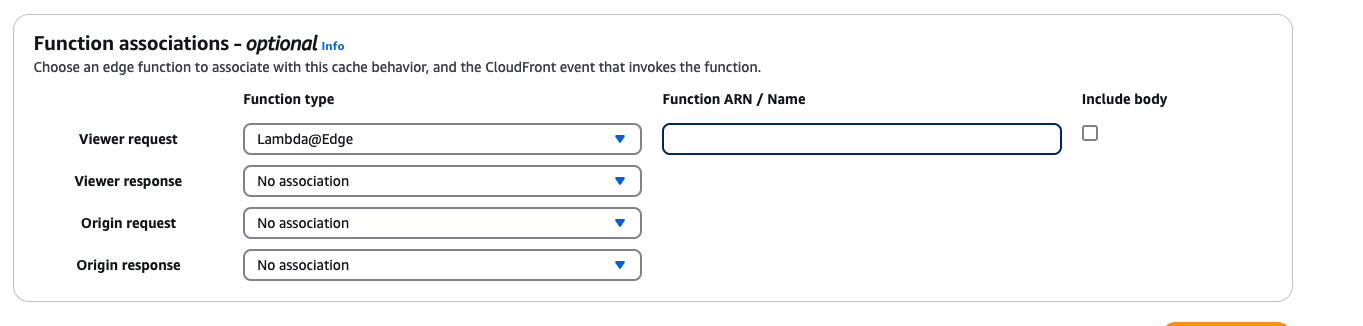
Associate Lambda@Edge
- Click on Save changes.
Advanced configuration
Settings
By default, the configuration is located in the first code block of the datadome.mjs/datadome.js (or datadome.py) file.
Refer to the list below for the possible configuration settings.
| Setting | Description | Required | Default |
|---|---|---|---|
DATADOME_LICENSE_KEY | Your DataDome server side key, found in your Dashboard. | Yes | |
DATADOME_TIMEOUT | The request timeout to DataDome API, in milliseconds. | Optional | 300 |
DATADOME_URI_REGEX | Regular expression to include URIs in the DataDome analysed traffic. | Optional | |
DATADOME_URI_REGEX_EXCLUSION | Regular expression to exclude URIs from the DataDome analysed traffic. | Optional | List of excluded static assets below |
DATADOME_LOG_BOT_INFO | Boolean to log the requests' bot information in CloudWatch. Refer to the Log enrichment header section. | Optional | false |
DATADOME_ENABLE_GRAPHQL_SUPPORT | Boolean to enable GraphQL support. Refer to Enable GraphQL support section. | Optional | false |
DATADOME_ENABLE_MCP_SUPPORT | Boolean to enable Model Context Protocol support. Refer to Enable MCP support section. | Optional | false |
DATADOME_USE_X_FORWARDED_HOST | Use the X-Forwarded-Host header instead of Host when the application is behind a reverse proxy/load balancer. | Optional | false |
DATADOME_CUSTOM_FIELD_STRING_1 | Static value or callback function to send a custom string. Refer to Add custom field section. | Optional | |
DATADOME_CUSTOM_FIELD_STRING_2 | Static value or callback function to send a custom string. Refer to Add custom field section. | Optional | |
DATADOME_CUSTOM_FIELD_STRING_3 | Static value or callback function to send a custom string. Refer to Add custom field section. | Optional | |
DATADOME_CUSTOM_FIELD_INTEGER_1 | Static value or callback function to send a custom integer. Refer to Add custom field section. | Optional | |
DATADOME_CUSTOM_FIELD_INTEGER_2 | Static value or callback function to send a custom integer. Refer to Add custom field section. | Optional | |
DATADOME_CUSTOM_FIELD_FLOAT_1 | Static value or callback function to send a custom float. Refer to Add custom field section. | Optional | |
DATADOME_USER_ID | Static value or callback function to send a custom float. Refer to Add custom field section. | Optional | |
DATADOME_PRODUCT_ID | Static value or callback function to send a custom float. Refer to Add custom field section. |
Can I dynamically configure the module?It is not possible to use environment variables in Lambda@Edge due to an AWS limitation - see Restrictions on edge functions.
However you can still follow the steps to configure the module from another function file and override a configuration depending on AWS Secrets Manager for instance.
Enable GraphQL support
Since version 1.19.0 of Lambda@Edge Node.js module, it is possible to enable GraphQL support:
- Change the value of
DATADOME_ENABLE_GRAPHQL_SUPPORTtotrueinside thedatadome.mjs/datadome.js:
const DATADOME_ENABLE_GRAPHQL_SUPPORT = true;- Configure the CloudFront distribution behavior:
- Allow
POSTmethods.
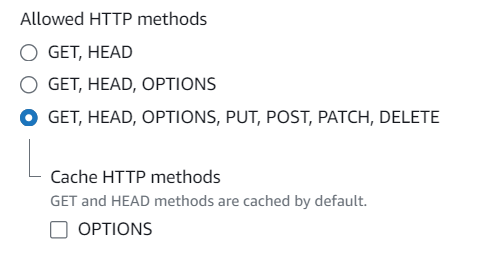
Allow POST methods on your CloudFront distribution
- Include the body of the request in your CloudFront distribution on the Lambda@Edge’s viewer request by checking the corresponding box in the Edit Behavior - Function association section.
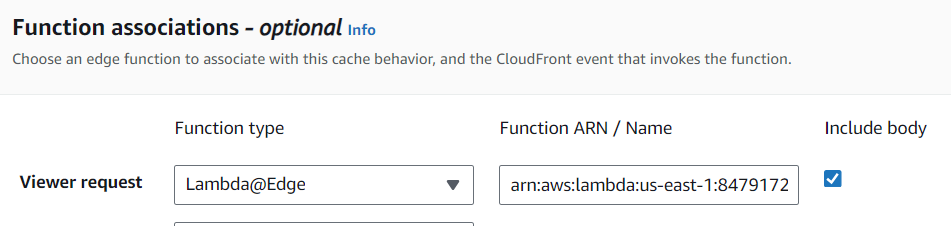
Include the body on the Lambda@Edge viewer request
- Click on Save changes button.
Protect only a part of a CloudFront Distribution
To protect only a part of a CloudFront Distribution, select one of the possibilities below:
- First option: set an exclusion based on file extension. Modify the value
DATADOME_URI_REGEX_EXCLUSIONinsidedatadome.mjs/datadome.js(ordatadome.py) to exclude hits to the Datadome API. In this case, the Lambda@Edge function is still executed (and billed) at the Amazon infrastructure level. - Second option: set an exclusion based on the path. Define a behavior in your CloudFront Distribution and attach the Lambda@Edge only to the needed paths. In this case, there is no Lambda execution at Amazon infrastructure nor at Datadome API.
Use an existing Lambda@Edge function (only supported with Node.js)
From version 1.18.0 of the Node.js Lambda@Edge module, calling and configuring the module can be done from another file.
The following example explains how to update a handler in the index.mjs/index.js file.
- Import the DataDome code as mentioned above.
- Import the DataDome module inside your
index.mjs/index.jsfile:
import { configure, handler as datadomeHandler } from './datadome.mjs';const datadome = require("./datadome.js");- Configure the DataDome module inside your
index.mjs/index.jsfile:
// Configure DataDome module
const configuration = {
  serverSideKey:        'serverSideKeyValue',
  timeout:              300,
  maxSockets:           100,
  debug:                false,
  urlPatternInclusion:  null,
  urlPatternExclusion:  /\.(avi|flv|mka|mkv|mov|mp4|mpeg|mpg|mp3|flac|ogg|ogm|opus|wav|webm|webp|bmp|gif|ico|jpeg|jpg|png|svg|svgz|swf|eot|otf|ttf|woff|woff2|css|less|js|map)$/i
};
configure(configuration);
// Configure DataDome module
const configuration = {
serverSideKey: 'serverSideKeyValue',
timeout: 300,
maxSockets: 100,
debug: false,
urlPatternInclusion: null,
urlPatternExclusion: /\.(avi|flv|mka|mkv|mov|mp4|mpeg|mpg|mp3|flac|ogg|ogm|opus|wav|webm|webp|bmp|gif|ico|jpeg|jpg|png|svg|svgz|swf|eot|otf|ttf|woff|woff2|css|less|js|map)$/i
};
datadome.configure(configuration);
Update the configuration values (onlyserverSideKeyis mandatory)Other keys are shown with their default values.
- Update your handler from the
index.mjs/index.jsfile to execute the DataDome protection:
export const handler = async (event, context) => {
  // Call DataDome handler
  const ddResponse = await datadomeHandler(event, context);
  // [...]
  return ddResponse;
}
exports.handler = (event, context, callback) => {
// Call DataDome handler
datadome.handler(event, context, callback);
// [...]
}- Ensure that the handler configured for this Lambda@Edge is
index.handlerin the Runtime settings section.
Add custom fields
Requires version 1.24.0 of the Node.js flavor.
Custom fields featureDataDome let you enrich in real time our detection engine by sending us some custom fields with your business data. These fields can be used for specific detection models.
👋 Please reach out to our support team for reviewing the data received.
Sample a callback function to set custom fields dynamically
The callback is a function receiving a single parameter, the AWS Http request - defined here: https://docs.aws.amazon.com/AWSJavaScriptSDK/latest/AWS/HttpRequest.html
// Sample code for custom fields
// Editing directly the datadome.mjs file
var DATADOME_CUSTOM_FIELD_STRING_1 = function (request) {
    if (request.headers['x-user-tier'] && request.headers['x-user-tier'][0] && request.headers['x-user-tier'][0].value) {
        return request.headers['x-user-tier'][0].value;
    } else {
        return 'standard';
    }
};

// Sample code for User ID
// Replace the header name with whatever carries your user identifier
var DATADOME_USER_ID = function (request) {
    if (request.headers['x-user-id'] && request.headers['x-user-id'][0] && request.headers['x-user-id'][0].value) {
        return request.headers['x-user-id'][0].value;
    }
    return null; // return null when no user context is available
};
// Using a index.mjs to configure the module
// when used with an existing lambda function (code is merged)
// see #use-an-existing-lambdaedge-function-only-supported-with-nodejs
import { configure, handler as datadomeHandler } from './datadome.mjs';
configure({
customFieldString1: (request) => {
if(request.headers['x-user-tier'] && request.headers['x-user-tier'].[0] && request.headers['x-user-tier'][0].value)
return request.headers['x-user-tier'][0].value;
} else {
return 'standard';
},
customFieldInteger1: 42
});// Using a index.js to configure the module
// when used with an existing lambda function (code is merged)
// see #use-an-existing-lambdaedge-function-only-supported-with-nodejs
datadome.configure({
customFieldString1: (request) => {
if(request.headers['x-user-tier'] && request.headers['x-user-tier'].[0] && request.headers['x-user-tier'][0].value)
return request.headers['x-user-tier'][0].value;
} else {
return 'standard';
},
customFieldInteger1: 42
});Enable MCP support
Since version 1.25.0 of Lambda@Edge Node.js module, it is possible to enable Model Context Protocol (MCP) support:
- Change the value of
DATADOME_ENABLE_MCP_SUPPORTtotrueinside thedatadome.mjs/datadome.js:
const DATADOME_ENABLE_MCP_SUPPORT = true;- Configure the CloudFront distribution behavior:
- Allow
POSTmethods.
Allow POST methods on your CloudFront distribution
- Include the body of the request in your CloudFront distribution on the Lambda@Edge’s viewer request by checking the corresponding box in the Edit Behavior - Function association section.
Include the body on the Lambda@Edge viewer request
- Click on Save changes button.
Upgrade
To update the code of the Lambda@Edge and publish a new version, apply the following steps:
- Select the lambda function to update.
- Store the active configuration of the module (List of possible configuration).
- Click Upload from then Amazon S3 location as shown below.
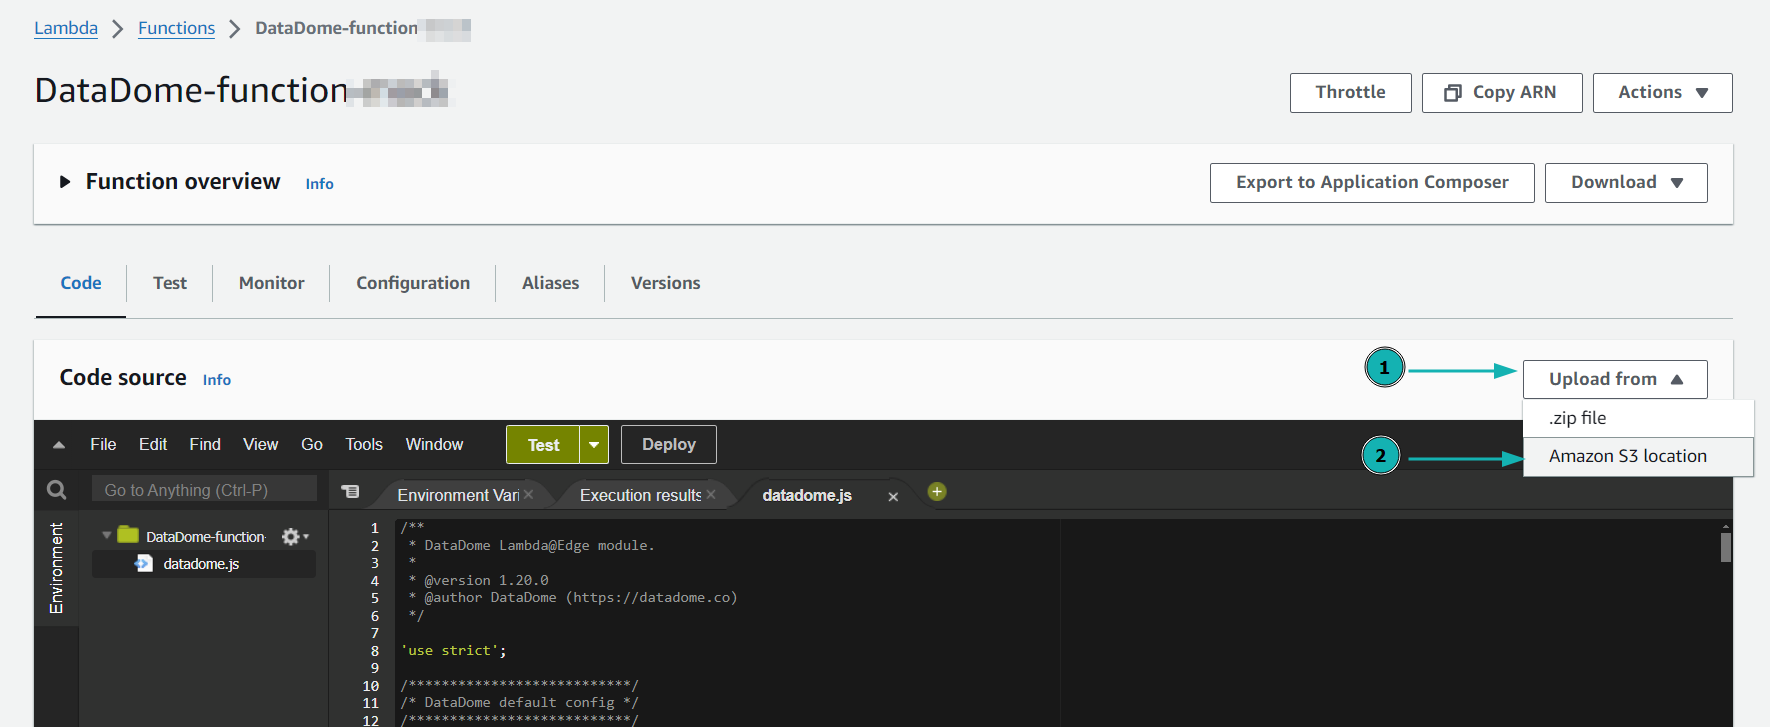
Upload new lambda function from Amazon S3 location
- Paste the right S3 location depending on the runtime used for the lambda and click on Save.
https://s3.amazonaws.com/dd-lambda-edge/datadome-lambda-edge-v2-latest.ziphttps://s3.amazonaws.com/dd-lambda-edge/datadome-lambda-edge-latest.ziphttps://s3.amazonaws.com/dd-lambda-edge/datadome-lambda-edge-py-latest.zip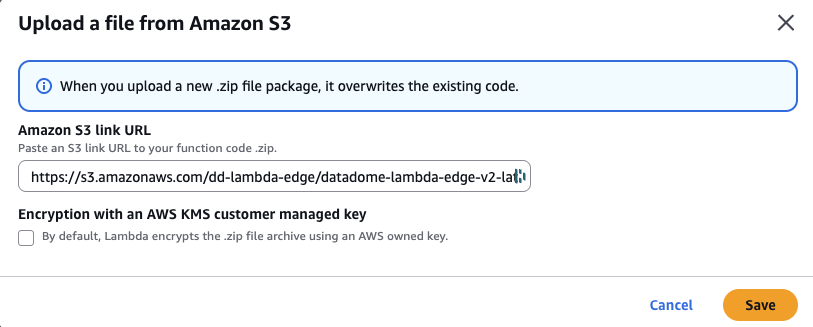
Paste the S3 location of the lambda
- Replace YOUR_DATADOME_LICENSE_KEY with your DataDome server-side key, available in your DataDome dashboard.
- Restore other specific configurations stored during Step 2.
- Click to Actions and Deploy to Lamda@Edge to deploy this up-to-date version.

Deploy to Lambda@Edge
- Select the CloudFront distribution and click Deploy.
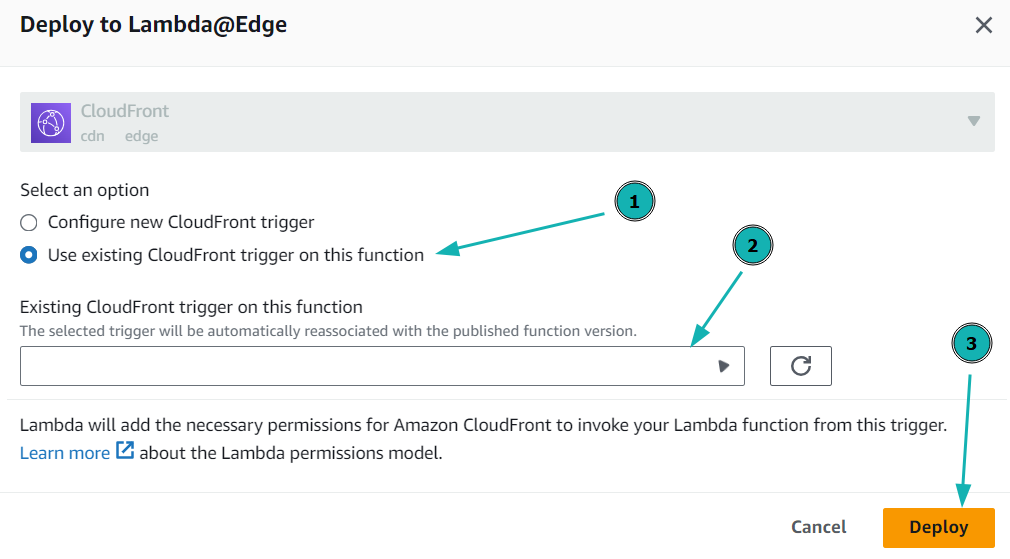
Deploy the Lambda@Edge function on CloudFront distribution
FAQ
How can I integrate DataDome on a multi-account architecture?
If you have multiple CloudFront distributions deployed on different AWS accounts, one Lambda@Edge function per account is required.
You must repeat the configuration of the CloudFront distribution and the configuration of the Lambda@Edge function section for each of your distributions.
Can I get Bot Name, Rule Type and Bot/Human flags in my application?
The DataDome module can inject headers in HTTP requests received by your application.
The list of all exposed headers is available in our Log Enrichment page.
These headers will be recorded in your CloudWatch logs.
Can I integrate DataDome on CloudFront Functions?
It is not possible to set up DataDome inside CloudFront Functions as they do not provide network access to call third-party APIs - see Restrictions on CloudFront Functions.
Can I use AWS Secret Manager to store the DataDome Server side key?
While technically possible, this solution is not viable, in terms of latency and cost.
- AWS charges for each time the secret has to retrieved (so for each warm up of the Lambda).
- AWS Secret Manager is Regional (not global), so most the request will have to wait for the Secret Manager in a single region before calling the DataDome Bot Protect API.
- Tests we performed to validate the feasibility sometimes reached several seconds.
Updated 27 days ago