Google Cloud Load Balancer
This DataDome module is developed in Go and integrates with a compatible Application Load Balancer using a Google Service Extension callout.
Compatibility
DataDome supports Google Load Balancer Service Extensions: check out this compatibility table for supported Application Load Balancers
Prerequisites
This article assumes that the user has already:
- A Google Cloud account: https://console.cloud.google.com/
- Created a project in GCP: https://console.cloud.google.com/projectcreate
- Created a Load Balancer: https://console.cloud.google.com/net-services/loadbalancing/add
Installation
There are three main steps and they outline the essential fields required to successfully activate DataDome integration:
- Cloud Run: Create a service to run the DataDome module (Step 1).
- Load Balancer Backend Service: Create a Backend Service and a NEG (Network Endpoint Group) that allows the Service Extension to connect to the Cloud Run service added in step 1.
- Service Extensions: Create a Service Extension and attach the Load Balancer to the Backend Service (step 2).
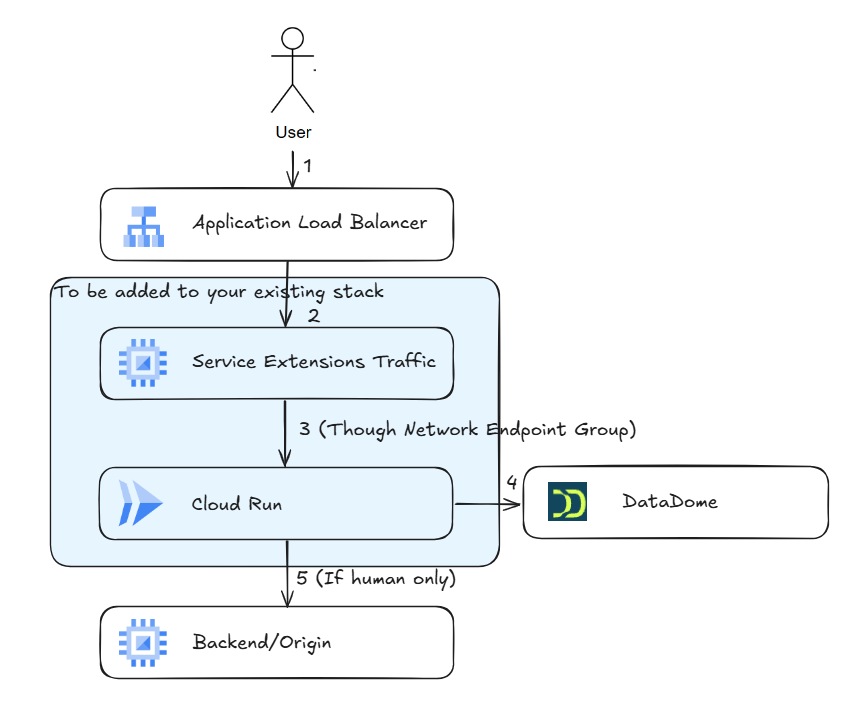
Request flow
1 - Cloud Run
To call DataDome, it is mandatory to execute the module within the GCP project by creating a service on Cloud Run:
- Go to the Cloud Run main page
- Click on Deploy Container button and select Service
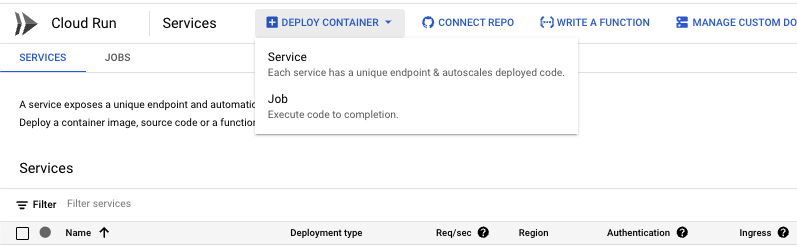
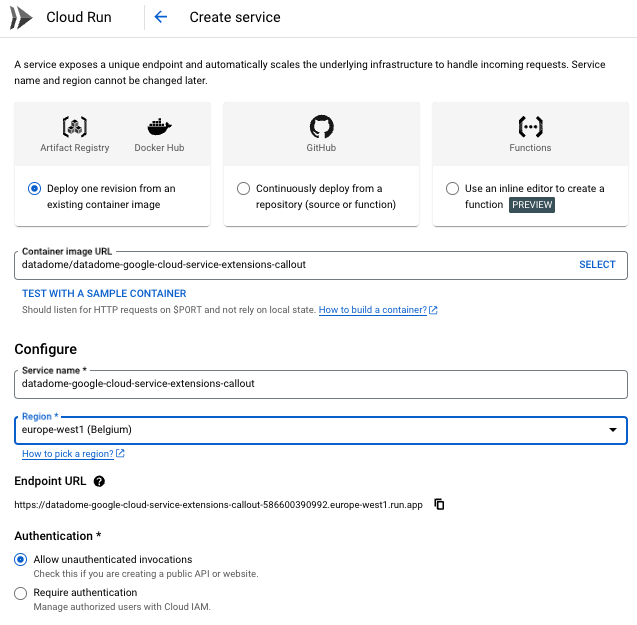
- Click on Deploy one revision from an existing container image button
- Add DataDome DockerHub image path to Container image URL field:
datadome/datadome-google-cloud-service-extensions-callout- Service name will be automatically filled
- Select a Region on the dropdown list
- Select Allow unauthenticated invocations button
- Ingress control
- Click on Internal button
- Check Allow traffic from external Application Load Balancer
- Click on Internal button

-
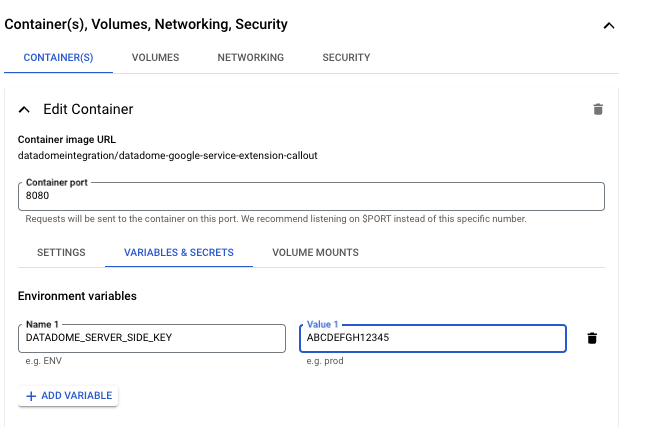
Expand Container(s), Volume, Networking Security
- Container(s)
- Container port
- use the default
8080value on the text field
- use the default
- Variable & Secrets
- Click on Add variable button:
- Name:
DATADOME_SERVER_SIDE_KEY - Value: DataDome server side key, found on the dashboard
- Name:
- Click on Add variable button:
- Container port
- Container(s)
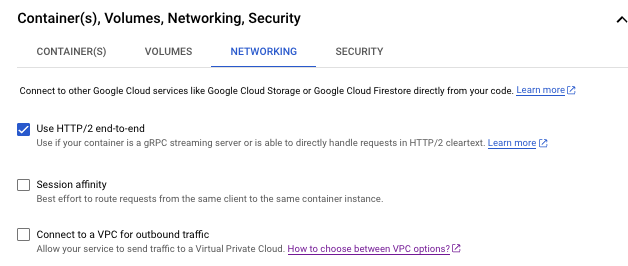
- Go to Networking
- Check Use HTTP/2 end-to-end
- Click on Create button
2 - Load Balancer Backend Service
The Load Balancer Backend Service calls the Cloud Run service via gRPC to execute DataDome module.
To achieve this, create a Backend Service with a NEG (Network Endpoint Group) pointing to the CloudRun service created on step 1:
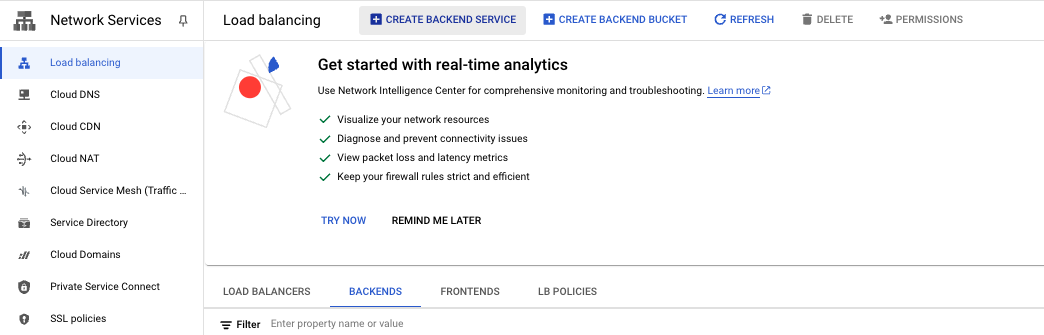
- Go to Load Balancing page

- Go to Backends tab and click on the Create BackendService button
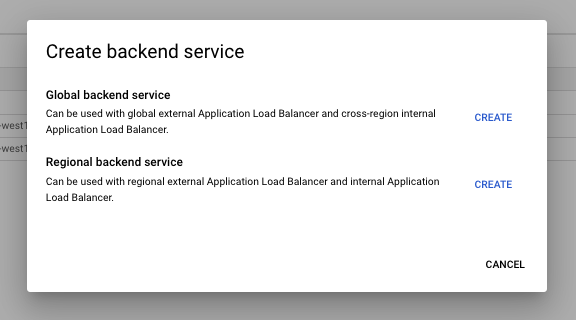
- Select the type of service based on the Load Balancer in place
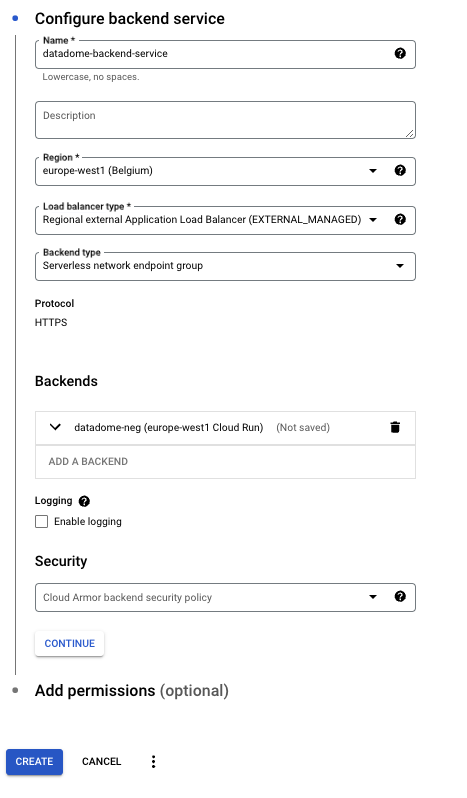
- Add a Name to the backend service text field
- Select a Region on the dropdown list
- Select Backend type : Serverless network endpoint group
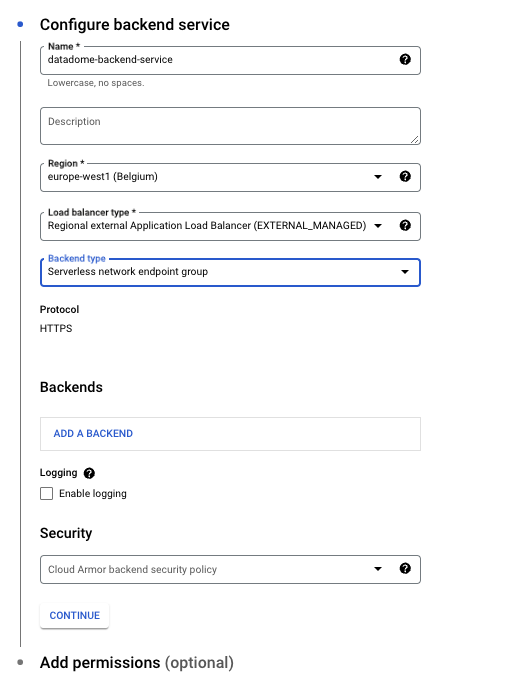
- Add a Backend
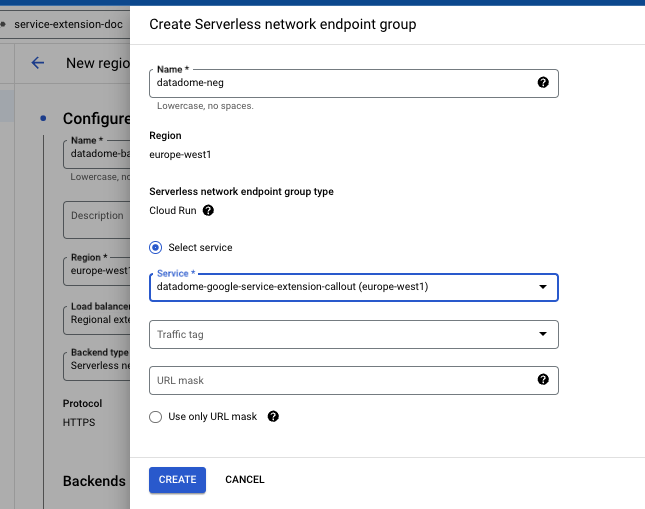
- Select Create Serverless Network Endpoint Group
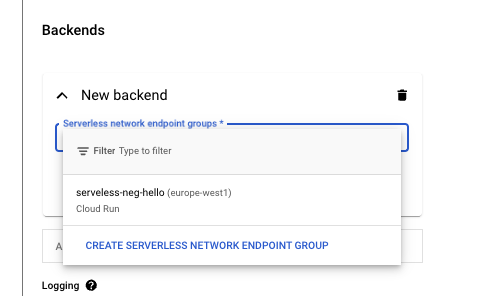
- Add a Name to the network endpoint group
- Select on the the Cloud Run service created on step 1
- Click on Create button
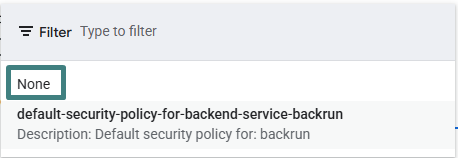
- Now, back to the backend service, ensure Security : Cloud Armor Backend security policy is set to none

- Click on Create button
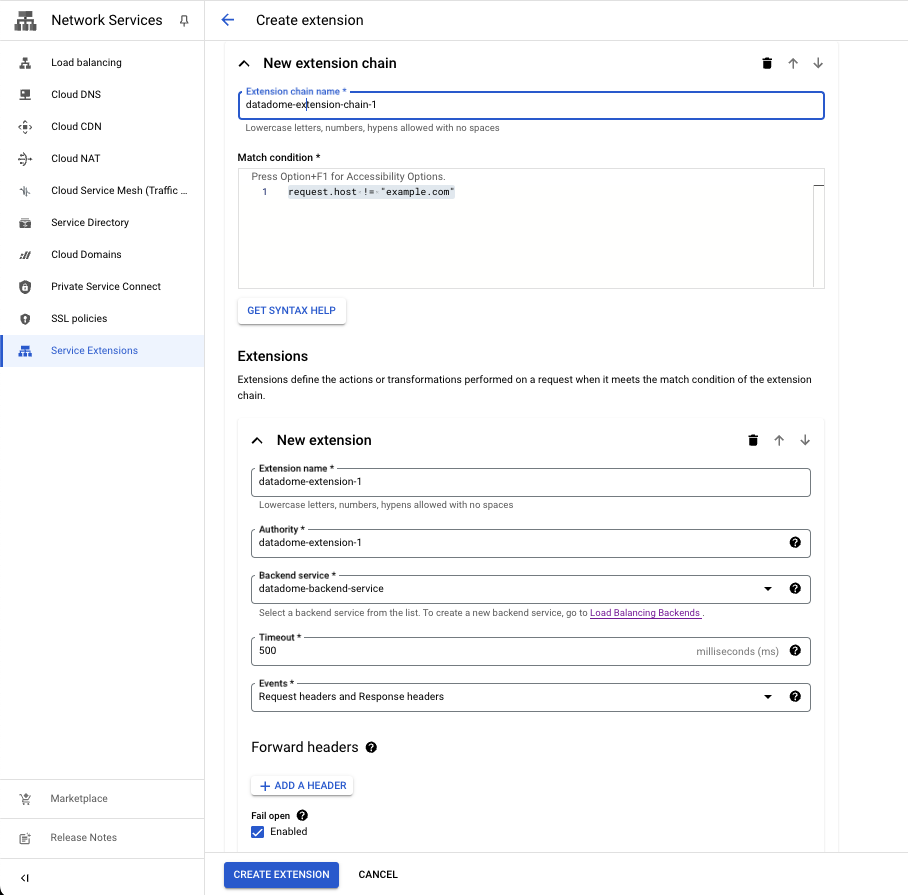
3 - Service Extensions
To protect the Load Balancer, create and configure a Service Extension which will call the Backend Service (step 2) and DataDome integration hosted on Cloud Run (step 1):
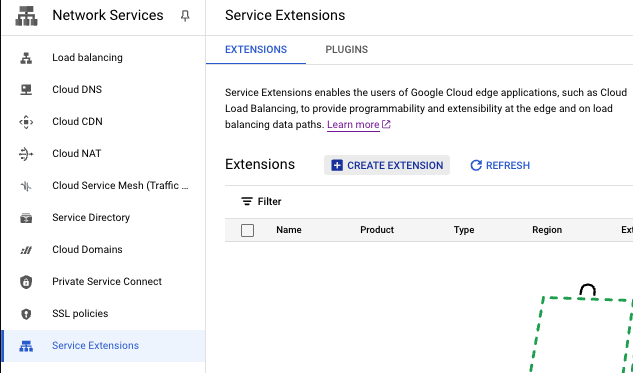
- Go to Service Extensions page
- Click on Create extension button
- Click on Continue button
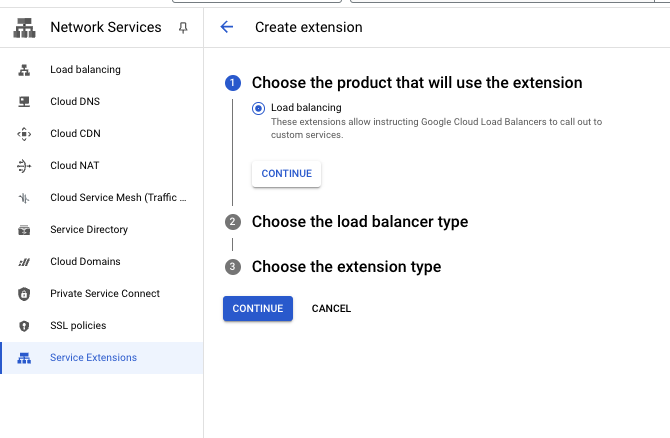
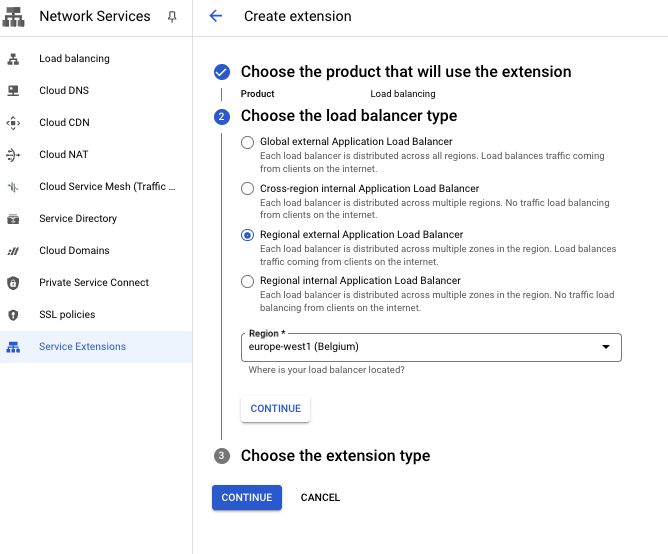
- Select the Load Balancer type
- Select a Region on the dropdown list
- Click on Continue button
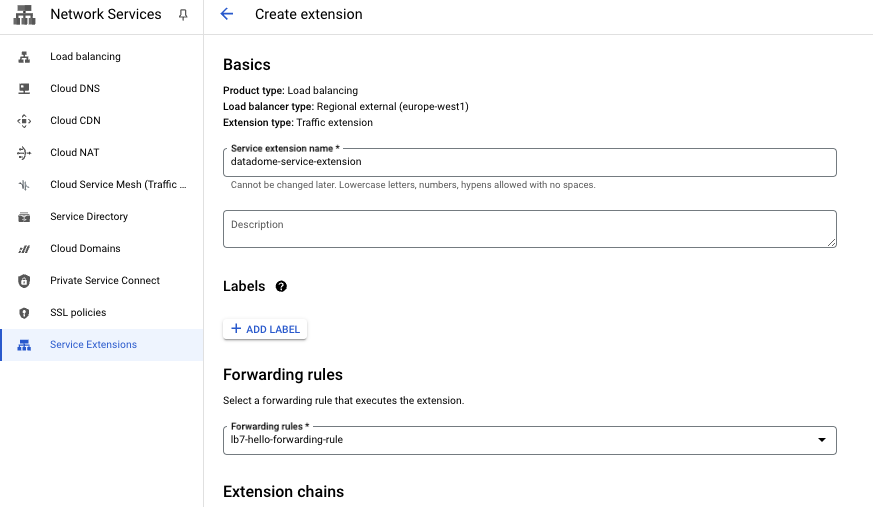
- Add a Service Extension name
- Select the forwarding rule attached to the Load Balancer on the dropdown list
- Add a matching condition to trigger the Service Extension. You can tune the expression to only send part of your traffic to DataDome. Google is using CEL Matcher language.
- Regex to exclude static files before the requests reaches the module:
!request.path.matches('^[^?]*\\.(css|gif|gz|ico|jpe?g|js|json|map|mp3|mp4|otf|png|svg|ttf|webm|webp|woff2?|xml|zip)$')
- Regex to exclude static files before the requests reaches the module:
- Fill Extension name field with : datadome-extension-1
- Fill Authority field with : datadome-extension-1
- Select the Backend service created on step 2
- Select the timeout of the Service Extension
- note: It should be higher than DataDome timeout
- Select Request headers and Response headers on Events dropdown list
- Ignore Forward headers
- All headers are sent If a header isn't specified
- Check Enabled on Fail open
- Click on Create Extension button
Congrats! 🎉 Your traffic is now protected by DataDome Bot protection.
Settings
| Setting | Description | Required | Default Value |
|---|---|---|---|
| DATADOME_SERVER_SIDE_KEY | DataDome server side key, found on the dashboard | yes | |
| DATADOME_ENDPOINT | Host of the API Server Available endpoints | no | api.datadome.co |
| DATADOME_TIMEOUT | Timeout for regular API calls | no | 150 (in milliseconds) |
| DATADOME_URL_PATTERN_INCLUSION | Regular expression to include URLs | no | |
| DATADOME_URL_PATTERN_EXCLUSION | Regular expression to exclude URLs | no | List of excluded static assets below |
| DATADOME_ENABLE_GRAPHQL_SUPPORT | Boolean to enable GraphQL support. | no | false |
| DATADOME_GRAPHQL_ENDPOINT | Path of the GraphQL endpoint | no | graphql |
| DATADOME_CUSTOM_FIELD_STRING_1 DATADOME_CUSTOM_FIELD_STRING_2 DATADOME_CUSTOM_FIELD_STRING_3 DATADOME_CUSTOM_FIELD_INTEGER_1 DATADOME_CUSTOM_FIELD_INTEGER_2 DATADOME_CUSTOM_FIELD_FLOAT_1 | Custom request header values that are sent to DataDome. | no |
"\\.(avi|flv|mka|mkv|mov|mp4|mpeg|mpg|mp3|flac|ogg|ogm|opus|wav|webm|webp|bmp|gif|ico|jpeg|jpg|png|svg|svgz|swf|eot|otf|ttf|woff|woff2|css|less|js|map|json)$"Logging
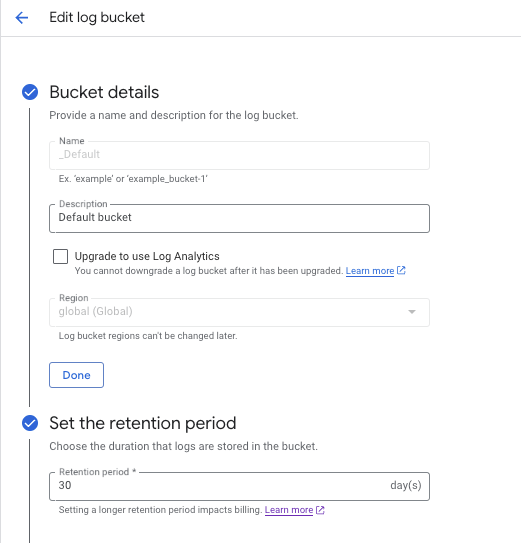
The execution of this integration on Cloud Run automatically sends logs to Google Cloud Logging.
- To manage the logs, go to Google Cloud Logging
- Logs are stored in the
_Defaultbucket - Log retention can be configured to control storage costs
- The default retention is 30 days
- To change it, click on the button on the right and select Edit Bucket
- Choose the Retention period (in days)
- Logs are stored in the

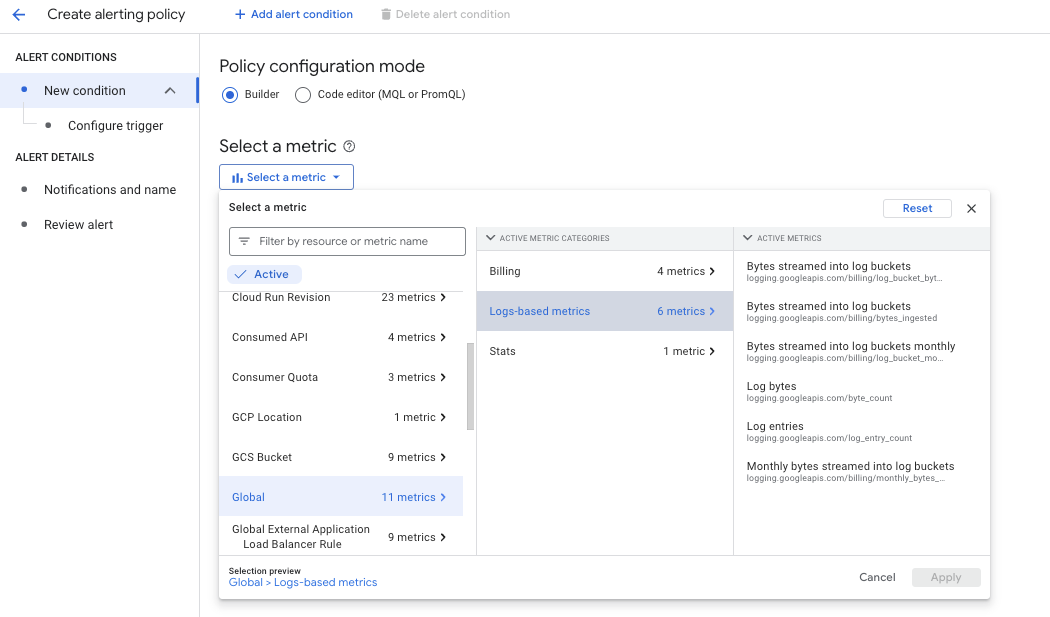
- Alerts can be set up to monitor bucket size and notify you of potential cost increases
- Click on Create Policy
- Select Global -> Logs-Based metrics
- Select the desired metric

FAQ
How can I use this Google Cloud integration with a VM instance?
The Google Cloud integration can be hosted on a Google Cloud Compute Engine VM by running it inside a Docker container giving full control over the runtime environment:
- Follow Google's documentation to set up a callout backend service
- Use DataDome's image:
datadome/datadome-google-cloud-service-extensions-callout - Instead of the example image:
us-docker.pkg.dev/service-extensions-samples/callouts/python-example-basic:main
- Use DataDome's image:
- We recommend using your own certificate in production environments (example below)
- By default, this setup uses port 443 for gRPC and a self-signed certificate provided by Google
docker run -d \
  -p 80:80 -p 443:443 -p 8080:8080 \
  -e DATADOME_SERVER_SIDE_KEY="${DATADOME_SERVER_SIDE_KEY}" \
  -v ./your-certificate.crt:/etc/ssl/datadome/server.crt \
  -v ./your-certificate.key:/etc/ssl/datadome/server.key \
  datadome/datadome-google-cloud-service-extensions-callout:latest
How to enable GraphQL support?
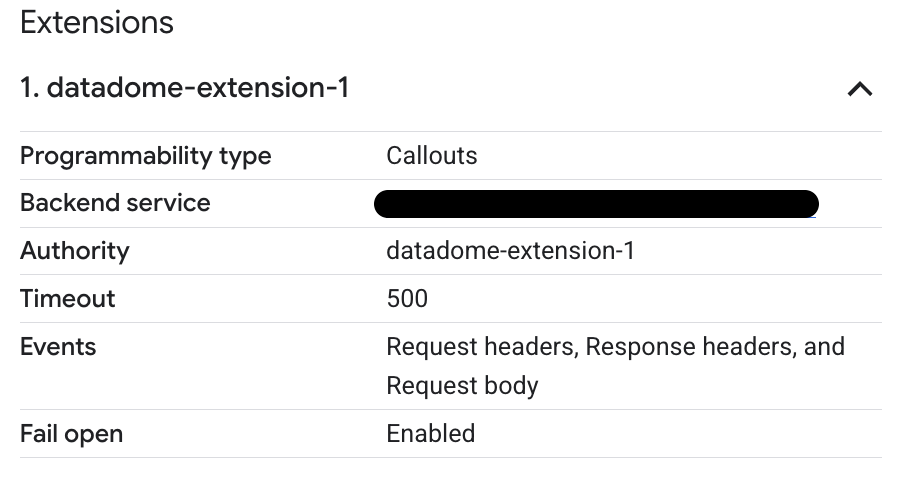
Since version 1.3.0 of the module, it is now possible to enable GraphQL support to include operation count, names and types in the collected data:
- Use DataDome's image with version 1.3.0 or above
- Set the
DATADOME_ENABLE_GRAPHQL_SUPPORTenvironment variable totrue - Update your Service Extension to add the Request Body event:
- Select your Service Extension
- Click on the Edit button
- Unfold the
datadome-extension-chain-1Extension chain - Unfold the
datadome-extension-1Extension - In the Events, add the Request body event
- Click on the Update extension button
Your extension's configuration will look like so:
How do I add custom fields?
- Since version 1.5.0, it is now possible to forward custom request header values to DataDome.
- This allows you to enrich DataDome's payload with business-specific data that your upstream services attach to requests.
How does it work?
- Each
DATADOME_CUSTOM_FIELD_*environment variable maps to a request header name. - When a request is processed, the module reads the value of the configured header and forwards it to DataDome as part of the payload. Fields are typed: values are validated and cast before being sent.
- Up to 6 custom fields are supported, across three types:
| Environment variable | Type |
|---|---|
DATADOME_CUSTOM_FIELD_STRING_1 / _2 / _3 | string |
DATADOME_CUSTOM_FIELD_INTEGER_1 / _2 | integer (int32) |
DATADOME_CUSTOM_FIELD_FLOAT_1 | float (float64) |
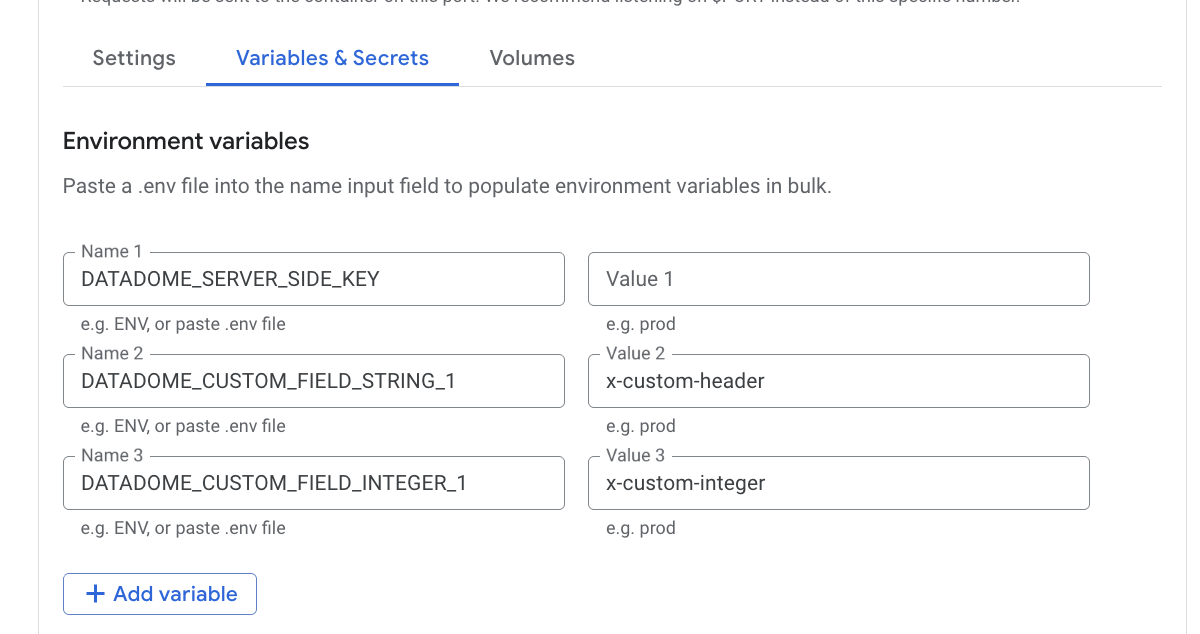
Configuration
Set the environment variables to the request header names you want to map and then (re)deploy your Service Extension with the updated environment variables:
- Go to CloudRun > Services in the Google Cloud Console.
- Select your service and click Edit & deploy new version.
- Select Variables and Secrets and add or update the
DATADOME_CUSTOM_FIELD_*variables with the header names you want to map. - Click Deploy and wait for the new revision to be deployed.
Once deployed, any request that includes the configured headers will have those values forwarded to DataDome. Headers not present in a given request are simply ignored for that call.
Updated 3 months ago