CloudFormation Template
This module is made for AWS CloudFront distributions, using the AWS CloudFormation service.
When to use it
You can apply this integration only if:
- Your AWS IAM user or role has the necessary permissions to create CloudFront distributions, Lambda functions, and CloudFormation stacks.
- You have a CloudFront distribution that you want to protect with DataDome.
- Your CloudFront distribution:
- Has no existing 403 response page.
- Has no viewer-request event associations.
- Has no Response headers policy attached.
If your CloudFront distribution does not meet all these criteria, the CloudFormation stack will fail and log the unmet conditions.
- You accept that this integration will automatically modify your CloudFront distribution by:
- Adding the DataDome Lambda@Edge function to all behaviors.
- Attaching the DataDome Response headers policy.
- Creating a 403 error page.
- You understand that manually modifying CloudFront settings, IAM roles, Lambda permissions, or behaviors may disrupt DataDome’s protection.
If you don’t meet these requirements, consider using the DataDome AWS CloudFront manual integration instead.
What this template does:
- Creates and deploys DataDome’s Lambda@Edge function to analyze and protect traffic.
- Deploys a helper Lambda function to update CloudFront settings.
- Creates necessary IAM roles for execution.
- Modifies the CloudFront distribution to integrate protection.
Refer to the Resources section for a detailed breakdown of the resources created and modified.
Installation
Prerequisites
- The server-side key, available in your DataDome dashboard
- The ID of the CloudFront distribution you want to protect
- DataDome JavaScript Tag set up as First-Party
Protect your traffic
-
Download the CloudFormation Template.
This template will create the required AWS resources, including the Lambda@Edge function and its CloudFront associations. -
Sign in to the AWS Console and navigate to CloudFormation.
-
Click Create stack → With new resources.

Create a new Stack with new resources
-
Select Choose an existing template and then Upload a template file. Then, upload the DataDome-Cloudformation-Template-latest.yml file downloaded in step 1.
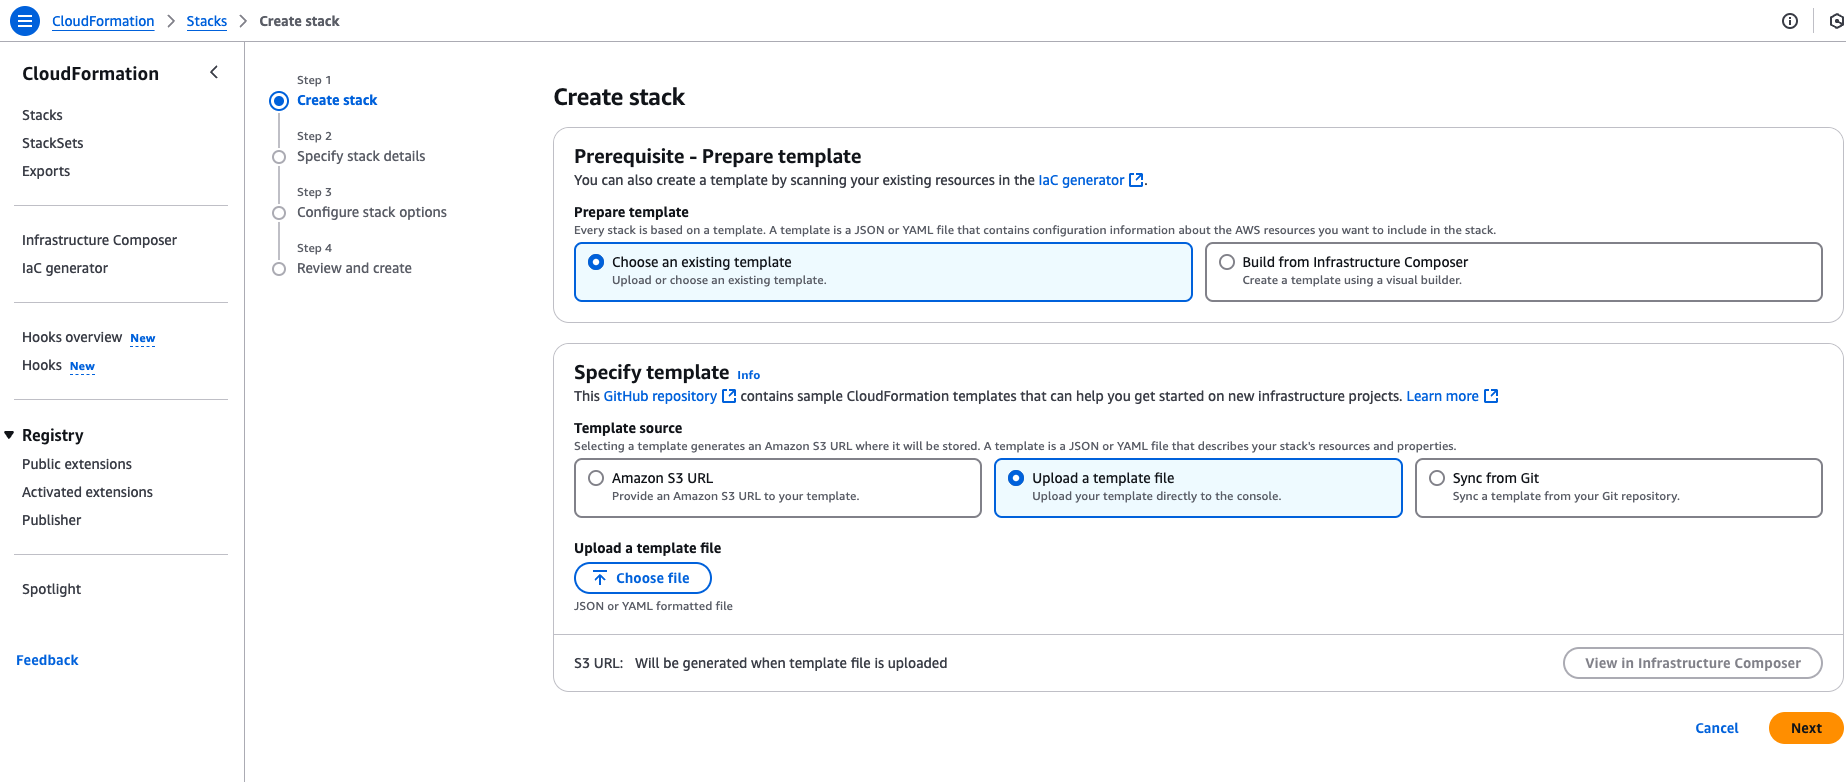
-
Click Next, then enter the following parameters:
- StackName (Required): Choose a name for your CloudFormation stack (e.g.,
DataDomeCloudFrontProtection). - CloudFrontDistributionId (Required): Enter the ID of the CloudFront distribution you want to protect.
- ServerSideKey (Required): Enter the DataDome server-side key.
- StackName (Required): Choose a name for your CloudFormation stack (e.g.,
-
Click Next.
-
Configure the Stack options as you want.
-
Check the box at the bottom of the page to acknowledge that AWS CloudFormation might create IAM resources.
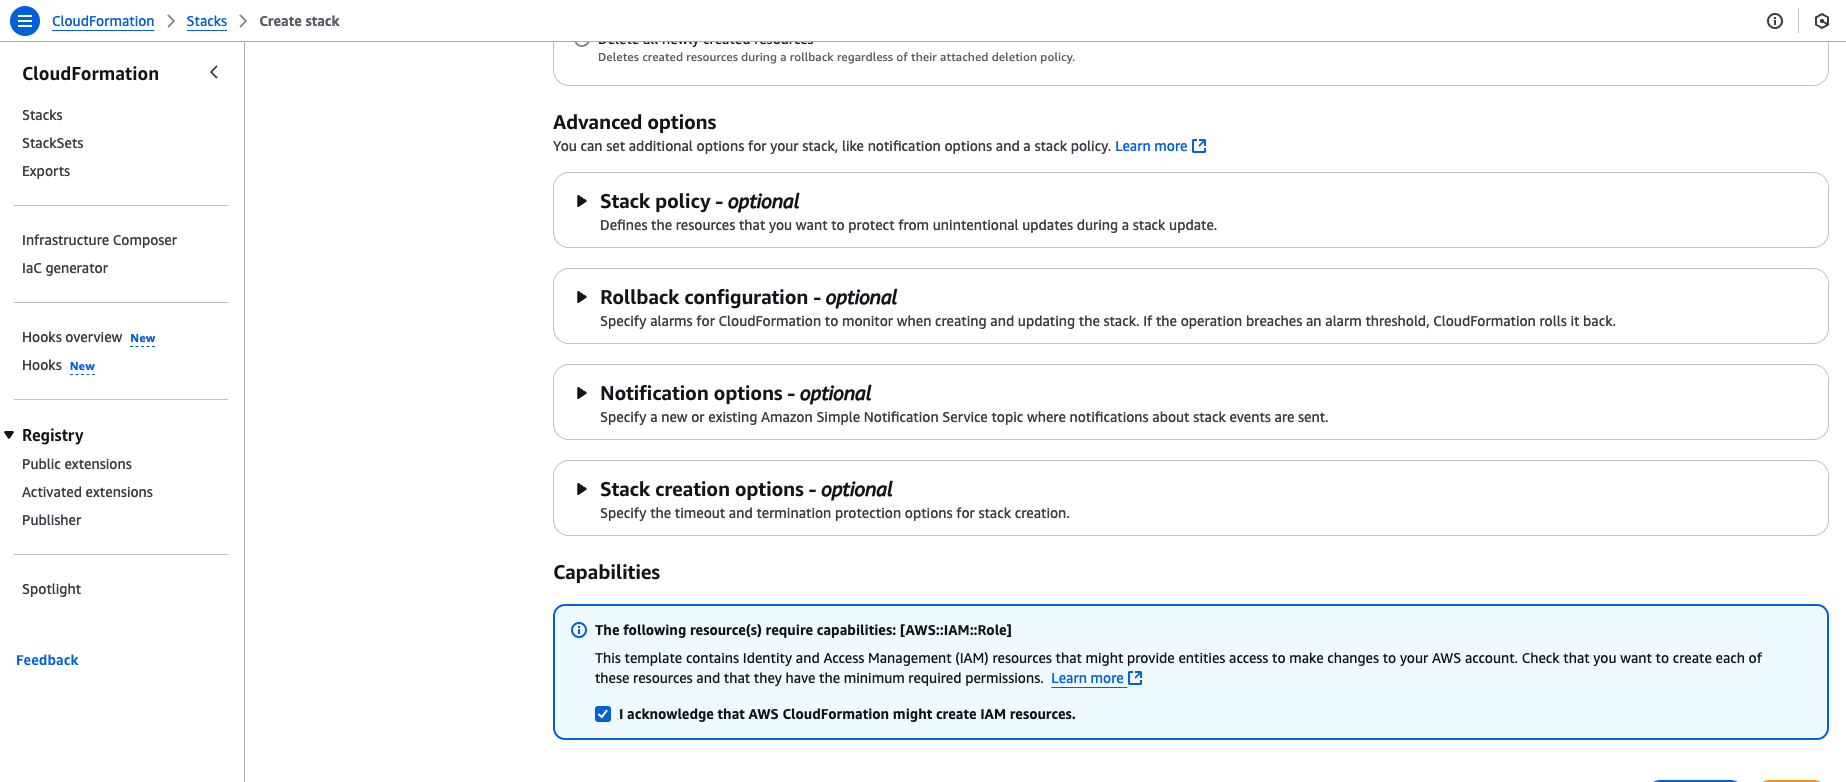
-
Click Next.
-
Review the settings and click Submit.
-
Wait for the deployment to complete (this may take a few minutes).
-
Once the CloudFormation stack has been created, ensure its status is
CREATE_COMPLETE. You can check this in the AWS Management Console under the CloudFormation section.
- If the status is
CREATE_COMPLETE, the stack was successfully created. - If the status is
CREATE_FAILEDor any other state, refer to the Troubleshooting section for steps to diagnose and resolve the issue.
- If the status is
Congrats! You can now see your traffic in your DataDome dashboard.
Configuration
Configuration is done by filling in CloudFormation Stack parameters:
Settings
| Setting | Description | Required | Default |
|---|---|---|---|
DataDomeServerSideKey | Your DataDome server-side key, found in your Dashboard. | Yes | |
DataDomeUriRegex | Regular expression to include URIs in the DataDome analyzed traffic. | Optional | |
DataDomeUriRegexExclusion | Regular expression to exclude URIs from the DataDome analyzed traffic. | Optional | List of excluded static assets below |
DataDomeLogBotInfo | Boolean to log the requests' bot information in CloudWatch. Refer to the Log enrichment header section. | Optional | false |
DataDomeEnableGraphQLSupport | Boolean to enable GraphQL support. Refer to Enable GraphQL support section. | Optional | false |
DataDomeEnableMCPSupport | Boolean to enable Model Context Protocol support. Refer to Enable MCP support section. | Optional | false |
DataDomeUseXForwardedHost | Use the X-Forwarded-Host header instead of Host when the application is behind a reverse proxy/load balancer. | Optional | false |
DataDomeCustomFieldString1 | Static value or callback function to send a custom string. Refer to Add custom field section. | Optional | |
DataDomeCustomFieldString2 | Static value or callback function to send a custom string. Refer to Add custom field section. | Optional | |
DataDomeCustomFieldString3 | Static value or callback function to send a custom string. Refer to Add custom field section. | Optional | |
DataDomeCustomFieldInteger1 | Static value or callback function to send a custom integer. Refer to Add custom field section. | Optional | |
DataDomeCustomFieldInteger2 | Static value or callback function to send a custom integer. Refer to Add custom field section. | Optional | |
DataDomeCustomFieldFloat1 | Static value or callback function to send a custom float. Refer to Add custom field section. | Optional | |
DataDomeUserID | Static value or callback function to send a custom float. Refer to Add custom field section. | Optional | |
DataDomeProductID | Static value or callback function to send a custom float. Refer to Add custom field section. | Optional |
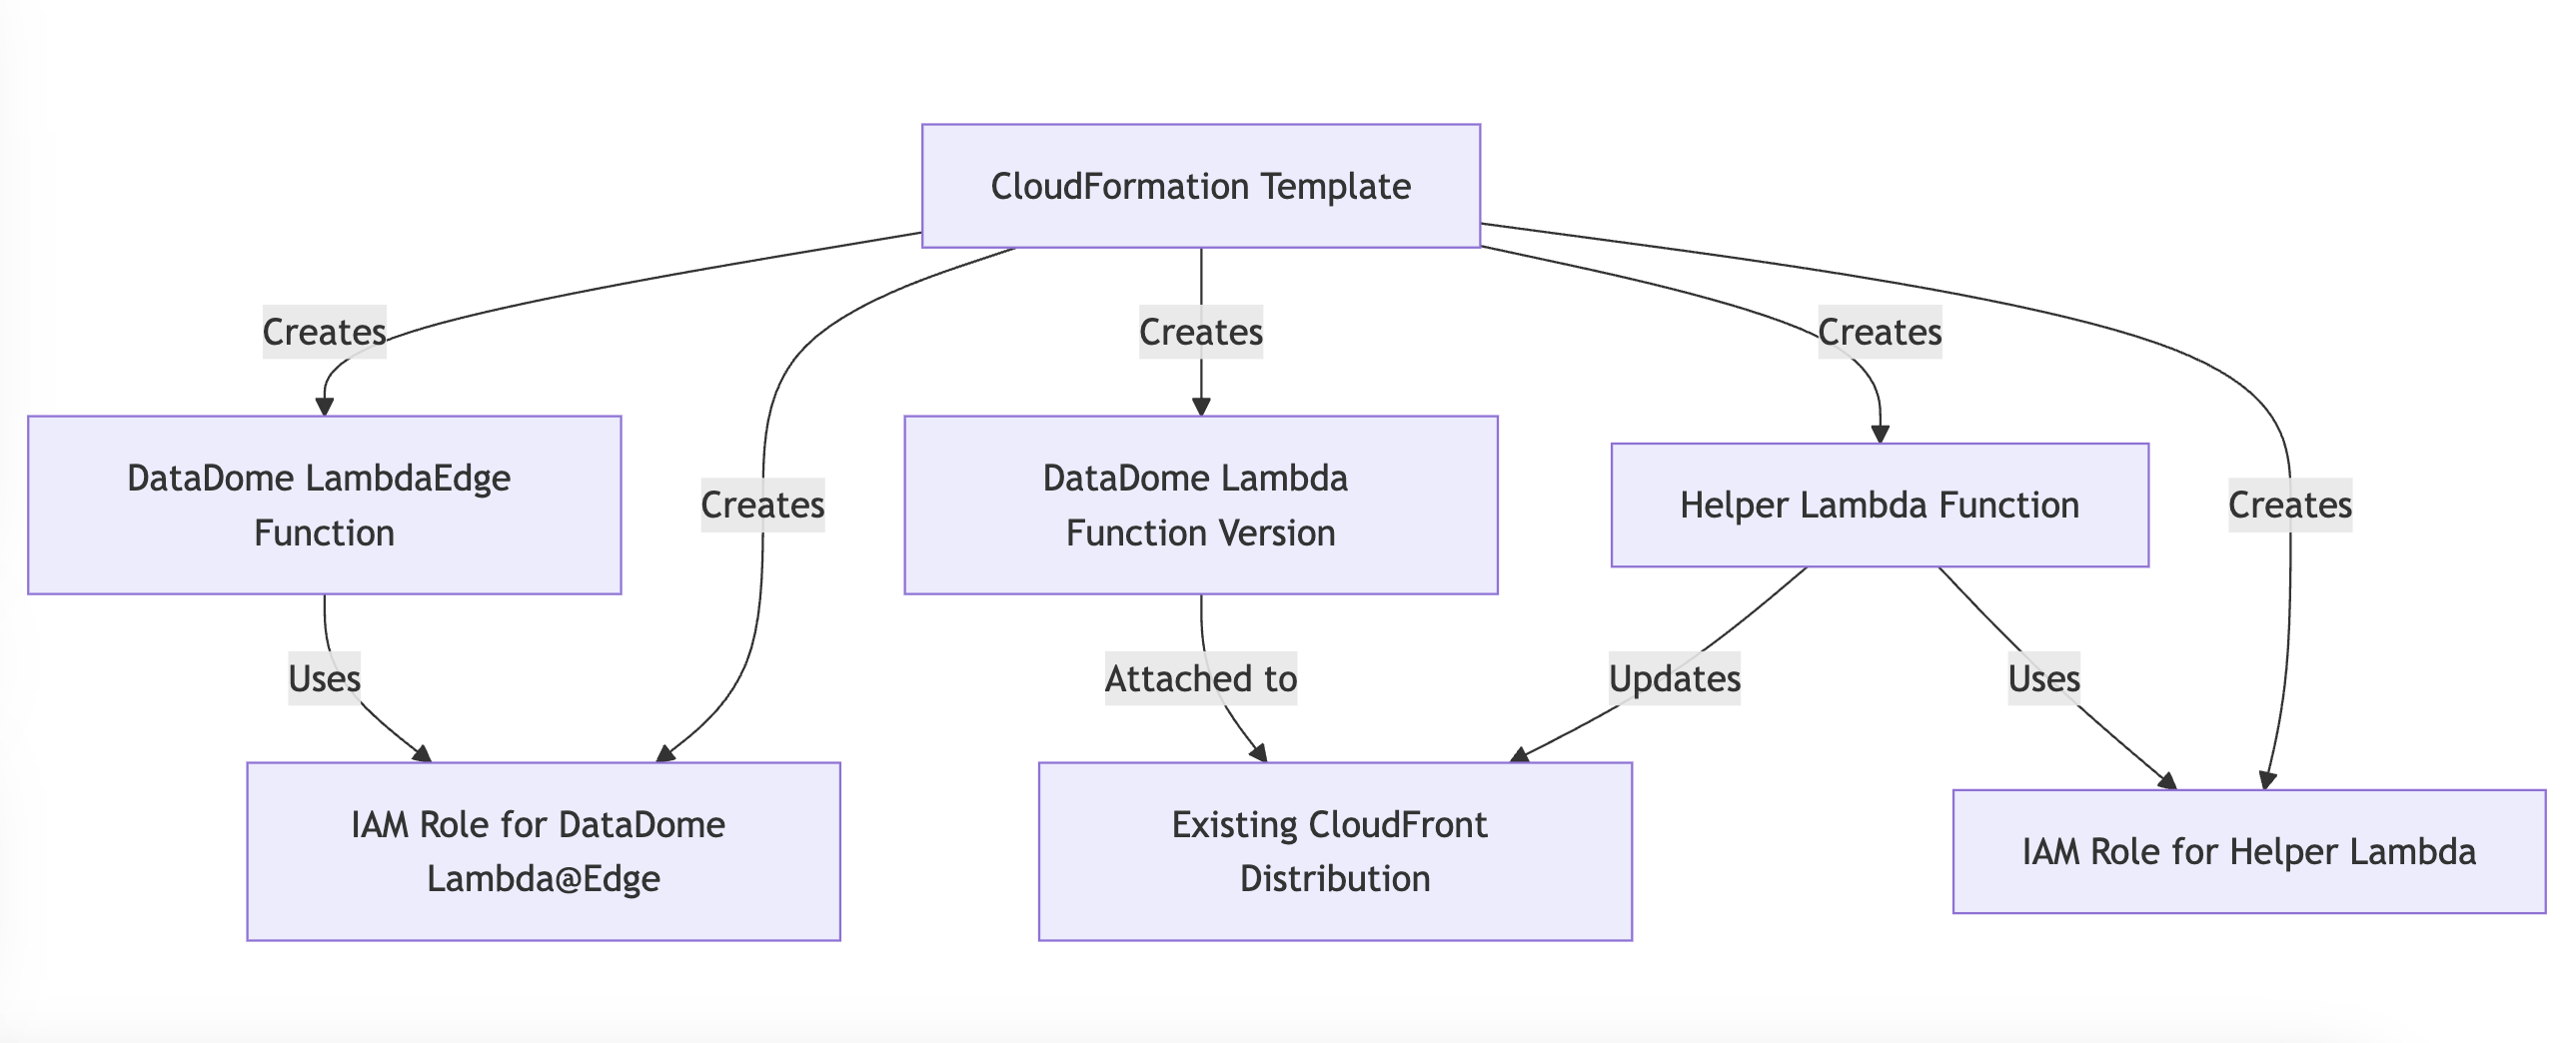
Resources created and modified
The following AWS resources are created or modified by this CloudFormation template:
Created Resources
- Lambda@Edge Function (
DatadomeLambda): handles bot protection at CloudFront's edge locations. - Lambda Function Version (
DatadomeLambdaVersion): a published version of the Lambda function to enable CloudFront integration. - IAM Role for Lambda@Edge (
DatadomeLambdaExecutionRole): grants necessary execution permissions. - Helper Lambda Function (
DatadomeHelperLambdaFunction): updates the CloudFront distribution to attach the DataDome Lambda@Edge function. - IAM Role for Helper Lambda (
DatadomeHelperLambdaExecutionRole): Provides CloudFront modification permissions to the helper Lambda.
Modified Resources
CloudFront Distribution (CloudFrontDistributionId): updated to attach the DataDome Lambda@Edge function, create a 403 error page and .
Summary
Troubleshooting
CREATE_FAILED
If the CloudFormation stack finishes in the ROLLBACK_COMPLETE state and PrimerInvoke is in CREATE_FAILED, check the error message provided in the CloudFormation Events tab.

Common reasons for failure include:
- Existing CloudFront Error Page conflict:
- Message example: "The distribution already has a 403 response page."
- Solution: Remove the existing error page configuration from the CloudFront distribution before redeploying the stack.
- Lambda@Edge Association Already Exists:
- Message example: "The default cache behavior already has a 'viewer-request' Lambda@Edge association."
- Solution: Remove the existing Lambda@Edge function association from the CloudFront distribution before deploying the stack.
Updating
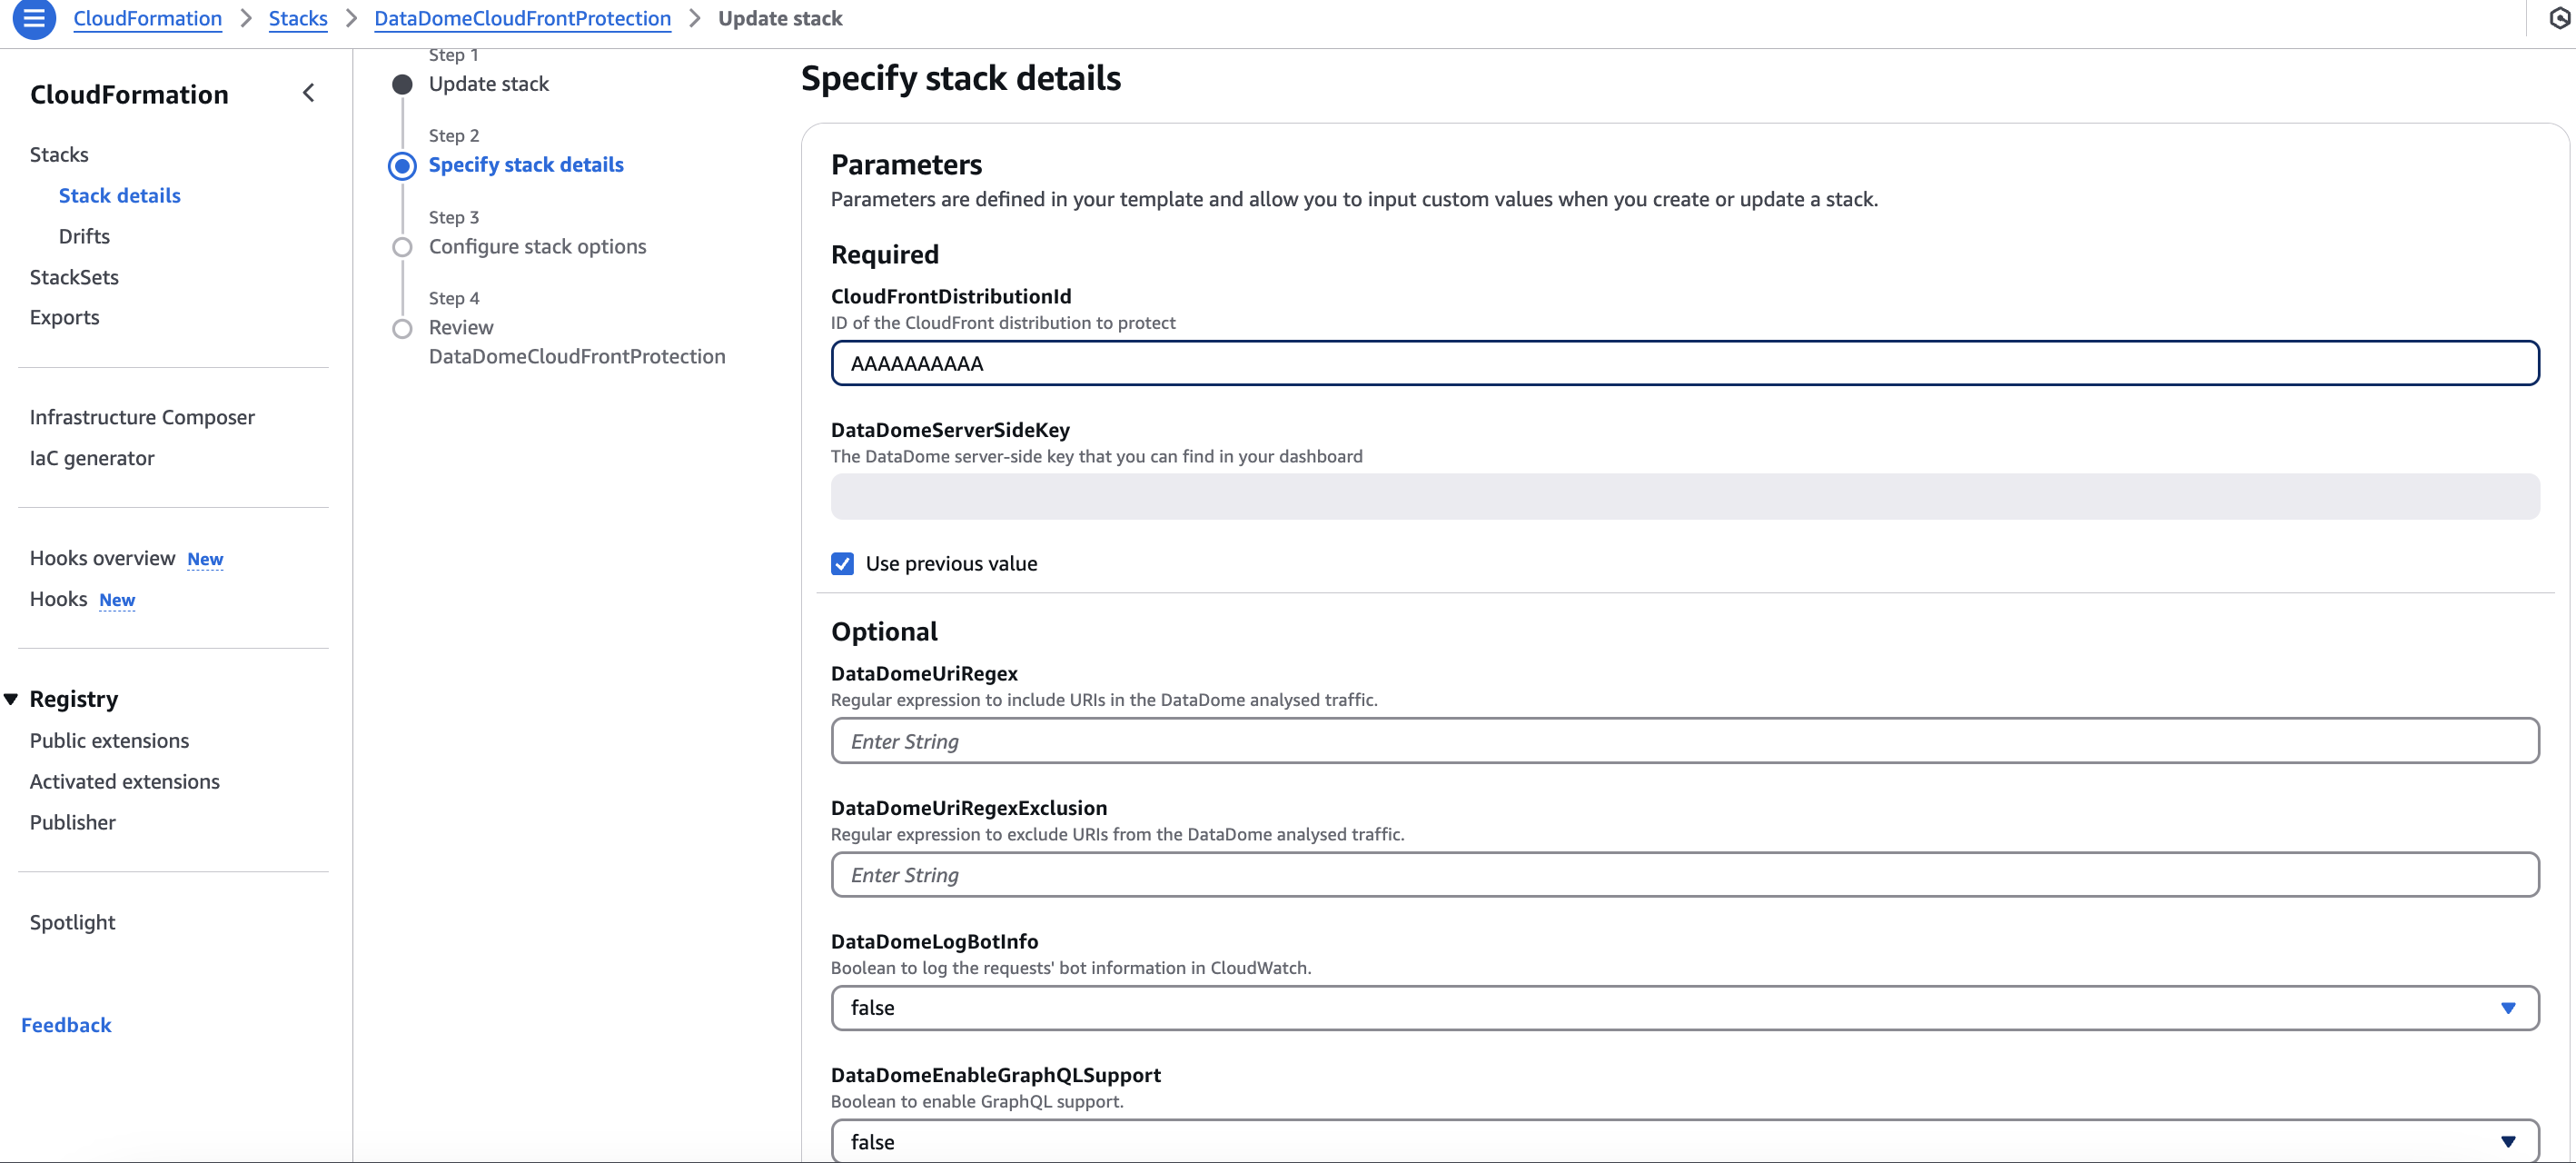
Edit DataDome setting value
To change the value of a DataDome setting:
- Sign in to the AWS Console and navigate to CloudFormation.
- Click on the Stack you created to install Datadome.
- Click on Update.

-
Select Use existing template.
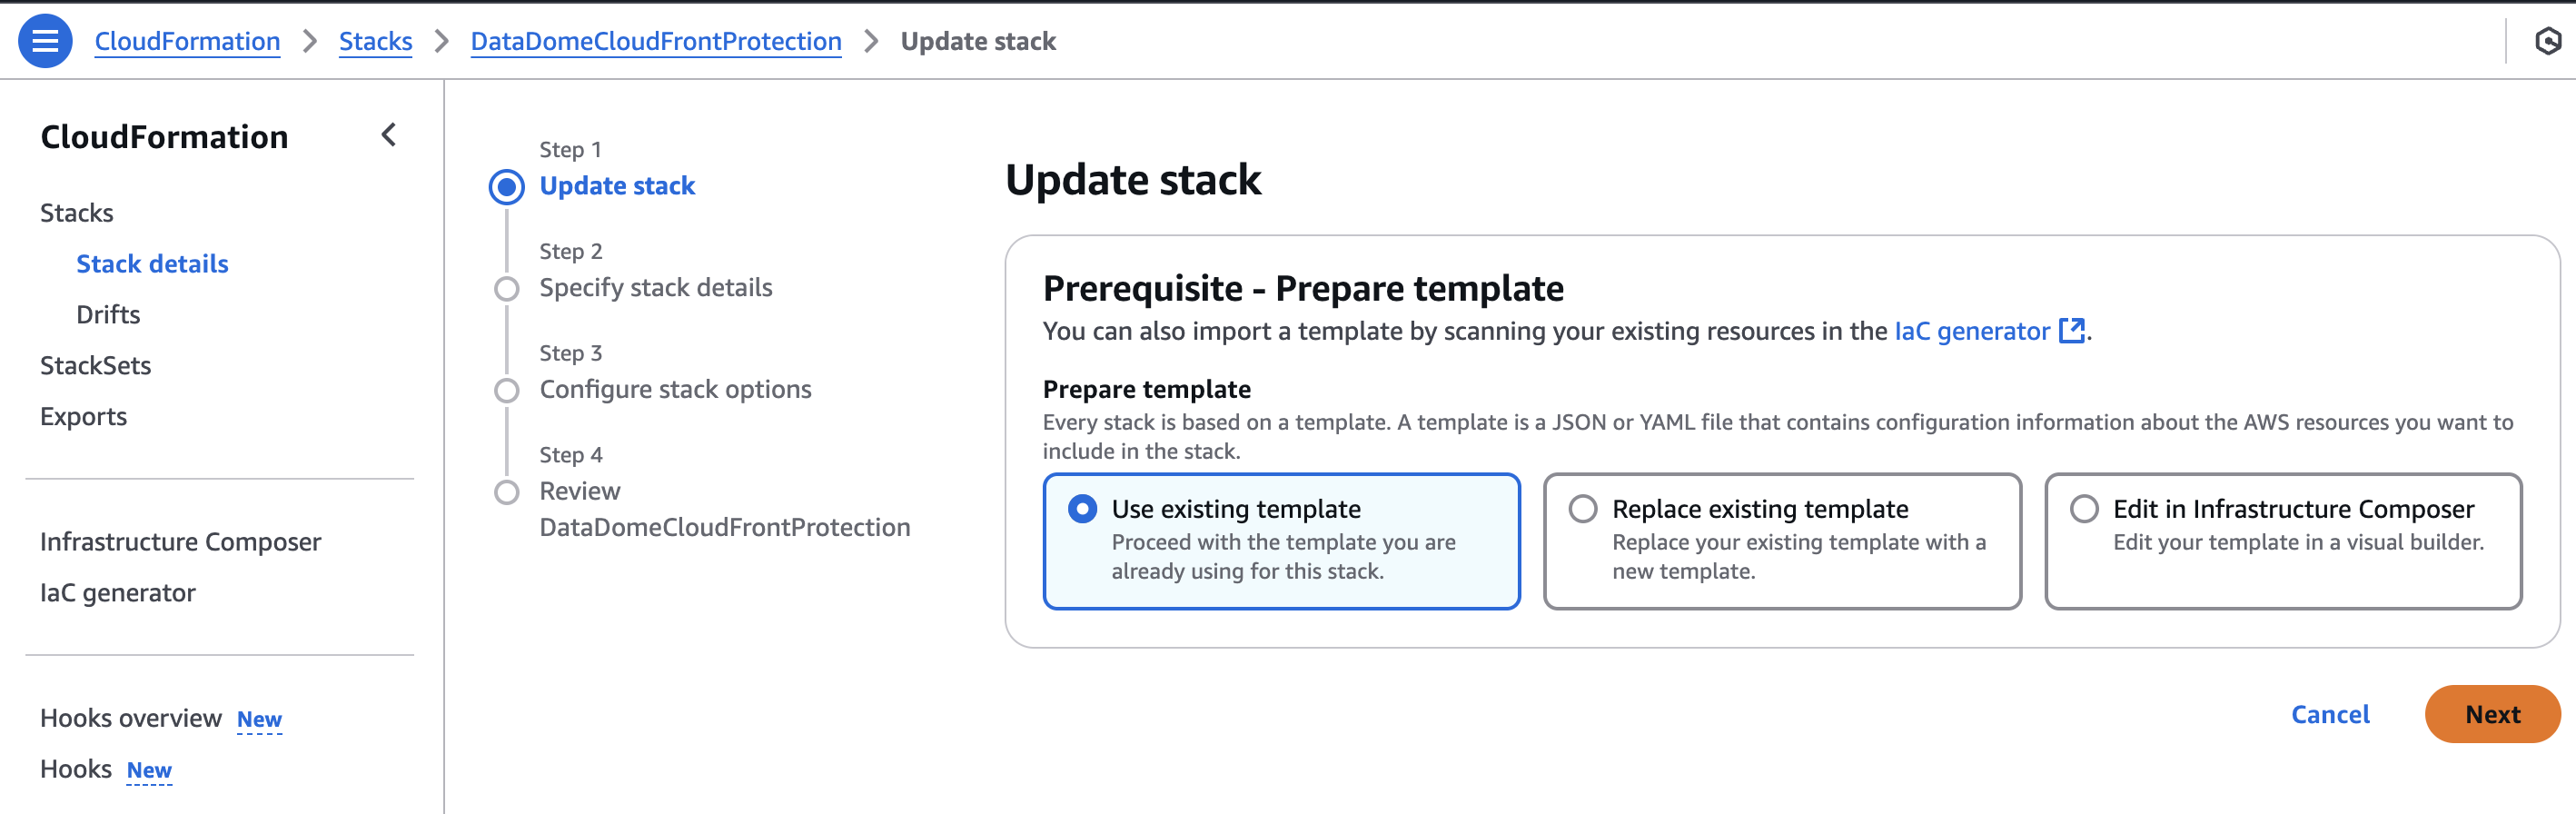
-
Click Next.
-
Modify the values you want to modify.
- Check the box at the bottom of the page to acknowledge that AWS CloudFormation might create IAM resources.
- Click Next.
- Click Submit.
- Wait for the deployment to complete (this may take a few minutes).
- Once the CloudFormation stack has been created, ensure its status is
UPDATE_COMPLETE. You can check this in the AWS Management Console under the CloudFormation section.
- If the status is
UPDATE_COMPLETE, the stack was successfully upadted. - If the status is
UPDATE_FAILEDor any other state, please contact our support team.
Upgrade DataDome version
To update Datadome Protection when a new version of the DataDome module has been released:
- Download the CloudFormation Template which is the latest version available.
- Sign in to the AWS Console and navigate to CloudFormation.
- Click on the Stack you created to install Datadome.
- Click on Update.
- Select Replace existing template and Upload a template file. Then, upload the upload the DataDome-Cloudformation-Template-latest.yml file downloaded in step 1.
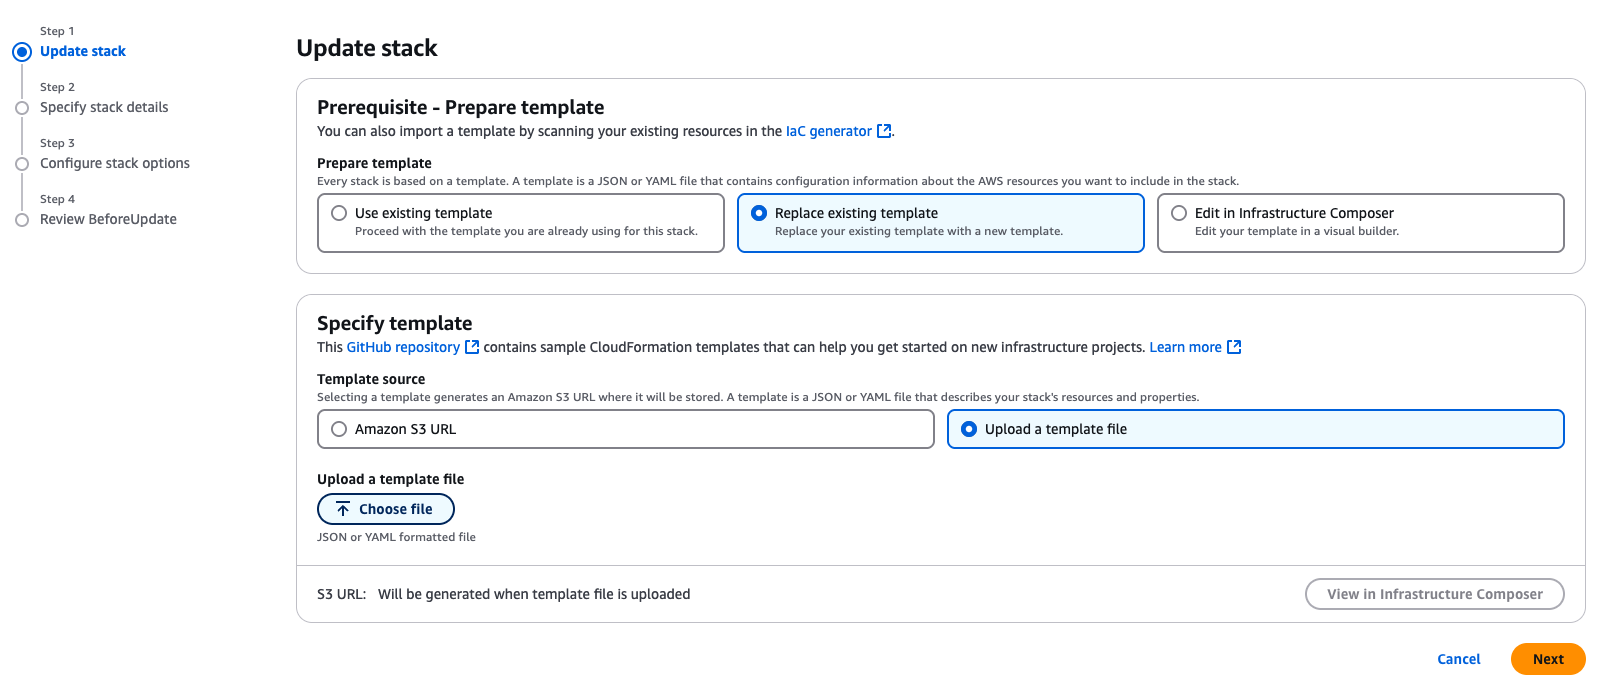
- Click Next.
- In the Specify stack details, review the configuration and click Next.
- Check the box at the bottom of the page to acknowledge that AWS CloudFormation might create IAM resources.
- Click Next.
- Click Submit.
- Wait for the deployment to complete (this may take a few minutes).
- Once the CloudFormation stack has been created, ensure its status is
UPDATE_COMPLETE. You can check this in the AWS Management Console under the CloudFormation section.
- If the status is
UPDATE_COMPLETE, the stack was successfully upadted. - If the status is
UPDATE_FAILEDor any other state, please contact our support team.
Deleting
To remove Datadome Protection, simply delete the CloudFormation stack using the AWS Management Console.
This will remove all resources created by the stack and remove the associations and error page on the distribution.
Updated 3 months ago