SDK integration for login
DataDome Account Protect detects account takeover threats and protects you against them
Account Protect can be integrated into your backend through SDK packages that are available on multiple platforms.
Prerequisites for Account ProtectAccount Protect is separate from Bot Protect and is not available on your account by default.
Please contact your account manager to enable it.This service requires a dedicated API key, which will be available on your dashboard once it is enabled.
Main concepts
When a user attempts to log into your website, the Account Protect SDK sends data to DataDome's Account Protect API:
- When a login is successful, i.e. with valid credentials:
- The Account Protect API will reply with a recommendation to either allow or deny the login
- A recommendation means that your application will still make the final decision. Please find below some mitigation examples:
- Block the login
- Add the user to a watchlist to monitor their next actions (like purchase or profile updates)
- Require the user to authenticate with MFA
- Reset the user password
- Send the data to enrich your internal fraud tool
- When a login fails, i.e. with incorrect credentials:
- The Account Protect API will collect information to enrich our detection models
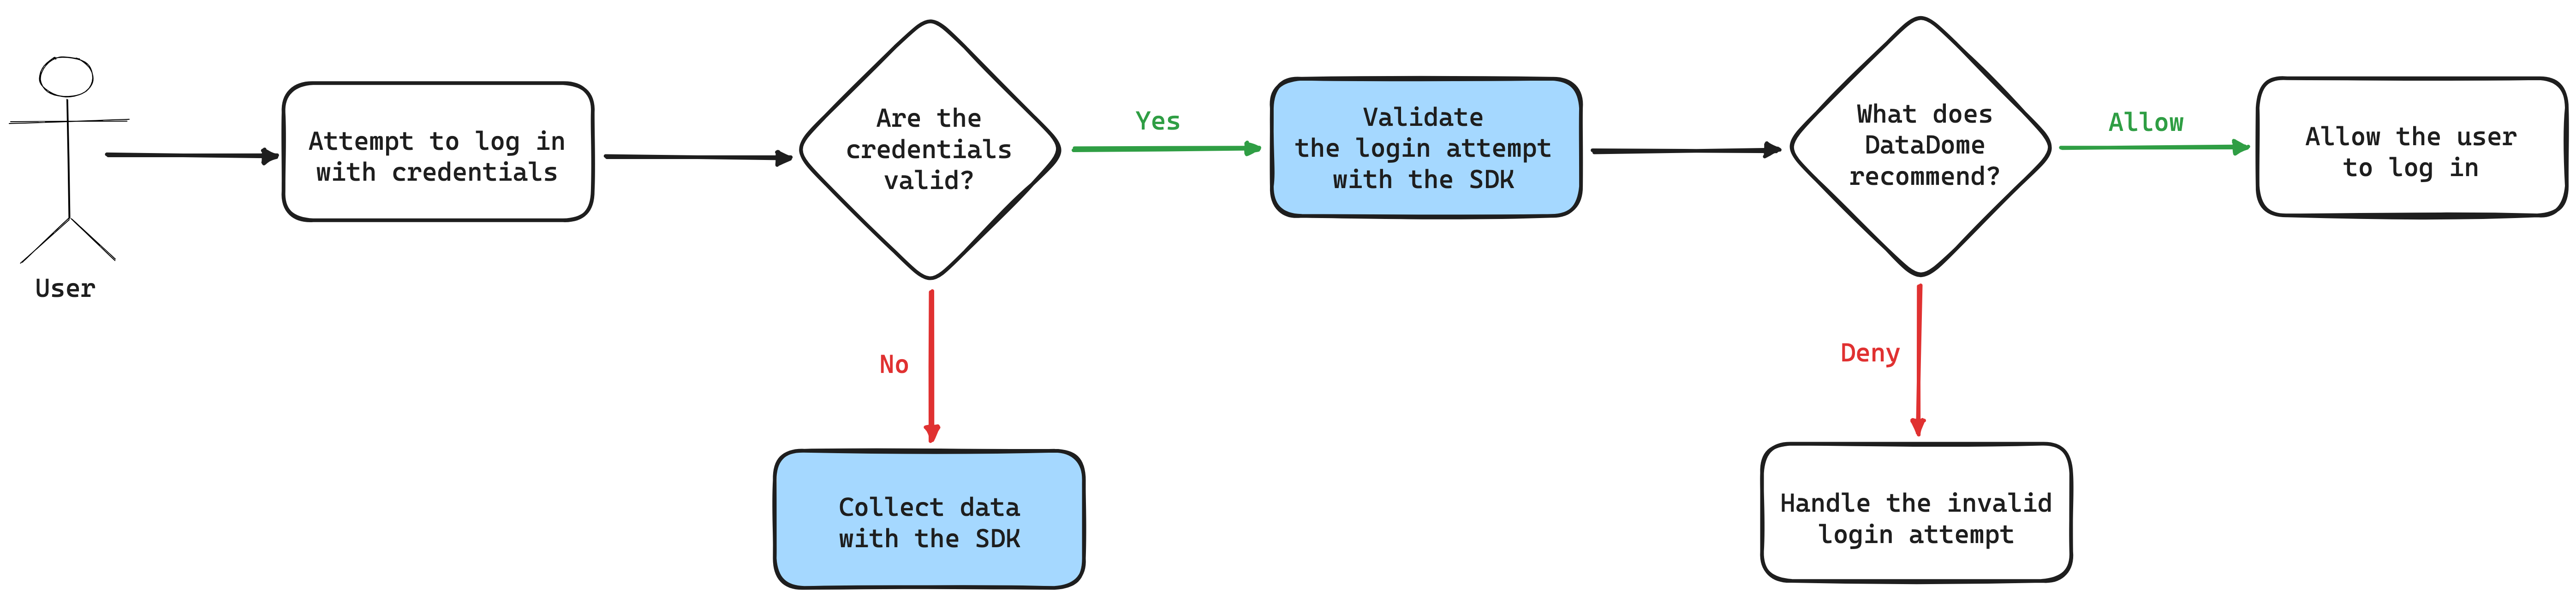
Overview of the implementation flow for a login attempt
Installation
The Account Protect SDK is distributed on multiple platforms:
- Maven package for Java 11+ and Spring Boot 2.x
- Maven package for Java 17+ and Spring Boot 3.x - compatible with Scala 2.12+
- Npm package for Node.js 14 or newer
- NuGet package for .NET 6
- Packagist package for Symfony PHP (8.1+) applications
- Packagist package for Laravel PHP (8.1+) applications
- Pypi package for Python 3.8 +
- Ruby gem for Ruby 3.2+
- Go package for Go 1.18+
You can use one of the commands below to install the relevant package for your application:
npm i @datadome/fraud-sdk-nodedotnet add package DataDome.AspNetCore.Fraud.SDK<!-- insert in the pom.xml file of the project -->
<dependency>
<groupId>co.datadome.fraud</groupId>
<artifactId>fraud-sdk-java</artifactId>
<!-- <version>1.0.1</version> --> <!-- compatible with Spring Boot 2.x -->
<version>2.3.0</version> <!-- compatible with Spring Boot 3.x -->
</dependency>libraryDependencies += "co.datadome.fraud" % "fraud-sdk-java" % "2.2.1"pip install datadome-fraud-sdk-pythoncomposer require datadome/fraud-sdk-symfony# 1. add `datadome/fraud-sdk-laravel` to your project
composer require datadome/fraud-sdk-laravel
# 2. Generate an autoloader
composer dump-autoload
# 3. Edit `config/app.php` to add `DataDomeServiceProvider`
# config/app.php
use DataDome\FraudSdkLaravel\Providers\DataDomeServiceProvider;
[...]
'providers' => ServiceProvider::defaultProviders()->merge([
[...]
DataDomeServiceProvider::class
# 4. publish `datadome.php` in the `config` folder
php artisan vendor:publishgem install datadome_fraud_sdk_rubygo get github.com/datadome/fraud-sdk-go-packageUsage
Using the SDK requires changes in your application to handle the recommendations provided by DataDome's Account Protect API.
Example for a login event
const { DataDome, LoginEvent, ResponseAction, StatusType } = require("@datadome/fraud-sdk-node");
const express = require("express");
const app = express();

const serverKey = "FRAUD_API_KEY";
const datadomeClient = new DataDome(serverKey);
app.use(express.json());

app.post("/login", async function (req, res) {
  // [...] Do Login
  const accountName = req.body.login;
  const authentication: Authentication = {
    socialProvider: 'google',
    type: 'social',
    mode: 'password',
  };
	const session: Session = { id: 'fake_session_id', createdAt: new Date() };
  const loggedUser = findUser(req.body.login, req.body.password); // Logging in
  if (!!loggedUser) {
    // Confirm legitimacy of login request
    const user: Pick<User, 'id'> = {
      id: loggedUser.id,
    };
    const ddResponse = await datadomeClient.validate(req, new LoginEvent({
	    account: accountName,
  	  user,
    	session,
	    status: 'succeeded',
  	  authentication,
	  }));
    if (ddResponse?.action == ResponseAction.ALLOW) {
      // DataDome recommends to allow this login. Continue the authentification process.
      const userIp = ddResponse?.ip;
      const userLocation = ddResponse?.location?.country + ' - ' + ddResponse?.location?.city;
      console.log(`User from $USERLOCATION just logged in with IP $USERIP`);
      // [...]
      res.status(200).send(`Hello ${accountName}`);
    } else {
      // DataDome recommends to deny this login. Enforce "deny" process.
      const denyReasons = ddResponse?.reasons?.join(','); // Retrieving denial reasons
      console.log(`User ${accountName} denied because ${denyReasons}`);
      // [...]
      res.status(401).send('Login Failed');
    }
  } else { // loginFailed
    // Send to DataDome any failed login to enrich our models
    await datadomeClient.collect(req, new LoginEvent({
      account: accountName,
      session,
      status: 'failed',
      authentication,
    }));
    res.status(401).send('Login Failed');
  }
});

app.listen(3000);
// 1. Add your API Key in the appsettings.json, or as environment variables
"DataDome": {
"FraudAPIKey": "----"
}
// 2. In the Program.cs / Startup.cs add the DataDome SDK
using DataDome.AspNetCore.Fraud.SDK;
// Option 1: Passing in a reference to the configuration, for values in appsettings
builder.Services.AddDataDome(builder.Configuration);
// Option 2: Passing in the values directly, for environment variables
builder.Services.AddDataDome(o =>
{
o.FraudAPIKey = "DataDomeParisNewYorkSingapore";
});
// 3. Include IDataDomeContext as a dependency injection in the concerned controller
using DataDome.AspNetCore.Fraud.SDK.Model.Shared;
// ...
private readonly SDK.IDataDomeContext _dataDome;
private readonly AuthenticationService _authenticationService;
public LoginController(SDK.IDataDomeContext dataDome, AuthenticationService authenticationService)
{
_dataDome = dataDome;
_authenticationService = authenticationService;
}
// 4. Invoke the DataDome Fraud API within the login business logic
[Route("SubmitLogin")]
[HttpPost]
public async Task<IActionResult> SubmitLogin([FromForm] LoginUser user)
{
if (_authenticationService.ValidateLogin(user))
{
var ddResponse = await _dataDome.Validate(Request, new LoginEvent(user.Email));
if (ddResponse != null && ddResponse.ResponseAction == ResponseAction.Allow)
{
TempData["SuccessMessage"] = $"Welcome!";
return View("Success");
}
else
{
// Business Logic here
// MFA
// Challenge
// Notification email
// Temporarily lock account
}
}
else
{
await _dataDome.Collect(Request,
new LoginEvent(
user.Email,
LoginStatus.Failed,
new Authentication()
{
Mode = AuthenticationMode.Password,
SocialProvider = AuthenticationSocialProvider.Google,
Type = AuthenticationType.Local
},
new User()
{
Id = user.Email,
FirstName = user.Name,
},
new Session
{
Id = Guid.NewGuid().ToString("D"),
CreatedAt = DateTime.UtcNow,
},
failReason: LoginFailReason.WrongPassword,
accountType: AccountType.Customer
)
{
// Sample code for partnerId and custom fields
PartnerId = user.PartnerId,
CustomFields = new List<CustomField> { new CustomField("registration", "AA-123-EE") {
Type = CustomFieldType.String,
IsPii = false }
},
AccountCreationDate = DateTime.UtcNow
}
);
}
TempData["ErrorMessage"] = "Error in login, please input your details again.";
TempData["From"] = "login";
return RedirectToAction("Index");
}// 1. Add your FRAUD_API_KEY as an application configuration parameter
// example for resource file "application.properties"
datadome.fraud.api_key=FRAUD_API_KEY
// 2. In an application component add the DataDome Fraud SDK
import co.datadome.fraud.DataDomeFraudService;
// LoginEvent related objects
import co.datadome.fraud.api.request.event.LoginEvent;
import co.datadome.fraud.model.User;
import co.datadome.fraud.model.Session;
import co.datadome.fraud.model.authentication.*;
// 3. Initialize the DataDome Fraud SDK in a Spring bean
@Bean
public DataDomeFraudService dataDomeFraud(
@Value("${datadome.fraud.api_key}")
String datadomeFraudApiKey) {
return new DataDomeFraudService(datadomeFraudApiKey);
}
// 4. Use dependency injection to use in it in the controller (here in the constructor)
public LoginController(DataDomeFraudService dataDomeFraudService) {
this.dataDomeFraudService = dataDomeFraudService;
}
// 5. Use it in the login endpoint of login controller
public ResponseEntity<?> login(ServletRequest request, User user) {
if (this.authenticateUser(user)) {
LoginEvent loginEvent = LoginEvent.newBuilder()
.user(co.datadome.fraud.model.User.newBuilder().id("user_id").build())
.account(userform.user.get("email"))
.authentication(Authentication.newBuilder()
.type(AuthenticationType.SOCIAL)
.socialProvider(SocialProvider.GOOGLE)
.mode(AuthenticationMode.PASSWORD)
.build())
.session(Session.newBuilder()
.id("session_id")
.build())
.build();
DataDomeResponse validate = this.dataDomeFraudService
.validate(request, loginEvent);
if (validate.getAction() == ResponseActionType.allow) {
return new ResponseEntity<>("Welcome", HttpStatus.OK);
} else {
// Business Logic here
// MFA
// Challenge
// Notification email
// temporarly lock account
return new ResponseEntity<>(validate, HttpStatus.UNAUTHORIZED);
} else {
DataDomeResponse collect = this.dataDomeFraudService
.collect(request, new LoginEvent(user.getLogin()));
Message response = new Message("error", "invalid credentials");
return new ResponseEntity<>(response, HttpStatus.UNAUTHORIZED);
}
[...]
}// 1. Add these imports
import co.datadome.fraud._
import co.datadome.fraud.api.request.{DataDomeMetadata, LoginEvent}
import co.datadome.fraud.model.{Address, User}
// 2. Declare the constant FraudApiKey with the value provided by DataDome
// 3. Initialization of DataDomeFraudService with the FraudApiKey
val dataDomeFraudService = new DataDomeFraudService(FraudApiKey)
// 4. Example for Finagle - Extend SimpleFilter
//
class DataDomeLoginFilter[Req, Rep]() extends SimpleFilter[Req, Rep] {
def apply(request: Req, service: Service[Req, Rep]): Future[Rep] = {
val req = request.asInstanceOf[http.Request] // Casting to http.Request
val inputJson: Map[String, String] = upickle.default.read[Map[String, String]](req.contentString)
val login = inputJson.getOrElse("login", "")
// 5. Build data and call the service
val ddm: DataDomeMetadata = requestToDataDomeMetadata(req) // with req coming from your framework
// see below for an example implementation for Finagle
val response = service(request) // Call authentication service before DataDomeFraudService
response.onSuccess(response => {
// Authentication match a valid user
// Validate using Fraud protection
val dataDomeResponse = dataDomeFraudService.validate(ddm, new LoginEvent(login))
/*
`validateAsync` and `collectAsync` methods return CompletableFuture<>
Note that CompletableFuture can throw Exception and must be handled in your code
*/
if (dataDomeResponse.isDenied) {
// Example - Stop authentication procedure
Future.exception(new RuntimeException("its a bot"))
} else {
// continue
response
}
}).onFailure(t => {
// Authentication invalid - send data for collection
dataDomeFraudService.collect(ddm, new LoginEvent(login))
})
}
}
// Example implementation to extract the request metadata from a Finagle request
def requestToDataDomeMetadata(req: Request): DataDomeMetadata = {
val builder = DataDomeMetadata.newBuilder()
.addr(req.remoteAddress.getHostAddress)
.method(req.method.name)
.port(req.remotePort)
.protocol(req.version.versionString)
.request(req.uri)
if (req.accept.nonEmpty) builder.accept(req.accept.mkString(", "))
// retrieve clientId
req.cookies.get("datadome").foreach(cookie => builder.clientId(cookie.value))
req.headerMap.get("accept-encoding").foreach(builder.acceptEncoding)
req.headerMap.get("accept-language").foreach(builder.acceptLanguage)
req.headerMap.get("connection").foreach(builder.connection)
req.headerMap.get("from").foreach(builder.from)
req.headerMap.get("hostname").foreach(builder.serverHostname)
req.headerMap.get("origin").foreach(builder.origin)
req.headerMap.get("x-real-ip").foreach(builder.xRealIp)
req.host.foreach(builder.host)
req.charset.foreach(builder.acceptCharset)
req.contentType.foreach(builder.contentType)
req.referer.foreach(builder.referer)
req.userAgent.foreach(builder.userAgent)
req.xForwardedFor.foreach(builder.xForwardedForIp)
builder.build()
}
// 4. Instantiate filter
val ddLoginFilter = new DataDomeLoginFilter[Request, Response]()
// 5. - Register filter
val protectedAuthService: Service[http.Request, http.Response] =
ddLoginFilter.andThen(loginService)from datadome_fraud_sdk_python import DataDome, LoginEvent, ResponseAction
datadome_instance = DataDome("FraudAPIKey")
@auth.route('/login', methods=['POST'])
def login():
email = request.form.get('email')
if is_authenticated_user(email):
dd_response = await datadome_instance.validate(request, LoginEvent(email))
if(dd_response.action == str(ResponseAction.ALLOW)):
login_user(email)
else:
flash("You are not allowed to log in")
else:
await datadome_instance.collect(request, LoginEvent(email))// 1. Update the .env files with your preferred configuration.
DATADOME_FRAUD_API_KEY='FRAUD_API_KEY'
DATADOME_TIMEOUT=1500
DATADOME_ENDPOINT='https://account-api.datadome.co'
// 2. Add the required imports in your controller
use DataDome\FraudSdkSymfony\Config\DataDomeOptions;
use DataDome\FraudSdkSymfony\DataDome;
use DataDome\FraudSdkSymfony\Models\Address;
use DataDome\FraudSdkSymfony\Models\LoginEvent;
use DataDome\FraudSdkSymfony\Models\StatusType;
use DataDome\FraudSdkSymfony\Models\RegistrationEvent;
use DataDome\FraudSdkSymfony\Models\Session;
use DataDome\FraudSdkSymfony\Models\User;
use DataDome\FraudSdkSymfony\Models\ResponseAction;
// 3. Invoke the validate and collect methods as required
[...]
if ($this->authenticateUser($userForm)) {
$loginEvent = new LoginEvent($userForm.login, StatusType::Succeeded);
$loginResponse = app("DataDome")->validate($request, $loginEvent);
if ($loginResponse != null && $loginResponse->action == ResponseAction::Allow->jsonSerialize()) {
// Valid login attempt
return response()->json([true]);
} else {
// Business Logic here
// MFA
// Challenge
// Notification email
// Temporarily lock account
return response()->json(["Login denied"]);
}
}
else {
$loginEvent = new LoginEvent($userForm.login, StatusType::Failed);
app("DataDome")->collect($request, $loginEvent);
}
return response()->json([false]);// 1. Update the .env files with your preferred configuration.
DATADOME_FRAUD_API_KEY='----'
DATADOME_TIMEOUT=1500
DATADOME_ENDPOINT='https://account-api.datadome.co'
// 2. Add the required imports in your controller
use DataDome\FraudSdkSymfony\Config\DataDomeOptions;
use DataDome\FraudSdkSymfony\DataDome;
use DataDome\FraudSdkSymfony\Models\Address;
use DataDome\FraudSdkSymfony\Models\LoginEvent;
use DataDome\FraudSdkSymfony\Models\StatusType;
use DataDome\FraudSdkSymfony\Models\RegistrationEvent;
use DataDome\FraudSdkSymfony\Models\Session;
use DataDome\FraudSdkSymfony\Models\User;
use DataDome\FraudSdkSymfony\Models\ResponseAction;
// 3. Create a private DataDome object
$key = $_ENV['DATADOME_FRAUD_API_KEY'];
$timeout = $_ENV['DATADOME_TIMEOUT'];
$endpoint = $_ENV['DATADOME_ENDPOINT'];
$options = new DataDomeOptions($key, $timeout, $endpoint);
$this->dataDome = new DataDome($options);
// 4. Invoke the validate and collect methods as required
if ($this->validateLogin("account_guid_to_check")) {
$loginEvent = new LoginEvent("account_guid_to_check", StatusType::Succeeded);
$loginResponse = $this->dataDome->validate($request, $loginEvent);
if ($loginResponse != null && $loginResponse->action == ResponseAction::Allow->jsonSerialize()) {
// Valid login attempt
return new JsonResponse([true]);
} else {
// Business Logic here
// MFA
// Challenge
// Notification email
// Temporarily lock account
return new JsonResponse(["Login denied"]);
}
}
else {
$loginEvent = new LoginEvent("account_guid_to_check", StatusType::Failed);
$this->dataDome->collect($request, $loginEvent);
}# 1. Set the value of the DATADOME_FRAUD_API_KEY as an environment variable.
export DATADOME_FRAUD_API_KEY='FRAUD_API_KEY'
# 2. Add the required import in your controller.
require 'datadome_fraud_sdk_ruby'
# 3. Create a DataDome instance.
datadome = DataDome.new
# 4a. If you have access to the http request as `request`:
# Invoke the validate and collect methods.
if login.success?
login_event = DataDomeLoginEvent.new(account: params[:user][:email], status: DataDomeStatusType::SUCCEEDED)
datadome_response = datadome.validate(request: request, event: login_event)
if datadome_response.action == DataDomeResponseAction::ALLOW
# Implement logic to allow login as usual
else
# Business Logic here
# MFA
# Challenge
# Notification email
# temporarly lock account
end
else
login_event = DataDomeLoginEvent.new(account: params[:user][:email], status: DataDomeStatusType::FAILED)
datadome.collect(request: request, event: login_event)
# 4b. If you can't pass the current HTTP request to our SDK:
# i. Create DataDomeHeaders and DataDomeRequest with request information
datadome_headers = DataDomeHeaders.new(addr: "1.1.1.1", client_ip: "1.1.1.1", content_type: "text", host: "https://example.com", port: 80, x_real_ip: "1.1.1.1", x_forwarded_for_ip: "1.1.1.1", accept_encoding: "gzip, deflate, br", accept_language: "fr-FR,fr;q=0.8,en-US;q=0.6,en;q=0.4", accept: "*/*", method: "POST", protocol: "https", server_hostname: "example.com", referer: "https://example.com", user_agent:"curl", from: "[email protected]", request:"/login", origin: "https://example.com", accept_charset: "utf-8, iso-8859-1;q=0.7", connection: "keep-alive", client_id: "")
datadome_request = DataDomeRequest.new(datadome_headers)
## ii. Use the code from 4a and replace the request with datadome_request.
datadome_response = datadome.validate(request: datadome_request, event: login_event)
datadome_response = datadome.collect(request: datadome_request, event: login_event)package main
import (
"log"
"net/http"
dd "github.com/datadome/fraud-sdk-go-package"
)
func loginHandler(client *dd.Client) http.HandlerFunc {
return func(w http.ResponseWriter, r *http.Request) {
if r.Method == http.MethodPost {
_ = r.ParseForm()
login := r.FormValue("login")
password := r.FormValue("password")
isLogged := logUser(login, password) // Process login
if isLogged {
user := dd.User{
ID: "fake_user_id",
}
sessionId := "fake_session_id"
createdAt := time.Now().Format(time.RFC3339)
session := dd.Session{
ID: &sessionId,
CreatedAt: &createdAt,
}
authenticationMode := dd.Password
authenticationSocialProvider := dd.Google
authenticationType := dd.Social
authentication := dd.Authentication{
Mode: &authenticationMode,
SocialProvider: &authenticationSocialProvider,
Type: &authenticationType,
}
validate, err := client.Validate(r, dd.NewLoginEvent(
login,
dd.Succeeded,
dd.LoginWithUser(user),
dd.LoginWithAuthentication(authentication),
dd.LoginWithSession(session),
))
if err != nil {
log.Printf("error during validation: %v\n", err)
}
if validate.Action == dd.Allow {
w.WriteHeader(http.StatusOK)
return
} else {
// Business Logic here
// MFA
// Challenge
// Notification email
// temporarly lock account
http.Error(w, "denied by Account Protect API", http.StatusForbidden)
return
}
} else {
_, err := client.Collect(r, dd.NewLoginEvent(login, dd.Failed))
if err != nil {
log.Printf("error during collection: %v\n", err)
}
http.Error(w, "invalidate login", http.StatusUnauthorized)
return
}
}
}
}
func main() {
client, _ := dd.NewClient("FRAUD_API_KEY")
mux := http.NewServeMux()
mux.HandleFunc("/login", loginHandler(client))
_ = http.ListenAndServe(":8080", mux)
}API reference
LoginEvent
LoginEventThe SDK exposes methods for login validation that require a LoginEvent instance to be sent to the Account protect API along with the client request itself.
Available properties for this event type are listed below:
| Name | Description | Default value | Possible values | Optional |
|---|---|---|---|---|
| account | The unique account identifier used for the login attempt. | Any string value. | ||
| authentication.mode | Authentication mode | biometric, mail mfa, otp, password, other | Yes | |
| authentication.socialProvider | Authentication social provider | amazon, apple, facebook, github, google, linkedin, microsoft, twitter, yahoo, other | Yes | |
| authentication.type | Authentication type | local, socialProvider, other | Yes | |
| accountType | Describe the type of the account. | guest, staff,external,partner, customer, merchant, vip, test, other | Yes | |
| accountCreationDate | Date when account was created. | Format ISO 8601 YYYY-MM-DDThh:mm:ssTZD | Yes | |
| customFields | See dedicated custom fields section in the FAQ | |||
| failReason | Reason why the login failed | unknownAccount,wrongPassword ,expiredPassword,disabledAccount ,blockedAccount ,invalidMfa,internalBusinessRule,technicalIssue,other | ||
| partnerId | Identify the partner using the solution. | Any string value. | Yes | |
| status | The status of the login attempt. | StatusType.SUCCEEDED | StatusType.SUCCEEDED, StatusType.FAILED | Yes |
| session.createdAt | Creation date of the session | Format ISO 8601 YYYY-MM-DDThh:mm:ssTZD | Yes | |
| session.id | A unique session identifier from your system | Any string value. | Yes | |
| user.id | A unique customer identifier from your system. It has to be the same for all other event sent | Any string value. | No |
Validation response
Validating a login event should result in a response that can include the following properties:
| Name | Description | Possible values | Always defined |
|---|---|---|---|
| action | The recommended action to perform on the login attempt. | allow, deny, challenge, review | Yes |
| errors | A list of objects representing each error with details. Each object will have the properties listed below. | ||
| errors[i].error | A short description of the error. | ||
| errors[i].field | The name of the value that triggered the error. | ||
| eventId | Event identifier associated to this validate event. | A valid UUID. | Yes |
| ip | The IP address detected as the origin of the client request. | ||
| location | An object representing the location of a user based on their IP address. It will have the properties listed below. | ||
| location.city | The complete city name. | ||
| location.country | The complete country name. | ||
| location.countryCode | The country code, using the ISO-3166-1-alpha-2 standard format. | ||
| message | A description of the error if the status is failure or timeout. | Invalid header / Request timed out... | |
| reasons | A list of reasons to support the recommended action. | brute_force, teleportation | |
| score | The level of confidence when identifying a request as coming from a fraudster. Only available in Ruby SDK 2.1.0+, Go SDK v1.1.0+, and Node.Js SDK 2.0.0+, Java SDK 2.3.0+ | Integer | |
| status | The status of the request to the Account Protect API. | ok, failure, timeout | Yes |
Options
Options can be applied to the SDK during its instantiation.
| Option Name | Description | Default Value |
|---|---|---|
| endpoint | The endpoint to call for the Account Protect API. | https://account-api.datadome.co |
| timeout | A timeout threshold in milliseconds. When an API request times out, the SDK will allow it by default. | 1500 |
You can find usage examples for each platform below:
const instance = new DataDome(apiKey, {
    timeout: 1500,
    endpoint: 'https://account-api.datadome.co',
});
// appsettings.json
// The API key is always required, but can also be passed as
// an environment variable named DataDome__FraudAPIKey
"DataDome": {
"FraudAPIKey": "----",
"Timeout": 1500,
"Endpoint": "https://account-api.datadome.co"
}new DataDomeFraudService(datadomeFraudApiKey,
DataDomeOptions.newBuilder()
.endpoint("https://account-api.datadome.co")
.timeout(1500)
.build()
);datadome_instance = DataDome("FraudAPIKey", timeout=1500, endpoint="https://account-api.datadome.co")val dataDomeFraudService = new DataDomeFraudService(datadomeFraudApiKey,
DataDomeOptions.newBuilder()
.endpoint("https://account-api.datadome.co")
.timeout(1500)
.build()
)// .env
DATADOME_FRAUD_API_KEY='----'
DATADOME_TIMEOUT=1500
DATADOME_ENDPOINT='https://account-api.datadome.co'// .env
DATADOME_FRAUD_API_KEY='----'
DATADOME_TIMEOUT=1500
DATADOME_ENDPOINT='https://account-api.datadome.co'datadome = DataDome.new(1500, 'https://account-api.datadome.co', config.logger)client, err := dd.NewClient(
"FRAUD_API_KEY",
dd.ClientWithEndpoint("account-api.datadome.co"),
dd.ClientWithTimeout(1500),
)FAQ
What happens if there is a timeout on API request?
The SDK has been designed to have minimal impact on the user experience. If the configured timeout is reached, the SDK will cancel its pending operation and allow the application to proceed.
What happens if the API returns an error?
Errors and timeouts are handled the same way by the SDK: it will not interrupt the application and allow it to proceed.
What happens if my API key is incorrect?
Invalid keys are detected when calling the account protect API. The SDK will return an allow response to avoid blocking any login or registration attempt on the application. This response will also have a failure status and a message that describes the problem.
What are Custom Fields
Custom fields allow to send additional data. Up to 5 custom fields can be defined.
Each field is defined by the following
| name | type | description | Required |
|---|---|---|---|
| name | string | name of the custom field | Yes |
| value | string | Yes | |
| type | string | values: Number, String, Phone, email, userId, IP | No |
| isPii | boolean | trueif value contains Personally Identifiable Information | No |
Data type Phone must respect the E.164 format
Updated 15 days ago