

SCIM - User provisioning
SCIM (System for Cross-domain Identity Management) lets your identity provider (IdP) create, update, and delete DataDome dashboard users automatically. When you add, change, or remove a user in your IdP, the change is pushed to DataDome, with no manual invitations or off-boarding.
With SCIM you can:
- Provision new users to the DataDome dashboard the moment they're assigned in your IdP.
- Keep user details (name, email) in sync.
- Automatically revoke dashboard access when a user is deactivated or unassigned in your IdP.
DataDome supports inbound SCIM 2.0 on SSO connections using Microsoft Entra ID, SAML, and OpenID Connect (OIDC).
Before you begin
- An SSO connection that has completed setup is required. The connection does not need to be enabled: you can configure SCIM before activating the SSO. SCIM is configured per connection, so set up SSO first. See Enabling Single Sign-On (SSO).
- SCIM and Automatic Account Creation are mutually exclusive. A connection can use one or the other, not both. If Automatic Account Creation is enabled on the connection, disable it before turning on SCIM.
- You need an admin role on the DataDome dashboard to configure SCIM.
Step 1: Activate SCIM in the DataDome dashboard
-
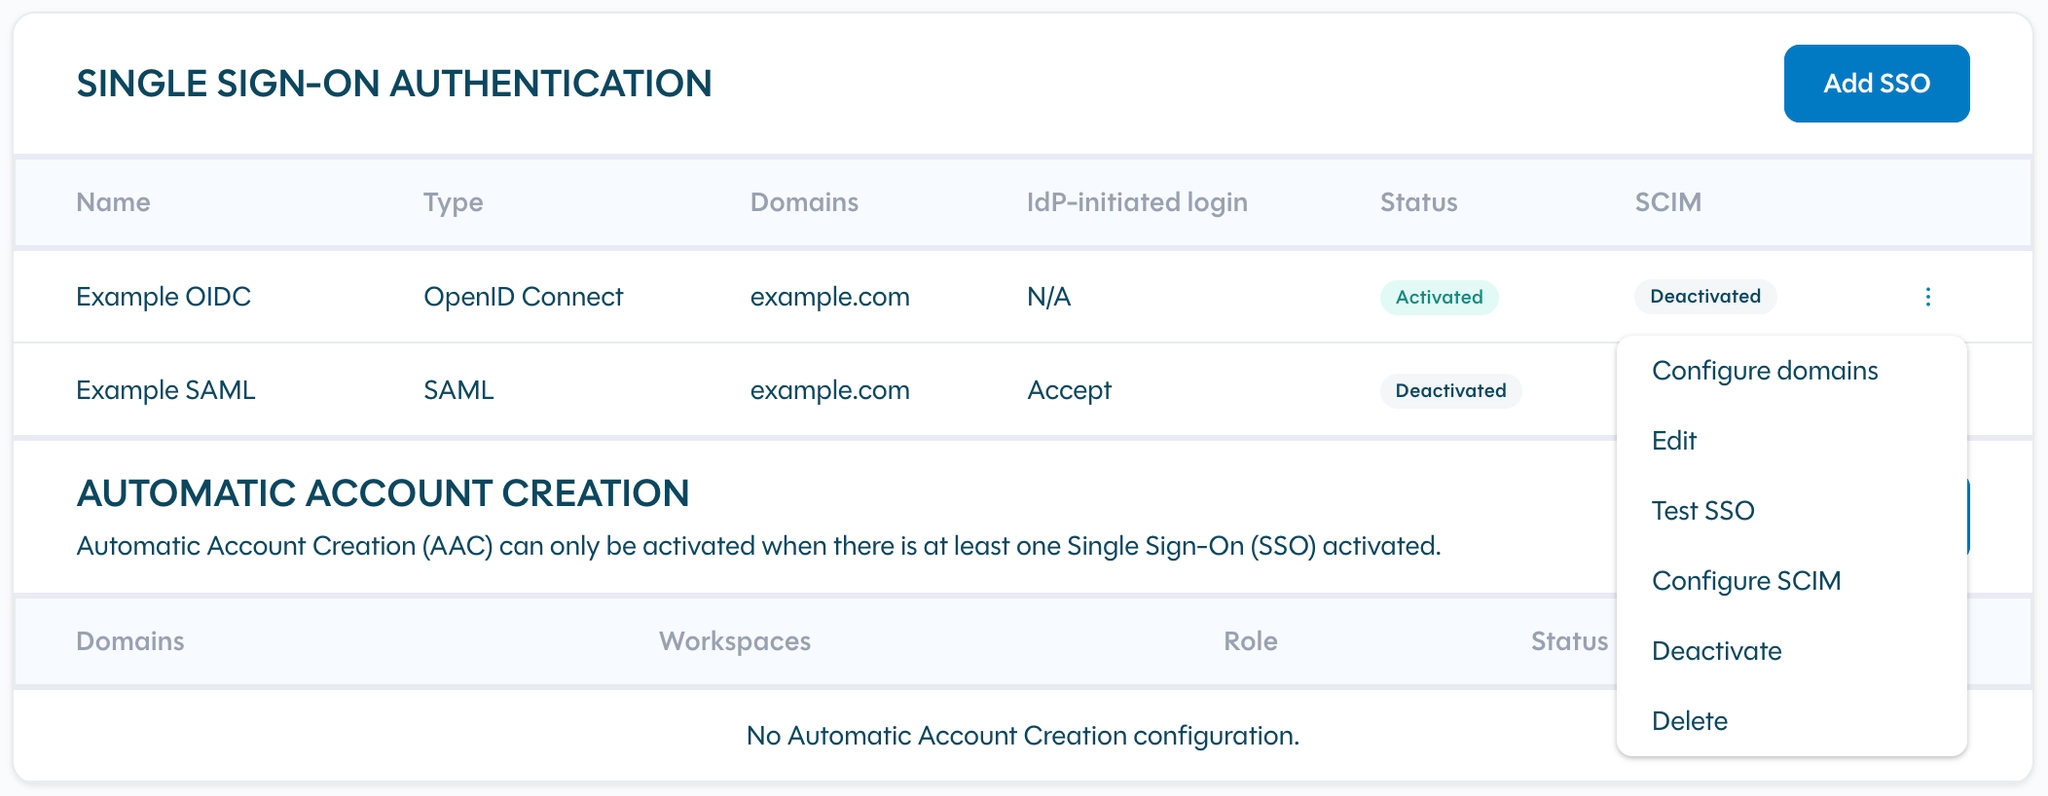
Go to Account Security and open your SSO connections.
-
In the SCIM column, find your connection and open Configure SCIM.
-
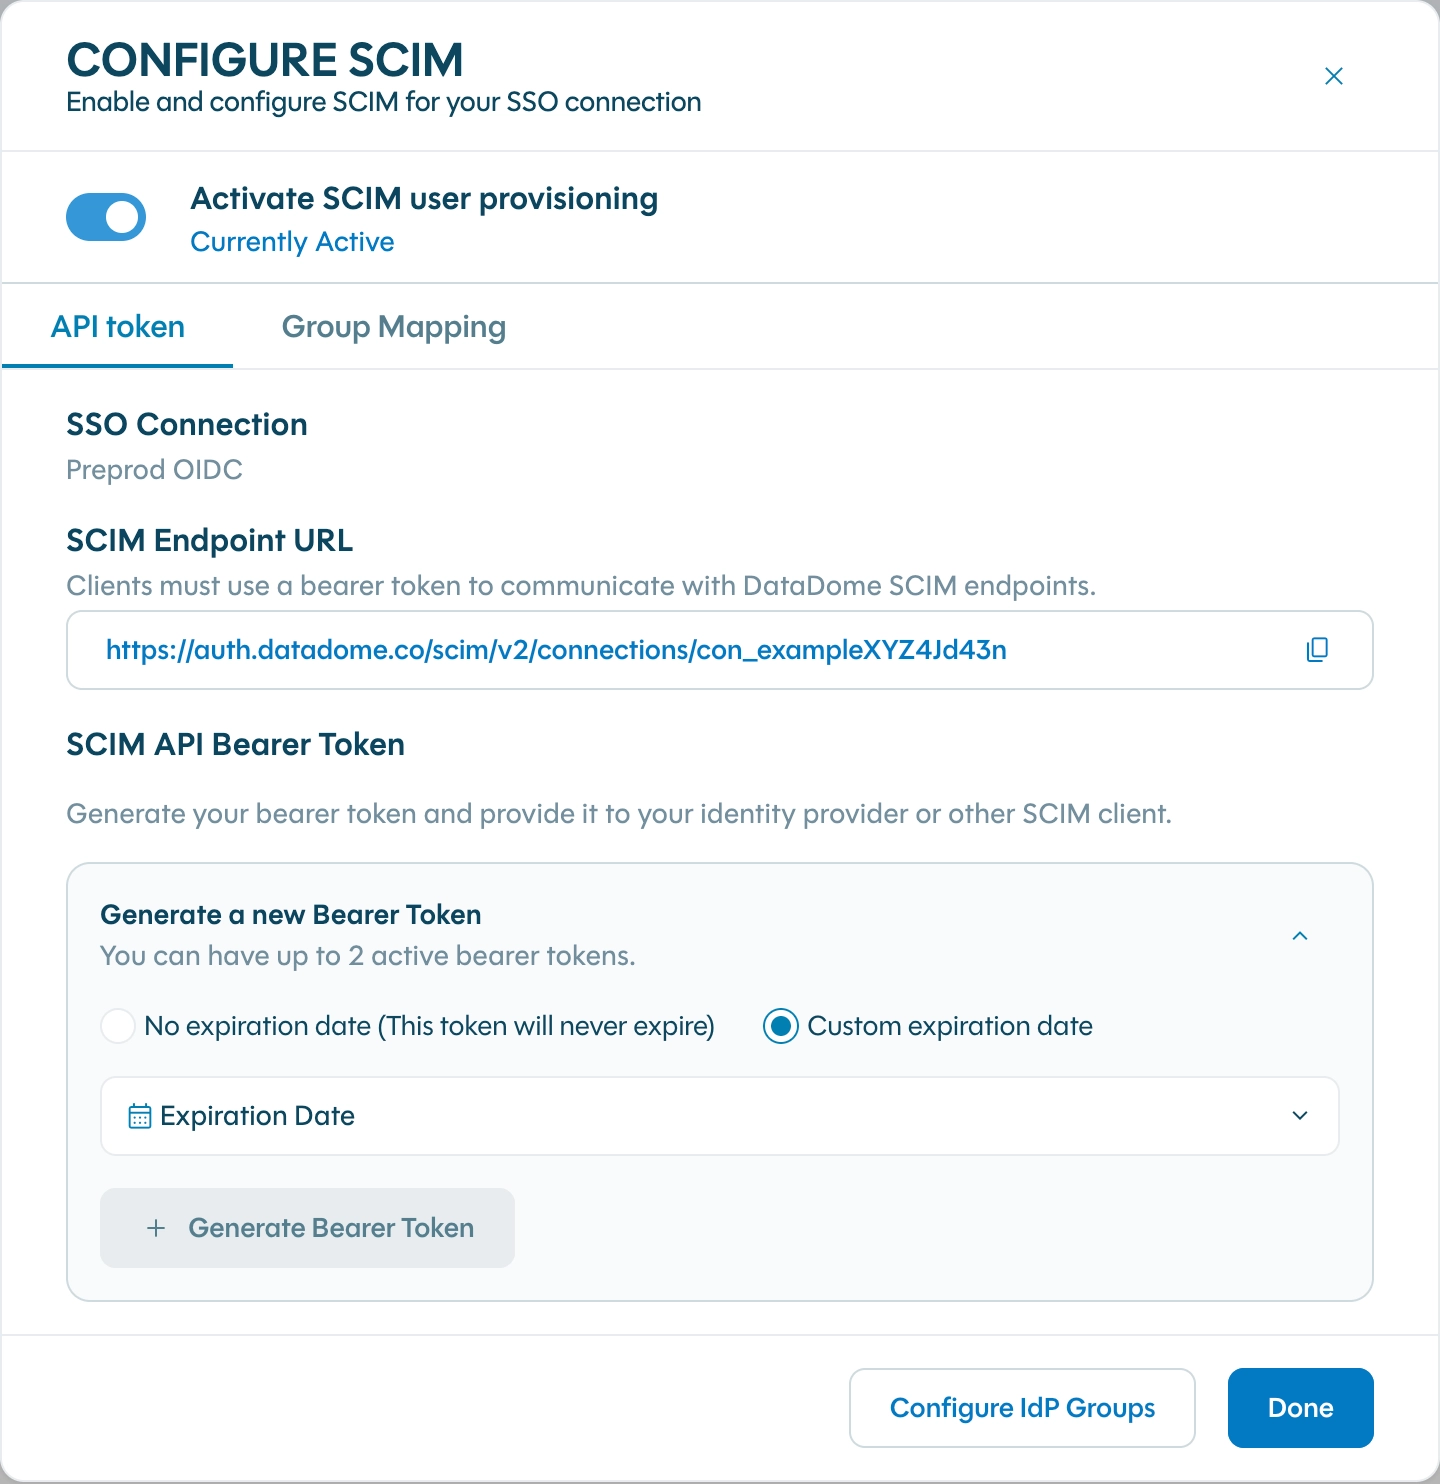
In the dialog, turn on Activate SCIM user provisioning. The status switches to Currently Active.
Step 2: Get your SCIM endpoint URL and bearer token
Still in the Configure SCIM dialog, on the API token tab:
-
Copy the SCIM Endpoint URL. It looks like:
https://auth.datadome.co/scim/v2/connections/<connection-id> -
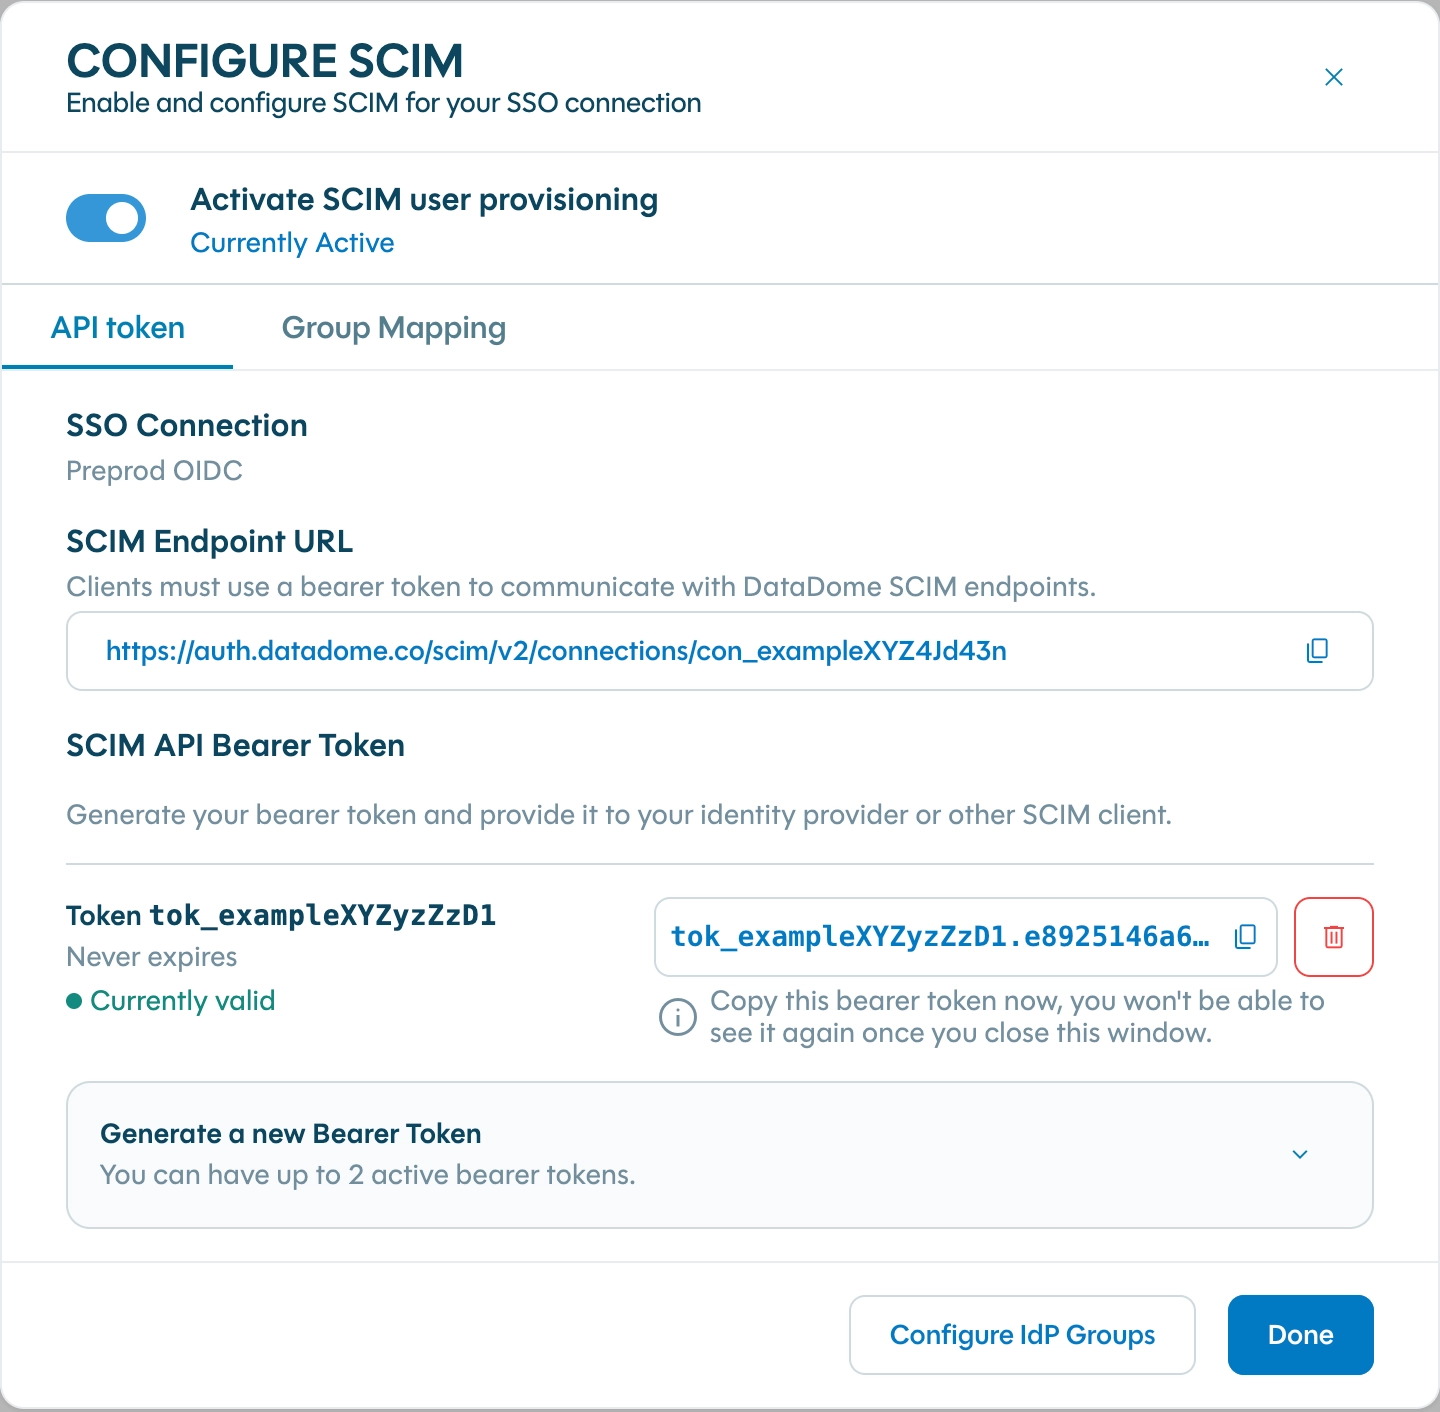
Under SCIM API Bearer Token, open Generate a new Bearer Token, choose an expiration (No expiration date or a Custom expiration date), then select Generate Bearer Token.
-
Copy the token immediately and store it securely. For security it is shown only once. Once you close the window you can't see it again.
Token limitsYou can have up to 2 active bearer tokens per connection. This makes it easy to rotate a token without downtime. You can revoke any token at any time from this tab.
You'll use the SCIM Endpoint URL and the bearer token in your identity provider below.
Step 3: Map your IdP groups to workspaces and roles
Workspace(s) and role will be provisioned to users based on the group they belong to in your IdP. You can set this up on the Group Mapping tab of the Configure SCIM dialog. Configure it before you start provisioning, as these values are applied when users are first created via SCIM.
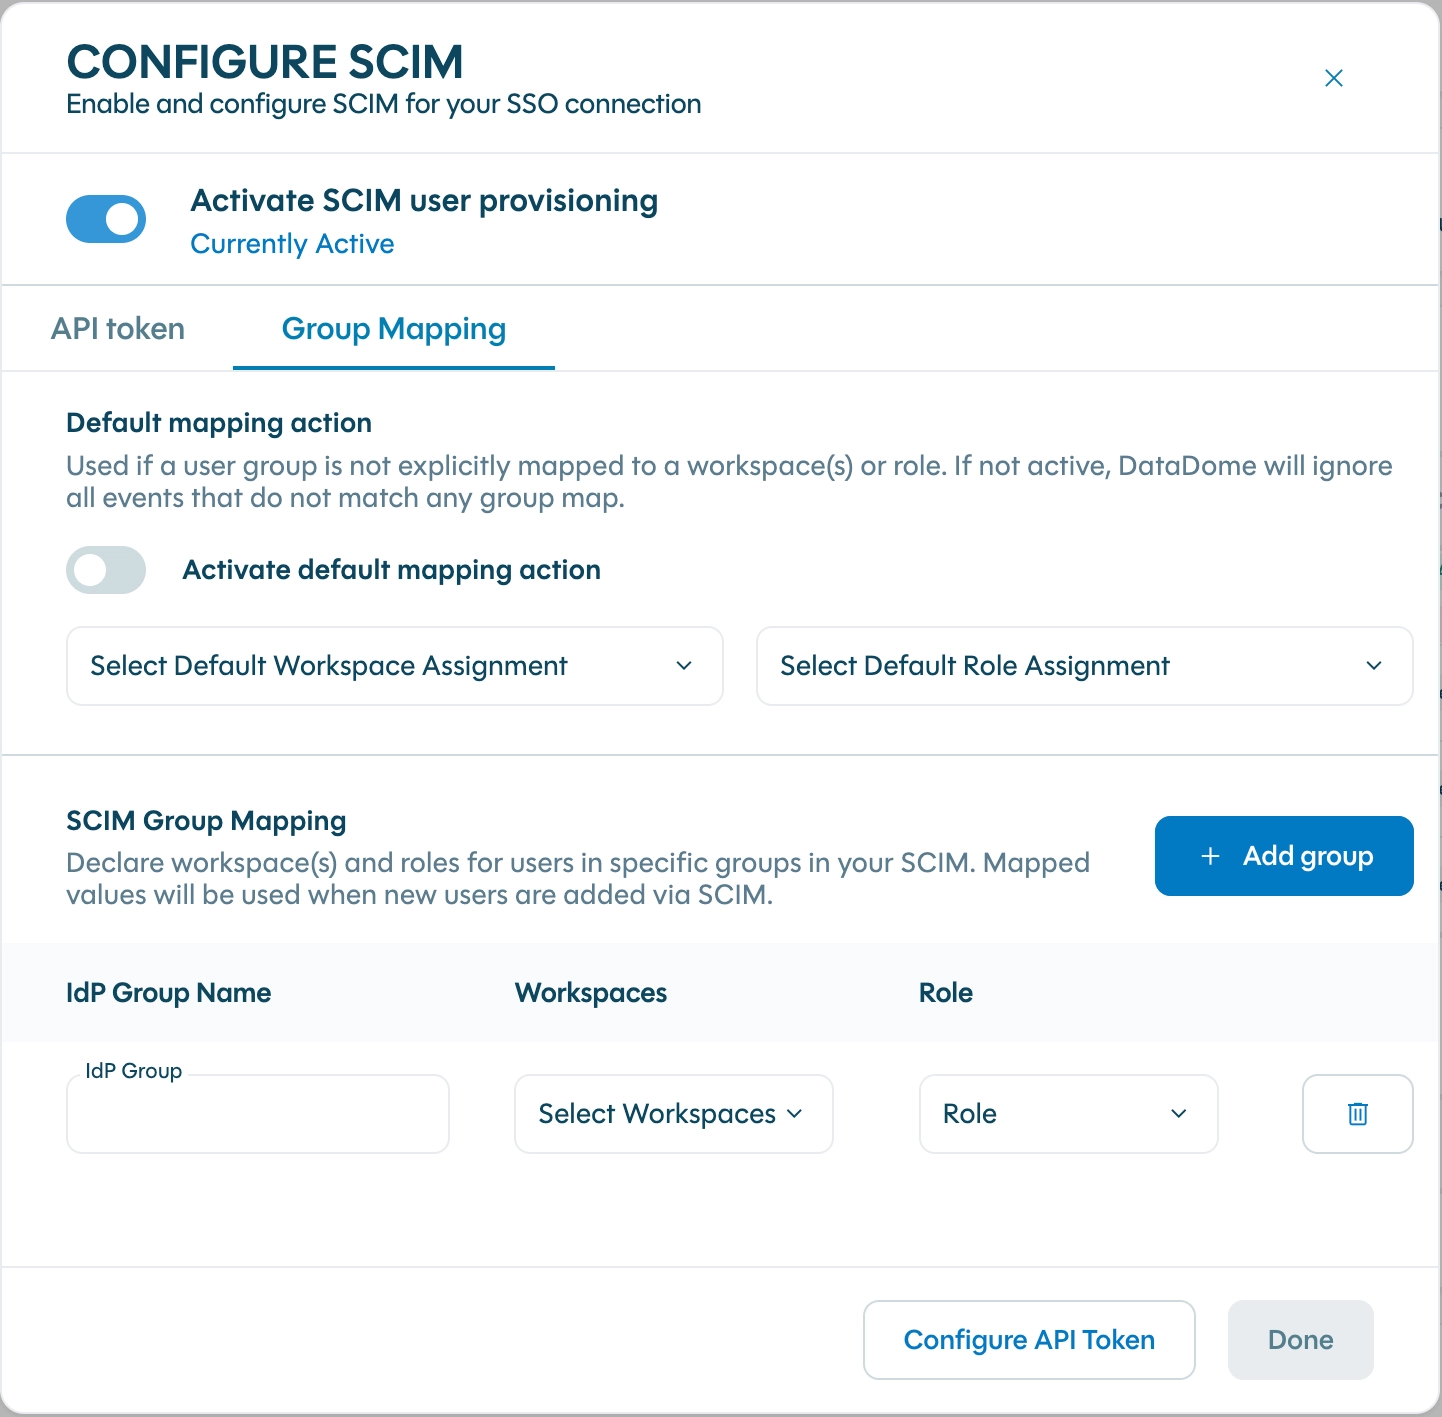
- Under SCIM Group Mapping, select Add group for each IdP group you want to map, and set:
- IdP Group Name: the group name exactly as your IdP sends it.
- Workspaces: one or more workspaces the user should get access to.
- Role: the role to assign in those workspaces.
- (Optional) Turn on Activate default mapping action and pick a default workspace and role. This is applied to users whose IdP group doesn't match any row in the “SCIM Group Mapping”.
Default mappingIf the default mapping action is off, users who don't match any group mapping are ignored (not provisioned). Turn it on if you want every assigned user to get access.
Step 4: Configure your identity provider
Your IdP acts as the SCIM client: it calls the DataDome SCIM endpoint, authenticating with the bearer token.
- In your IdP's application for DataDome, open its provisioning (SCIM) settings. Your IdP must support outbound SCIM 2.0 provisioning.
- Enter the SCIM Endpoint URL as the base URL / tenant URL, and the bearer token as the authentication token.
- Test the connection, assign the relevant users and groups, then enable provisioning.
- In the Microsoft Entra admin center, go to Entra ID > Enterprise apps and open the enterprise application you use for DataDome SSO.
- Open Manage > Provisioning, select Get started, and set Provisioning Mode to Automatic.
- Select Admin Credentials, then enter the SCIM Endpoint URL value you saved earlier as the Tenant URL. At the end of the URL, add the
?aadOptscim062020query parameter to fix known Azure AD issues described here. - Enter your bearer token as the Secret Token, then select Test Connection and Save.
- Under Manage > Users and groups, assign the users and groups you want provisioned to DataDome.
- Set Provisioning Status to On.
- In your IdP's application for DataDome, open its provisioning (SCIM) settings. Your IdP must support outbound SCIM 2.0 provisioning.
- Enter the SCIM Endpoint URL as the base URL / tenant URL, and the bearer token as the authentication token.
- Test the connection, assign the relevant users and groups, then enable provisioning.
OIDC matchingYour IdP must send the same value in the OIDC
subclaim and the SCIMexternalIdattribute. This is what links a provisioned account to the right user at login. If the values differ, users won't be matched correctly.
Managing SCIM-provisioned users
Once SCIM is active, the IdP is the source of truth for those users:
- Provisioning / deprovisioning is driven by the IdP. Assign a user in your IdP to grant dashboard access; unassign or deactivate them to revoke it.
- Workspaces and roles follow group membership. A user's access comes from the group mappings you set in Step 3, based on the groups your IdP sends.
- SCIM-managed users are locked in the dashboard. Their role can't be changed and they can't be deleted from the DataDome dashboard. Manage them in your IdP instead. These actions are disabled in the UI for those users.
Disabling SCIM
In the Configure SCIM dialog, turn off Activate SCIM user provisioning and confirm.
ImpactsDisabling SCIM permanently deletes the SCIM configuration for the connection and revokes all bearer tokens for it. Any SCIM client using this connection will stop being able to provision users. Users already provisioned keep their dashboard access; only future syncing stops. Users provisioned with SCIM aren’t deleted and could regain access through the forgot password procedure.
FAQ
Do I still need SSO? Yes. SCIM handles user provisioning; SSO handles login. SCIM runs on top of an existing SSO connection.
Can I use SCIM and Automatic Account Creation together? No, they're mutually exclusive on a connection. SCIM gives you full provisioning and deprovisioning, so it supersedes Automatic Account Creation.
A token leaked, what do I do? Revoke it from the API token tab and generate a new one, then update your IdP with the new token. With two token slots you can roll over without downtime.
Updated about 1 month ago